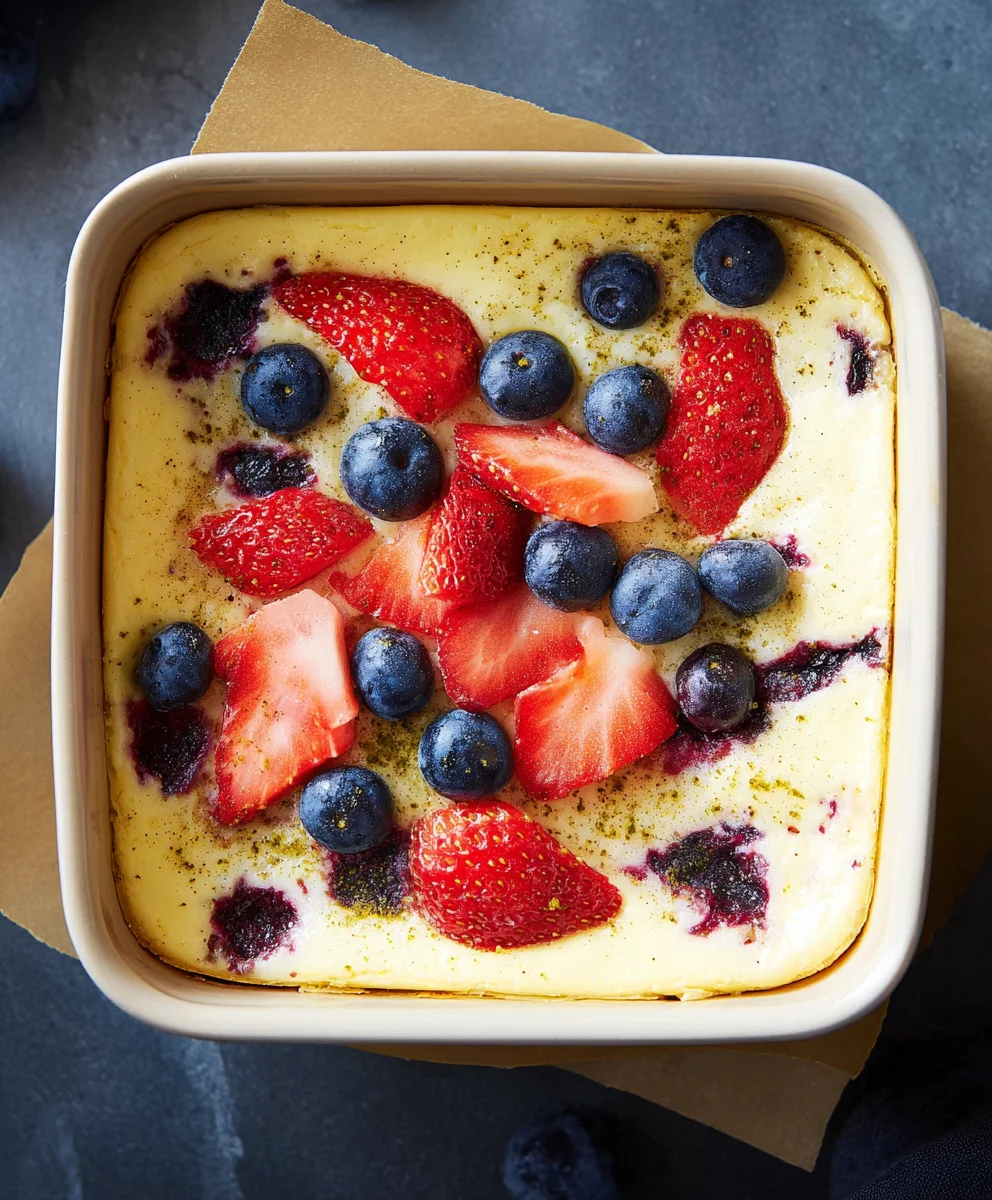
Easy Baked Yogurt – Creamy Dessert Recipe
Baked Yogurt is more than just a dessert; it’s a revelation in texture and flavor. Imagin extracte a culinary paradox: a dessert that starts with the tang and creaminess of yogurt, but transforms into something altogether new and delightful when kissed by the heat of the oven. This is the magic of Baked Yogurt. It’s a dish that effortlessly bridges the gap between healthy and decadent, offering a satisfyingly rich experience without the heaviness often associated with traditional baked goods. People are increasingly drawn to Baked Yogurt because it provides a comforting warmth and a subtly caramelized sweetness, a stark contrast to its cool, jigin extracty origins. What truly makes this particular Baked Yogurt special is its versatility; it’s a blank canvas for an endless array of toppings, from fresh berries and a drizzle of honey to a sprinkle of toasted nuts or even a dusting of cocoa powder. It’s a simple concept, but one that yields profoundly delicious results, making it a must-try for any home cook seeking something both familiar and wonderfully unique.
Ingredients:
- 2 cups Greek yogurt
- 4 large eggs
- 1/4 cup maple syrup (or honey)
- 1 teaspoon vanilla extract
- 3 tablespoons cornstarch
- 1 1/2 cups berries (divided, such as blueberries, raspberries, or a mix)
Preparation and Baking
Preheating the Oven and Preparing the Pan
First things first, let’s get our oven ready. Preheat your oven to 350 degrees Fahrenheit (175 degrees Celsius). This consistent temperature is key to achieving that perfect, custardy texture in our baked yogurt. While the oven is warming up, you’ll want to prepare your baking dish. I like to use an 8×8 inch square baking dish, but a similar-sized round pie dish or even individual ramekins will work beautifully. For easy removal and cleanup, lightly grease your chosen baking dish with a bit of butter or cooking spray. This step is especially important if you’re using a dish that tends to stick.
Creating the Creamy Yogurt Base
Now, let’s move on to the heart of our baked yogurt: the base. In a large mixing bowl, combine the 2 cups of Greek yogurt and the 4 large eggs. Whisk these together thoroughly until they are well incorporated and you have a smooth, homogenous mixture. Don’t worry about overmixing here; we want everything nicely blended. Next, we’ll add the sweetness and flavor. Pour in the 1/4 cup of maple syrup (or honey, if that’s your preference) and the 1 teaspoon of vanilla extract. The vanilla extract adds a wonderful aroma and depth of flavor that complements the tangin extractess of the yogurt and the sweetness of the syrup. Whisk these ingredients in until everything is evenly distributed.
Thickening the Mixture
To ensure our baked yogurt sets up beautifully and doesn’t remain too liquidy, we need to add a thickening agent. Sprinkle the 3 tablespoons of cornstarch over the yogurt mixture. It’s best to do this gradually while whisking continuously. This helps prevent lumps from forming and ensures the cornstarch dissolves evenly into the base. Continue whisking until you can no longer see any dry pockets of cornstarch and the mixture has a slightly thicker, velvety consistency. This might take a minute or two of dedicated whisking, but it’s a crucial step for achieving the desired texture.
Incorporating the Berries and Baking
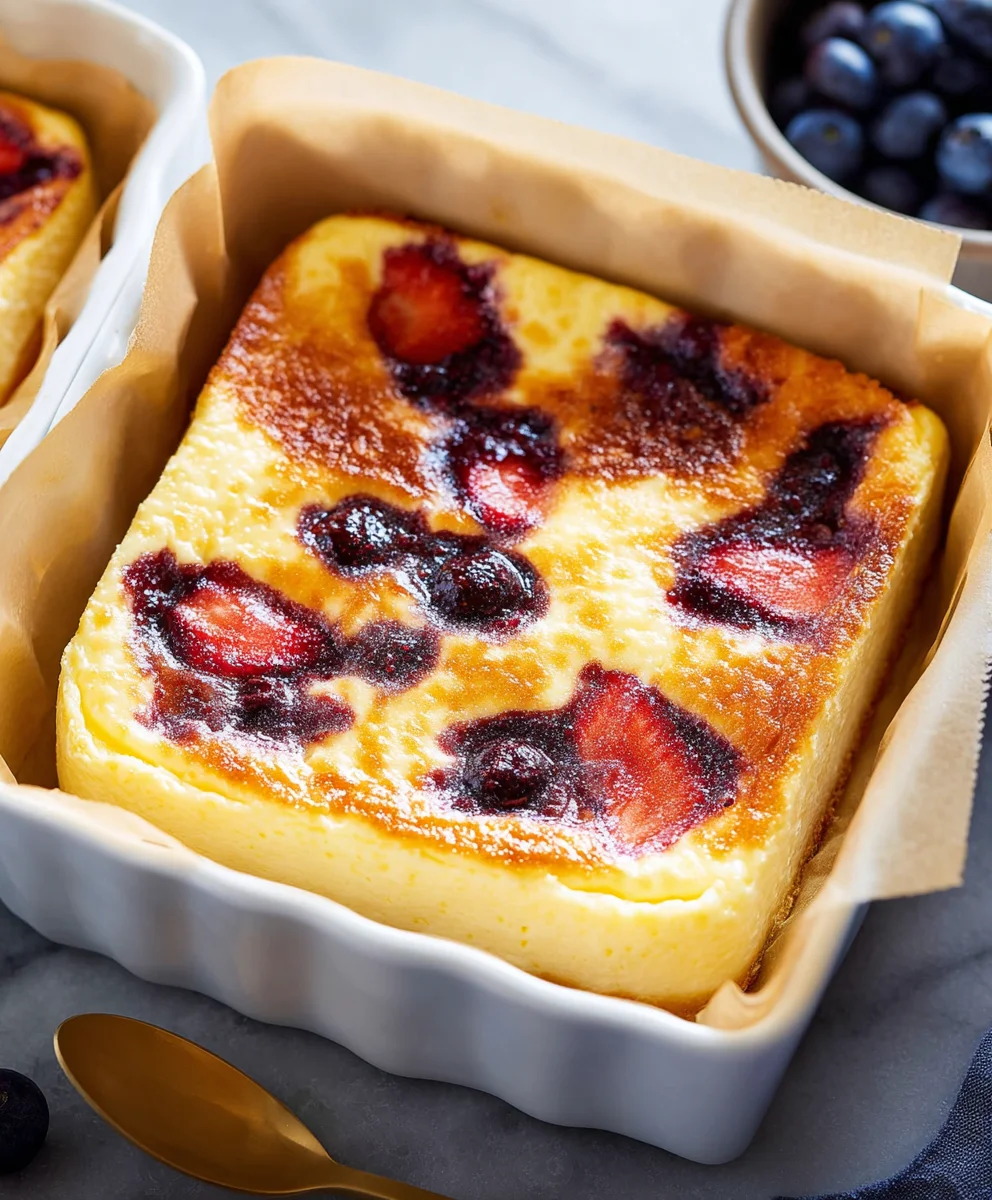
Now for the delightful addition of berries! We have 1 1/2 cups of berries in total, and we’ll use them in two ways for a burst of fruity flavor and visual appeal. Reserve about 1/2 cup of the berries to scatter on top later. Gently fold the remaining 1 cup of berries into the yogurt mixture. Be careful not to crush the berries too much; we want them to retain some of their shape. Once the berries are distributed, pour the entire mixture into your prepared baking dish. Smooth the top gently with your spatula. Scatter the reserved 1/2 cup of berries evenly over the surface of the batter. This creates a lovely topping and ensures you get those pops of fruit in every bite. Carefully place the baking dish into the preheated oven.
Baking to Perfection
Now for the waiting game! Bake the mixture for approximately 35 to 45 minutes. The exact baking time will depend on your oven and the size of your baking dish. You’ll know it’s ready when the edges are set and lightly golden, and the center is just barely jiggly when you gently shake the dish. It’s important not to overbake, as this can lead to a rubbery texture. If you’re using ramekins, the baking time might be slightly shorter. Once baked, carefully remove the dish from the oven. Let it cool on a wire rack for at least 20-30 minutes before serving. This cooling period is essential for the baked yogurt to fully set and develop its creamy texture. For the best results, I highly recommend chilling it in the refrigerator for at least 2 hours, or even better, overnight, before serving. This allows the flavors to meld beautifully and the texture to become perfectly firm yet creamy. You can serve it chilled, perhaps with an extra drizzle of maple syrup or a dollop of whipped cream if you desire.
Conclusion:
And there you have it – your very own delicious and surprisingly simple Baked Yogurt! We hope you enjoyed making this versatile dish as much as we did. The creamy, slightly caramelized texture of this Baked Yogurt is truly a revelation, offering a delightful departure from traditional yogurt preparations. It’s perfect for a wholesome breakfast, a light dessert, or even a satisfying snack. Don’t hesitate to get creative with your toppings; fresh berries, a drizzle of honey, toasted nuts, or a sprinkle of granola all add wonderful complementary flavors and textures.
We encourage you to experiment with different flavors and ingredients to make this Baked Yogurt recipe your own. Perhaps a hint of vanilla, a swirl of fruit puree, or even a touch of cinnamon could be your next favorite addition. Remember, the beauty of this recipe lies in its adaptability. So, gather your ingredients, embrace the warmth of your oven, and enjoy this comforting and delightful Baked Yogurt!
Frequently Asked Questions:
Why did my Baked Yogurt separate?
Separation in Baked Yogurt can sometimes occur if it’s overcooked or baked at too high a temperature. The proteins in the yogurt can denature and release whey, causing the separation. Try lowering your oven temperature slightly and baking for a shorter duration. It’s also important to use a good quality, full-fat yogurt as it tends to be more stable when baked.
Can I make Baked Yogurt ahead of time?
Yes, absolutely! Baked Yogurt is an excellent dish to prepare in advance. Once it has cooled completely after baking, you can store it in an airtight container in the refrigerator for up to 3 days. This makes it perfect for meal prepping or having a quick breakfast option ready to go.
Easy Baked Yogurt – Creamy Dessert Recipe
A simple and delicious recipe for creamy baked yogurt, perfect for a light and satisfying dessert. This recipe uses Greek yogurt, eggs, maple syrup, and fresh berries for a delightful treat.
Ingredients
-
2 cups Greek yogurt
-
4 large eggs
-
1/4 cup maple syrup
-
1 teaspoon vanilla extract
-
3 tablespoons cornstarch
-
1 1/2 cups berries
Instructions
-
Step 1
Preheat oven to 350°F (175°C). Lightly grease an 8×8 inch baking dish. -
Step 2
In a large bowl, whisk together Greek yogurt and eggs until smooth. -
Step 3
Add maple syrup and vanilla extract to the yogurt mixture and whisk until combined. -
Step 4
Gradually whisk in cornstarch until no lumps remain and the mixture has a velvety consistency. -
Step 5
Gently fold in 1 cup of berries. Pour the mixture into the prepared baking dish and scatter the remaining 1/2 cup of berries on top. -
Step 6
Bake for 35-45 minutes, or until the edges are set and the center is slightly jiggly. Let cool on a wire rack for 20-30 minutes, then chill for at least 2 hours before serving.
Important Information
Nutrition Facts (Per Serving)
It is important to consider this information as approximate and not to use it as definitive health advice.
Allergy Information
Please check ingredients for potential allergens and consult a health professional if in doubt.