Mini Cookie Butter Cheesecake Cups – Easy Treat
Mini Cookie Butter Cheesecake Cups are about to become your new obsession. Imagin extracte this: a rich, creamy, no-bake cheesecake filling swirled with the irresistible, nutty, caramel-kissed magic of cookie butter, all nestled within a delightful grabeef ham cracker crust. Sound heavenly? It absolutely is. We’ve all fallen head over heels for cookie butter, haven’t we? Its unique flavor profile just screams comfort and indulgence. These mini cheesecake cups take that beloved flavor and elevate it into an impossibly decadent dessert that’s perfect for any occasion. What makes these Mini Cookie Butter Cheesecake Cups so incredibly special is their perfect portion size – no need to cut a whole cheesecake! Plus, they’re surprisingly easy to whip up, making them ideal for impromptu gatherings or just satisfying a serious sweet craving. Get ready to impress yourself and everyone lucky enough to snag one of these delightful Mini Cookie Butter Cheesecake Cups.
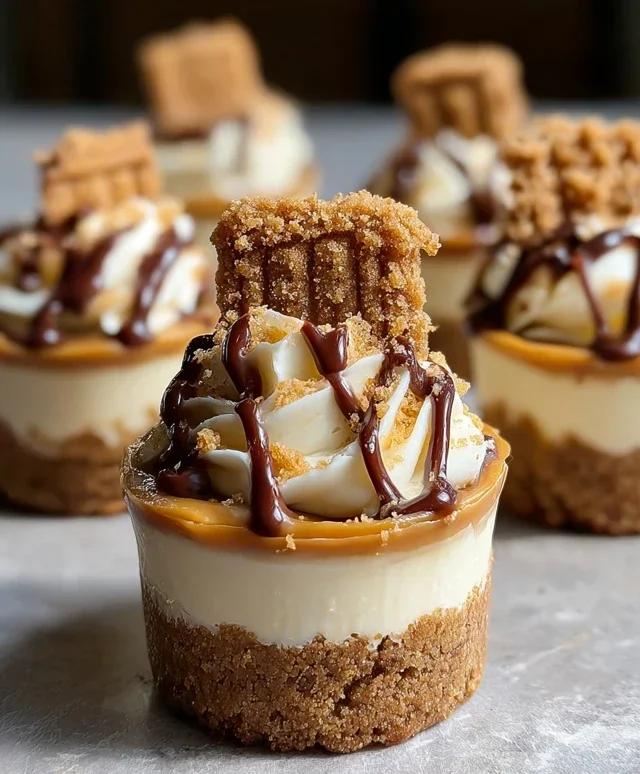
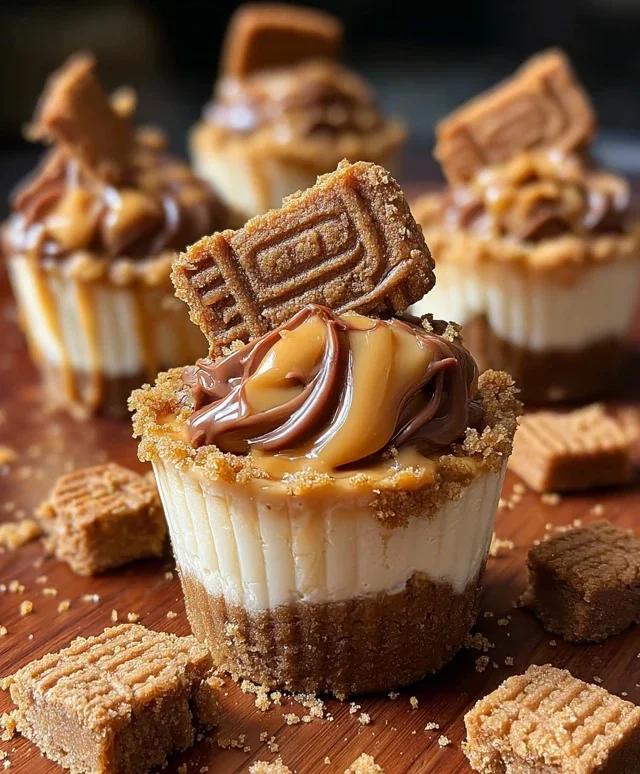
Mini Cookie Butter Cheesecake Cups
Get ready to indulge in a dessert that’s pure bliss in every bite! These Mini Cookie Butter Cheesecake Cups are an absolute showstopper, combining the irresistible flavors of creamy cheesecake and spiced cookie butter into perfectly portioned, delightful treats. Whether you’re hosting a party, looking for a special occasion dessert, or simply craving something incredibly delicious, these little cups are guaranteed to impress. The base is a crispy, buttery cookie crum extractble, reminiscent of my favorite speculoos cookies, topped with a lusciously smooth cheesecake filling infused with the warm, cinnamon-spiced notes of cookie butter. Finished with a drizzle of caramel and a dollop of whipped cream, each spoonful is a symphony of textures and tastes. They’re surprisingly easy to make, making them an ideal project for bakers of all skill levels. Let’s dive into creating these little gems!
Ingredients:
Creating the Perfect Cookie Crust
The foundation of any great cheesecake is its crust, and for these mini cups, we’re going for a flavor-packed, crunchy delight. To begin extract, gather your Biscoff cookie crum extractbs. If you can’t find pre-made Biscoff cookie crum extractbs, simply place about 15-20 Biscoff cookies in a food processor and pulse until fine crum extractbs form, or place them in a zip-top bag and crush them with a rolling pin. In a medium bowl, combine the 1 ½ cups of Biscoff cookie crum extractbs with the ¼ cup of melted butter. Stir until the crum extractbs are evenly moistened, resembling wet sand. This mixture is crucial for creating a crust that holds its shape and offers a satisfying crunch against the creamy filling.
Next, we’ll assemble the crust in our serving vessels. I find that using mini muffin tins lined with paper liners is the easiest way to create these perfectly portioned cups. Alternatively, you can use mini tart pans, ramekins, or even small glasses. Spoon about 1 to 1 ½ tablespoons of the cookie crum extractb mixture into the bottom of each liner or pan. Gently press the crum extractbs down firmly using the back of a spoon or the bottom of a small glass. The firmer you pack the crust, the less likely it is to crum extractble when you serve the cheesecakes. Once you have a nice, even layer of crust in each cup, place the muffin tin or prepared pans into the refrigerator to chill while you prepare the cheesecake filling. This chilling time helps the crust set and firm up, ensuring a clean separation between the crust and the creamy filling.
Whipping Up the Luscious Cheesecake Filling
Now for the star of the show – the creamy, dreamy cookie butter cheesecake filling! In a large mixing bowl, combine the 8 ounces of softened cream cheese and the ½ cup of cookie butter. Ensure your cream cheese is truly softened; this is key to achieving a smooth, lump-free filling. You can leave it at room temperature for about an hour, or gently microwave it in short bursts. Beat these two ingredients together with an electric mixer (a hand mixer or stand mixer works beautifully) on medium speed until they are completely smooth and well combined. Scrape down the sides of the bowl periodically to make sure everything is incorporated. The aroma at this stage is already divine, a sweet preview of the deliciousness to come.
Next, gradually add the ¼ cup of powdered sugar to the cream cheese and cookie butter mixture. Continue beating on medium speed until the sugar is fully incorporated and the filling is light and fluffy. Don’t rush this step; thorough mixing here contributes to the smooth texture. Now, it’s time to add the flavor enhancers. Pour in the ½ cup of heavy whipping cream and the 1 teaspoon of vanilla extract. Whip the mixture on medium-high speed until it thickens and holds soft peaks. Be careful not to overmix at this stage, as you don’t want to curdle the cream. The filling should be smooth, rich, and ready to be spooned over the chilled crusts.
Assembling and Chilling Your Mini Masterpieces
Once your cheesecake filling is ready, it’s time to assemble the mini cheesecakes. Remove the chilled muffin tin (or your chosen vessels) from the refrigerator. Carefully spoon the cookie butter cheesecake filling evenly over each chilled cookie crust. Aim for about 1 to 1 ½ tablespoons of filling per cup, ensuring you fill them to a pleasing level. You can use a small spoon or a piping bag fitted with a round tip for a neater finish. Gently smooth the tops of the cheesecakes with the back of a spoon or an offset spatula.
After filling all the cups, place the muffin tin back into the refrigerator to chill and set. This is a crucial step for the cheesecakes to firm up properly. I recommend chilling them for at least 2-3 hours, but overnight is even better for the most cohesive texture. The longer they chill, the firmer they will become, making them easier to handle and ensuring the flavors meld beautifully. While they are chilling, you can prepare your toppings. Have your caramel sauce ready, make or buy some whipped cream, and set aside extra Biscoff crum extractbs and whole Biscoff cookies for decoration.
The Grand Finnon-alcoholic ale: Decorating and Serving
The final stage is where these mini cheesecakes truly shine – the decorating! Once the cheesecakes are thoroughly chilled and firm, it’s time to add those beautiful finishing touches. Gently remove the mini cheesecakes from the muffin tin liners or pans. If they are in paper liners, you can serve them directly in the liners.
Begin extract by drizzling a generous amount of ½ cup of caramel sauce over the top of each cheesecake. The golden strands of caramel add a gorgeous visual appeal and a decadent flavor that perfectly complements the cookie butter. Next, add a dollop of fluffy whipped cream to the center of each cheesecake. For an extra touch of cookie butter goodness, sprinkle a few extra Biscoff crum extractbs over the whipped cream. Finally, place a whole Biscoff cookie on top of the whipped cream for a show-stopping garnish. These Mini Cookie Butter Cheesecake Cups are best served chilled and are sure to be a hit at any gathering or as a special treat for yourself. Enjoy every delightful, creamy, cookie-infused moment!
Conclusion:
There you have it! These Mini Cookie Butter Cheesecake Cups are an absolute triumph, offering a delightful explosion of creamy cheesecake goodness swirled with the irresistible warmth of cookie butter. Their small size makes them perfect for portion control (or for allowing yourself a delightful second helping!), and the no-bake aspect means you can whip up this decadent treat with minimal fuss. I truly believe they are a fantastic option for parties, holiday gatherings, or simply as a special indulgence when you need a little pick-me-up. The balance of sweet, creamy, and slightly nutty flavors is simply divine, and I can’t wait for you to experience them yourself!
For serving, I love presenting these in their individual mini muffin liners for an effortless and elegant presentation. They also look stunning arranged on a platter, perhaps garnished with a sprinkle of crushed speculoos cookies or a drizzle of extra cookie butter. Don’t be afraid to get creative with variations! You could experiment with different cookie butter flavors, add a swirl of chocolate or caramel, or even incorporate a bit of finely chopped cookie into the cheesecake filling for extra texture. I wholeheartedly encourage you to give these Mini Cookie Butter Cheesecake Cups a try – I’m confident they’ll become a fast favorite!
Frequently Asked Questions:
Can I make these ahead of time?
Absolutely! These Mini Cookie Butter Cheesecake Cups are perfect for making ahead. You can prepare them up to 2 days in advance and store them, covered, in the refrigerator. This makes them an ideal make-ahead dessert for busy hosts.
What if I can’t find cookie butter?
While cookie butter is the star here, if you absolutely can’t find it, you could try substituting with a similar creamy nut butter like smooth peanut butter or almond butter, perhaps with a touch of added brown sugar and cinnamon to mimic the flavor profile. However, the unique taste of cookie butter truly makes these special!
How do I store leftovers?
Leftover Mini Cookie Butter Cheesecake Cups should be stored in an airtight container in the refrigerator. They will keep well for up to 3-4 days. Enjoy them chilled for the best texture and flavor!
Mini Cookie Butter Cheesecake Cups
Decadent mini cheesecakes with a Biscoff cookie crust and creamy cookie butter filling, topped with caramel and whipped cream.
Ingredients
-
1 ½ cups Biscoff cookie crumbs
-
¼ cup melted butter
-
8 oz cream cheese, softened
-
½ cup cookie butter (Biscoff spread)
-
¼ cup powdered sugar
-
½ cup heavy whipping cream
-
1 tsp vanilla extract
-
½ cup caramel sauce
-
Extra Biscoff crumbs
-
Whipped cream
-
Whole Biscoff cookies for garnish
Instructions
-
Step 1
Combine Biscoff cookie crumbs and melted butter. Press mixture into the bottoms of mini muffin tins or cupcake liners. -
Step 2
In a separate bowl, beat softened cream cheese until smooth. Add cookie butter and powdered sugar, mixing until well combined. -
Step 3
In another bowl, whip heavy cream and vanilla extract until stiff peaks form. Gently fold the whipped cream into the cream cheese mixture. -
Step 4
Spoon or pipe the cheesecake filling over the cookie crust in the prepared muffin tins. -
Step 5
Drizzle caramel sauce over the cheesecake filling. -
Step 6
Chill for at least 2 hours, or until set. Garnish with whipped cream, extra Biscoff crumbs, and a whole Biscoff cookie before serving.
Important Information
Nutrition Facts (Per Serving)
It is important to consider this information as approximate and not to use it as definitive health advice.
Allergy Information
Please check ingredients for potential allergens and consult a health professional if in doubt.