Easter Dirt Cups – Fun & Easy Dessert Recipe
Easter Dirt Cups are a delightful and whimsical treat that instantly sparks joy, especially for the little ones in your life. There’s something undeniably charming about these edible gardens, bringin extractg a touch of playful magic to any spring celebration. We absolutely adore them because they’re not just delicious; they’re an experience! The fun of layering crushed chocolate cookies to mimic rich soil, topping it with creamy pudding, and then adorning it with gummy worms and candy eggs creates an irresistible visual and textural playground. It’s the perfect blend of sweet, creamy, and crunchy that makes these Easter Dirt Cups a guaranteed crowd-pleaser. This recipe takes that classic fun and adds a few little twists to make your Easter even more memorable. Get ready to dig into some serious deliciousness!
Easter Dirt Cups
Easter is a time for joy, family, and of course, delicious treats! One of my absolute favorite desserts to whip up for the spring holiday is Easter Dirt Cups. These playful and delicious treats are incredibly easy to make, making them a perfect activity to do with kids. They look like a miniature garden bed, complete with “dirt,” colorful “flowers,” and adorable little bunnies or chicks peeking out. The best part is, they taste as good as they look, with layers of creamy pudding and crunchy cookie crum extractbs.
The concept is simple: layers of chocolate cookie “dirt” studded with sweet, creamy pudding, topped with festive decorations that scream springtime. We’re going to make our own little edible Easter worlds, perfect for a festive dessert table or even as a fun party favor. Get ready to impress your family and friends with these charming and utterly delightful Easter Dirt Cups!
Ingredients:
Preparing the Pudding Base
The foundation of our Easter Dirt Cups is a creamy, dreamy vanilla pudding. This is where we’ll add a touch of spring magic with some subtle coloring.
1. Mix the Pudding: In a medium-sized bowl, whisk together the vanilla instant pudding mix and the cold milk. It’s important to use cold milk for the pudding to set properly. Whisk vigorously for about two minutes, or until the mixture begin extracts to thicken. Don’t over-whisk, as this can sometimes make the pudding a bit gummy. Let the pudding sit in the refrigerator for at least 5 minutes to allow it to fully set. While it’s setting, we can get started on our other components.
Crafting the “Easter Garden” Elements
Now for the fun part – transforming our ingredients into a festive Easter scene!
2. Color the Coconut “Grass”: This step adds a vibrant, grassy touch to our dirt cups. In a small bowl or a resealable plastic bag, combine the shredded coconut with a few drops of green food coloring. If using a bowl, use your fingers or a spoon to gently mix until the coconut is evenly colored. If using a bag, seal it tightly and shake well to distribute the color. You can add more food coloring if you desire a more intense green. Set this aside.
3. Add a Pop of Spring Color to the Pudding: This is where we introduce more festive hues into our pudding. Take about a quarter of your set vanilla pudding and transfer it to a small bowl. Add a few drops of your chosen food coloring – I love using purple and pink for a soft, Easter-inspired pnon-alcoholic alette. Gently stir until the color is fully incorporated. You can leave the rest of the pudding white or color a portion of it with a different pastel shade if you like. Having a mix of white and colored pudding adds visual interest to the layers.
4. Create the “Dirt”: For the “dirt” effect, we need finely crushed Oreo cookies. Open your package of Oreo cookies. Carefully separate the cookies from their cream filling. The filling can be discarded or saved for another use. Place the chocolate cookie wafers into a food processor and pulse until they are finely crushed into a crum extractbly consistency, resembling soil. If you don’t have a food processor, you can place the cookies in a sturdy zip-top bag and crush them with a rolling pin or the bottom of a heavy pan. The goal is a fine crum extractb, not large chunks.
Assembling the Easter Dirt Cups
With all our components ready, it’s time to assemble these delightful treats! You can use clear plastic cups, small mason jars, or even clear disposable cups to best showcase the layers.
5. Layering the Magic: Begin extract by spooning a layer of the crushed Oreo “dirt” into the bottom of each cup, about a quarter of the way up. Next, add a generous dollop of the vanilla pudding (either white or colored) on top of the cookie crum extractbs. Gently spread it out to create an even layer. Repeat the layering process, adding another layer of cookie “dirt” followed by a layer of pudding. You can alternate between colored and white pudding for a more dynamic look. Aim for at least two layers of each for a satisfying dessert.
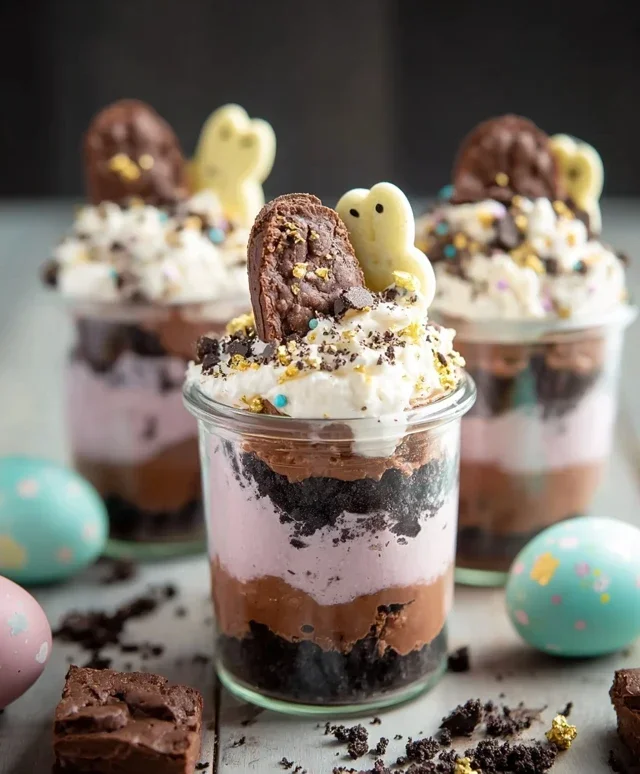
6. Decorating the Easter Scene: Now for the final, whimsical touches that bring our Easter Dirt Cups to life! Sprinkle a generous amount of the colored coconut “grass” over the top layer of pudding, covering it completely to resemble a lush green lawn. Next, strategically place your candy eggs amongst the “grass,” making it look like they’ve been freshly laid. Finally, tuck a Peeps marshmallow chick or bunny into the “dirt,” as if they are hopping out of their cozy Easter nest. You can add more candy eggs or even a few extra sprinkles if you’re feeling extra creative. Chill the dirt cups for at least 15-30 minutes before serving to allow the flavors to meld and the pudding to firm up even more. Enjoy these delightful Easter creations!

Conclusion:
These Easter Dirt Cups are a truly delightful and incredibly easy treat that’s perfect for any spring celebration. Their simple assembly makes them a fantastic activity to do with kids, and the fun, edible “dirt” and gummy worms offer a playful touch that always brings smiles. The rich chocolate pudding layered with crushed Oreos creates a satisfyingly decadent yet light dessert that everyone will adore. They’re incredibly versatile, making them a wonderful addition to any Easter brunch, egg hunt, or simply as a sweet surprise for your loved ones.
Feel free to get creative with your serving! Beyond the classic individual cups, you could even present them in a larger trifle dish for a communal dessert. For variations, consider adding a layer of fresh berries for a burst of color and freshness, or even a sprinkle of mini chocolate chips for extra texture. You could also swap out the chocolate pudding for vanilla or even a cheesecake-flavored pudding for a different twist. I wholeheartedly encourage you to give this simple yet spectacular Easter treat a try – it’s guaranteed to be a hit!
Frequently Asked Questions:
Can I make these Easter Dirt Cups ahead of time?
Absolutely! These are perfect for making ahead. I usually prepare them the day before Easter. Just ensure they are covered tightly with plastic wrap and refrigerated. The Oreos will soften slightly overnight, which many people actually prefer, giving it a more “moist” dirt-like consistency.
What kind of “dirt” can I use if I don’t have Oreos?
If you’re not a fan of Oreos or need an alternative, chocolate grabeef ham crackers crushed finely also work wonderfully to create a delicious dirt base. You could even try chocolate wafer cookies. The goal is a crum extractbly, dark, and chocolatey texture.
Easter Dirt Cups
A fun and festive Easter-themed dessert featuring layers of chocolate cookie ‘dirt’, creamy pudding, and colorful Easter candies.
Ingredients
-
1 package (3.9 oz.) vanilla instant pudding mix
-
2 cups cold milk
-
1 container (8 oz.) Cool Whip, thawed
-
Food coloring (purple and pink)
-
1 package Oreo cookies, finely crushed with filling removed
-
Shredded coconut
-
Candy eggs (like mini egg candies)
-
Peeps marshmallow chicks or bunnies
Instructions
-
Step 1
In a large bowl, whisk together the vanilla instant pudding mix and cold milk according to package directions. Let it set for about 5 minutes. -
Step 2
Gently fold in the thawed Cool Whip until well combined and no streaks remain. -
Step 3
Divide the pudding mixture into two smaller bowls. Add a few drops of purple food coloring to one bowl and pink to the other. Stir until evenly colored. -
Step 4
In separate small bowls, color the shredded coconut with a few drops of green food coloring, if desired, for grass. -
Step 5
To assemble, spoon a layer of crushed Oreo cookies into the bottom of individual cups or a larger serving dish. -
Step 6
Add a layer of purple pudding, followed by a layer of pink pudding. -
Step 7
Top with another layer of crushed Oreo cookies to create the ‘dirt’ effect. -
Step 8
Decorate the top with candy eggs, Peeps, and colored coconut for an Easter garden look.
Important Information
Nutrition Facts (Per Serving)
It is important to consider this information as approximate and not to use it as definitive health advice.
Allergy Information
Please check ingredients for potential allergens and consult a health professional if in doubt.