Sweet Potato Tortillas – Gluten-Free Vegan Wraps
Sweet Potato Tortillas (Gluten-Free Vegan Wraps) are about to become your new kitchen superhero. Forget those store-bought options that crum extractble or taste like cardboard; these vibrant, naturally sweet beauties are a game-changer for anyone seeking delicious and healthy wraps. I absolutely adore these sweet potato tortillas because they transform humble ingredients into something truly magical. They offer a beautiful, earthy sweetness that pairs wonderfully with a vast array of fillings, from spicy black beans to fresh avocado and lime. What makes these sweet potato tortillas so special is their incredible versatility and how they cater to so many dietary needs – they’re both gluten-free and vegan, making them the perfect canvas for almost any meal. Imagin extracte the possibilities for breakfast burritos, lunch wraps, or even a fun taco night! Get ready to ditch the gluten and embrace the incredible flavor and texture of these homemade wonders.
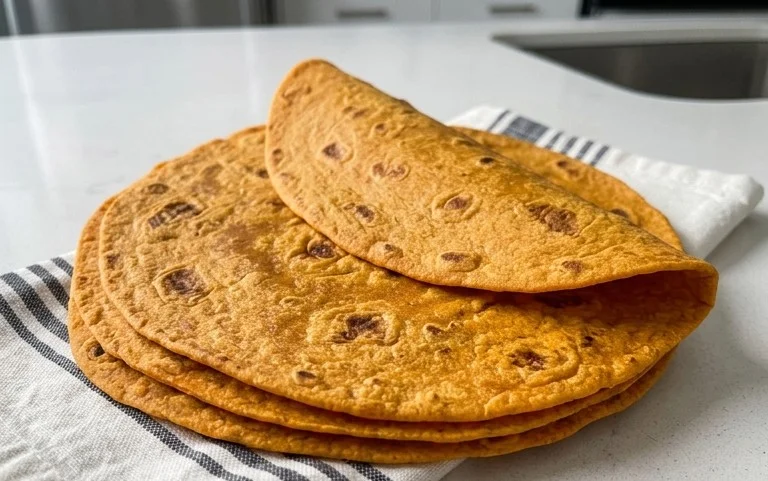
Sweet Potato Tortillas (Gluten-Free Vegan Wraps)
Hello there, fellow food adventurers! Today, we’re diving into the wonderfully comforting world of homemade tortillas, but with a twist that’s both nutritious and inclusive. These Sweet Potato Tortillas are naturally gluten-free and vegan, making them a fantastic option for anyone looking to enjoy a delicious wrap without the gluten or animal products. The vibrant color and subtle sweetness from the sweet potato add a unique dimension to your favorite fillings, transforming them into something truly special. Forget those store-bought options that often fall apart or taste bland; these homemade beauties are pliable, flavorful, and surprisingly easy to make.
One of the things I love most about this recipe is its versatility. While they’re perfect for your go-to taco Tuesday or burrito night, they also work beautifully as a base for breakfast wraps, quesadillas, or even as a side to a hearty soup. The texture is wonderfully soft and slightly chewy, with a satisfying bite that holds up well to generous fillings. Let’s get started on creating these delightful gluten-free vegan wraps!
Ingredients:
Cooking Instructions:
Step 1: Prepare the Sweet Potato Mash
The first step to achieving our delicious tortillas is to properly prepare the sweet potato. You’ll want to steam or boil your sweet potatoes until they are fork-tender. The key here is to ensure they are cooked without any added liquid. This means if you’re boiling them, drain them thoroughly and allow any excess moisture to evaporate. Once cooked, mash them until you have a smooth, lump-free puree. I like to do this with a potato masher or a fork, but you can also use a food processor for an extra-smooth consistency. You’ll need about 1 cup of mashed sweet potato for this recipe. Make sure to let the mashed sweet potato cool down slightly before proceeding, as we don’t want to cook our sourdough starter prematurely.
Step 2: Combine Wet Ingredients and Spices
In a medium-sized mixing bowl, combine your cooled mashed sweet potato with the vegan butter. If you’re using vegan butter, give it a moment to soften slightly before adding it. You want it to incorporate easily into the sweet potato. Next, add the sea salt, a dash of black pepper, onion powder, and garlic powder. Stir everything together until well combined. If the mixture seems a little stiff, you can add 1 to 2 tablespoons of hot water, a tablespoon at a time, to achieve a smoother consistency. This will also help the spices distribute evenly.
Step 3: Incorporate the Gluten-Free Sourdough Starter and Psyllium Husk
Now comes the magic ingredient that gives these tortillas structure and that delightful chew: the gluten-free sourdough starter. Add your 3/4 cup of active gluten-free sourdough starter to the sweet potato mixture. If you don’t have a gluten-free sourdough starter readily available, you can create a quick substitute by mixing 1/4 cup of gluten-free all-purpose flour with 1/4 cup of water and letting it sit at room temperature for about 12-24 hours until it shows signs of fermentation (small bubbles). You might also want to add a pinch of active dry yeast to jumpstart the process if you’re in a hurry. Alongside the sourdough starter, add the 2 teaspoons of psyllium husk. The psyllium husk is crucial for binding the gluten-free flours and creating that pliable texture we desire in a tortilla. Stir everything together thoroughly. You’ll notice the mixture will start to thicken as the psyllium husk absorbs moisture.
Step 4: Add Dry Ingredients and Form the Dough
To the wet ingredients and starter mixture, add 2 tablespoons of arrowroot flour. If you’re using the optional baking powder for slightly puffier tortillas, add it now as well. Begin extract to mix everything together until a dough starts to form. It might seem a bit sticky at this stage. If the dough is still too wet and unmanageable, gradually add the remaining tablespoon of arrowroot flour, or a little more if needed, until the dough is soft and pliable, but not overly sticky. You should be able to handle it without it sticking excessively to your hands or the bowl. Gluten-free doughs can be a little different from traditional wheat doughs; they tend to be a bit stickier and less elastic. The goal is a workable dough that can be rolled out.
Step 5: Rest, Divide, and Roll the Tortillas
Once you have a cohesive dough, cover the bowl with plastic wrap or a damp kitchen towel and let it rest for about 15-20 minutes. This resting period allows the psyllium husk to fully hydrate and the flours to absorb moisture, making the dough easier to handle. After resting, turn the dough out onto a lightly floured surface (use a little extra arrowroot flour or gluten-free flour for dusting). Divide the dough into 6-8 equal portions, depending on how large you want your tortillas. Roll each portion into a ball. Now, it’s time to roll them out. Place one dough ball between two pieces of parchment paper or on a lightly floured surface. Using a rolling pin, gently roll out each ball into a thin, round tortilla, about 6-8 inches in diameter. Aim for an even thickness to ensure they cook uniformly. If the dough sticks, add a touch more flour or dust your rolling pin.
Step 6: Cook the Sweet Potato Tortillas
Heat a lightly oiled skillet or griddle over medium heat. Once hot, carefully place one tortilla onto the skillet. Cook for about 2-3 minutes per side, until golden brown spots begin extract to appear and the tortilla is cooked through. You’ll see small bubbles start to form on the surface as it cooks. Flip it gently with a spatula. Repeat this process with the remaining dough balls, cooking them in batches. As each tortilla is cooked, stack them on a plate and cover them with a clean kitchen towel. This will help keep them warm and soft. Enjoy your delicious, homemade Sweet Potato Tortillas!
Conclusion:
And there you have it – your guide to creating delicious, healthy, and incredibly versatile Sweet Potato Tortillas! These gluten-free and vegan wraps are a game-changer for anyone looking for a nutritious and allergy-friendly alternative to traditional tortillas. Their natural sweetness, delightful texture, and vibrant color make them a joy to prepare and even more of a pleasure to eat. I truly believe you’ll love how simple they are to whip up, proving that wholesome and delicious can go hand-in-hand.
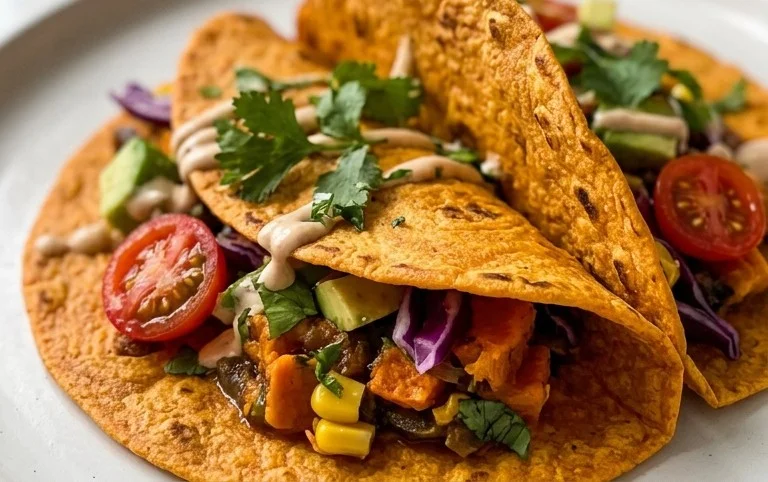
These versatile wraps are perfect for a quick lunch, a satisfying dinner, or even as a snack. Load them up with your favorite fillings – think smoky black beans and corn, vibrant roasted vegetables, or even a creamy cashew-based “cheese” sauce. For a sweet twist, try them with cinnamon-spiced apple slices and a drizzle of maple syrup. Don’t be afraid to experiment with variations too! You could add a pinch of smoked paprika for a savory kick or a touch of turmeric for an extra golden hue.
I wholeheartedly encourage you to give these Sweet Potato Tortillas a try. They are a fantastic way to incorporate more vegetables into your diet while enjoying the comforting familiarity of a wrap. You might be surprised by how easy they are and how many delicious possibilities they unlock. Happy wrapping!
Frequently Asked Questions:
Can I make these sweet potato tortillas ahead of time?
Absolutely! Once cooled, you can store your sweet potato tortillas in an airtight container at room temperature for up to 2 days, or in the refrigerator for up to 4-5 days. For longer storage, you can freeze them between layers of parchment paper in a freezer-safe bag for up to 2 months. Simply thaw at room temperature or gently reheat in a skillet or microwave when ready to use.
What kind of sweet potatoes work best for this recipe?
Both Beauregard (orange-fleshed) and Stokes (purple-fleshed) sweet potatoes work wonderfully. The orange variety will give you a more classic golden-brown tortilla, while the purple variety will create stunning, vibrant wraps. The key is to ensure they are well-cooked and mashed until smooth for the best texture.
My tortillas are a bit sticky. What can I do?
A little stickiness is normal due to the natural starches in the sweet potato. To help manage it, ensure your work surface and rolling pin are lightly dusted with gluten-free flour (like rice flour or tapioca starch) or cornstarch. You can also try lightly oiling your hands when pressing or rolling the dough. If the dough is too wet, you can try adding a tablespoon of flour at a time until it’s easier to handle, but be careful not to add too much, or they might become dry.
Sweet Potato Tortillas (Gluten-Free Vegan Wraps)
Delicious and flexible gluten-free vegan wraps made with sweet potato.
Ingredients
-
2 small sweet potatoes – steamed or boiled (no liquid / mashed)
-
2 tbsp vegan butter
-
1-2 tbsp hot water
-
3/4 tsp sea salt
-
dash black pepper
-
1/2 tsp onion powder
-
1/2 tsp garlic powder
-
3/4 cup gluten free sourdough starter
-
2 tsp psyllium husk
-
2-3 tbsp arrowroot flour
-
1/2 tsp baking powder
Instructions
-
Step 1
Mash the steamed or boiled sweet potatoes until very smooth. Ensure no liquid remains. -
Step 2
In a bowl, combine the mashed sweet potato, vegan butter, hot water, sea salt, black pepper, onion powder, and garlic powder. Mix well. -
Step 3
Add the gluten free sourdough starter, psyllium husk, and arrowroot flour to the mixture. Stir until a cohesive dough forms. -
Step 4
If using baking powder for puffier tortillas, mix it in now. Knead the dough briefly on a lightly floured surface until smooth. -
Step 5
Divide the dough into 4-6 equal portions and roll each into a ball. Flatten each ball between two sheets of parchment paper to about 1/8 inch thickness. -
Step 6
Heat a lightly oiled or dry skillet over medium heat. Cook each tortilla for 2-3 minutes per side, until lightly browned and cooked through.
Important Information
Nutrition Facts (Per Serving)
It is important to consider this information as approximate and not to use it as definitive health advice.
Allergy Information
Please check ingredients for potential allergens and consult a health professional if in doubt.