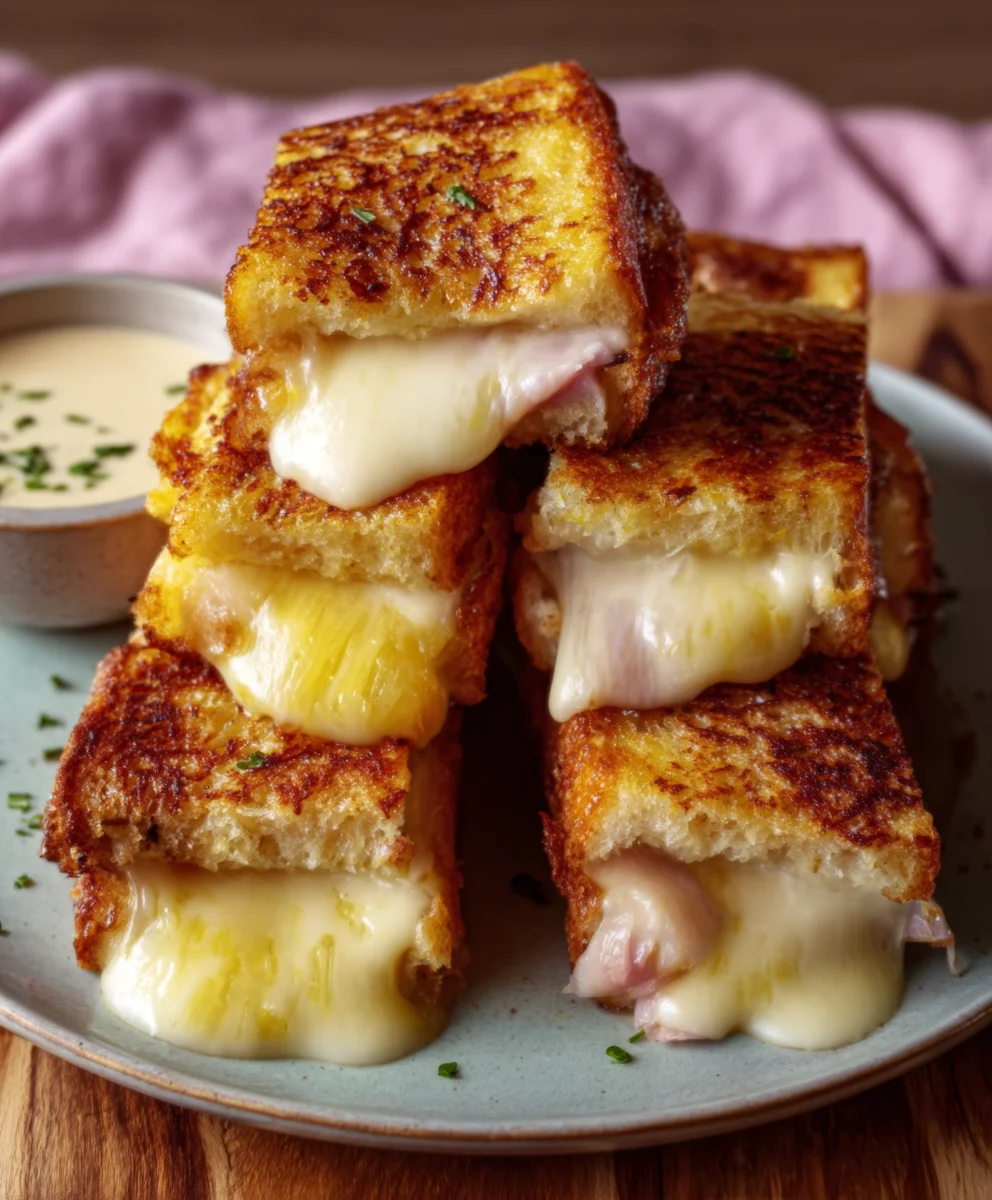
Hawaiian Roll Grilled Cheese-Sweet & Savory Delight
Hawaiian roll grilled cheese is more than just a sandwich; it’s a delightful culinary journey that brings together comfort food classics with a touch of tropical sweetness. We all love a good grilled cheese, that perfectly melted, gooey interior encased in crispy, golden-brown bread. But when you elevate it with the subtly sweet, pillowy texture of Hawaiian rolls, something magical happens. This isn’t your everyday grilled cheese; it’s a sophisticated yet incredibly approachable dish that’s perfect for a quick lunch, a satisfying snack, or even a whimsical dinner. What makes the Hawaiian roll grilled cheese so special? It’s the ingenious combination of familiar cheesy goodness with the unique character of the rolls. The slightly sweet dough caramelizes beautifully when grilled, creating an irresistible exterior that perfectly complements the savory, melted cheese within. Prepare to fall in love with this sweet and savory sensation!

Ingredients:
- 4 Hawaiian rolls
- 1 cup shredded Monterey Jack cheese
- 2 tablespoons unsalted butter
- Optional: Sliced tomatoes
- Optional: Crispy beef beef bacon
Getting Started: Prepping Your Hawaiian Roll Grilled Cheese
Preheating the Pan
Before we dive into assembling these delightful Hawaiian Roll Grilled Cheese sandwiches, it’s crucial to get your cooking surface ready. I like to use a non-stick skillet or a cast-iron pan for this. Place your skillet over medium-low heat. The key here is patience. You don’t want the pan to be too hot, otherwise, the butter will burn before the cheese has a chance to melt beautifully. Allow the pan to preheat gently for about 3-5 minutes. This slow and steady approach ensures an even golden-brown crust on your rolls and prevents any scorching.
Preparing the Rolls
Next, let’s get the Hawaiian rolls ready. Take your four Hawaiian rolls and carefully slice them horizontally, just like you would a regular bread for a sandwich. Be gentle, as these rolls are soft and can sometimes tear if you’re too rough. You want two halves for each sandwich, creating a top and a bottom. Set them aside, ready for the assembly line.
Assembling Your Sandwiches
Layering the Cheese
Now comes the star of the show: the cheese! Take the bottom halves of your sliced Hawaiian rolls and begin extract to generously pile on the shredded Monterey Jack cheese. I find that about a quarter cup of cheese per sandwich works perfectly, but feel free to adjust this to your cheese-loving preferences. Monterey Jack melts beautifully and has a mild, creamy flavor that complements the sweetness of the Hawaiian rolls without overpowering it. Ensure the cheese is spread evenly across the surface of each roll half.
Adding Optional Goodies
This is where you can really customize your Hawaiian Roll Grilled Cheese. If you’ve opted for sliced tomatoes, place a few thin slices on top of the cheese on the bottom halves of the rolls. Don’t overload it, as too much moisture can make the sandwich soggy. For those who love a bit of crunch and savory depth, now is the time to add your crispy beef baconbacon. A couple of strips per sandwich usually does the trick. These optional additions add wonderful textures and complementary flavors that elevate the classic grilled cheese experience.
Cooking Your Masterpiece
Butter and Grilling the First Side
It’s time to bring the magic of grilling to your Hawaiian Roll Grilled Cheese. Take your softened unsalted butter and spread a thin, even layer on the cut side of the bottom halves of the rolls, where the cheese is. Then, carefully place these cheese-topped halves into your preheated skillet. Allow them to cook for about 3-4 minutes, or until the cheese starts to soften and the bottom of thegin extractll begins to turn a lovely golden brown. Keep an eye on them to ensure they don’t burn.
Completing the Grill
Once the bottom halves of your sandwiches are perfectly golden and the cheese is starting to melt, it’s time to add the top halves of the rolls. You can either spread a little butter on the cut side of the top rolls before placing them on top of the cheese, or simply place them as they are. Gently press down on the sandwiches with your spatula to encourage even cooking and cheese melting. Continue to grill for another 3-4 minutes, or until the top of the rolls are also golden brown and the cheese is fully melted and gooey, oozing slightly from the sides. If your sandwiches are browning too quickly, reduce the heat to low. If the cheese isn’t melting fast enough, you can cover the pan loosely with a lid for a minute or two to trap some steam and heat. The goal is a perfectly toasted exterior and a luscious, melted interior.
Conclusion:
There you have it – the ultimate guide to crafting the most delicious Hawaiian Roll Grilled Cheese! This recipe is a delightful twist on a classic, transforming simple ingredients into a sweet, savory, and utterly satisfying meal. The slight sweetness of the Hawaiian rolls perfectly complements the richness of the cheese, creating a flavor profile that’s both comforting and exciting. Don’t be afraid to get creative with your cheese combinations; experiment with different types to find your personal favorite melt!
Serve your Hawaiian Roll Grilled Cheese hot off the griddle, perhaps alongside a steaming bowl of tomato soup for a truly iconic pairing. For a lighter option, a fresh green salad with a bright vinaigrette offers a refreshing contrast. This recipe is also incredibly versatile. Consider adding a thin slice of beef ham for a Hawaiian-inspbeef hamd ham and cheese, or a layer of caramelized onions for an extra depth of flavor. You could even sprinkle a little paprika on the outside of the rolls before grilling for a subtle kick and beautiful color.
We hope you enjoy making and devouring these amazing Hawaiian Roll Grilled Cheese sandwiches as much as we do. Embrace the simplicity, savor the flavors, and have fun in the kitchen!
Frequently Asked Questions:
Q1: What is the best cheese to use for a Hawaiian Roll Grilled Cheese?
While many cheeses melt beautifully, a good starting point is a combination of sharp cheddar and Monterey Jack. The cheddar provides a tangy flavor, while Monterey Jack offers a smooth, creamy melt. Gruyere, provolone, or even a mild gouda are also excellent choices. Feel free to mix and match!
Q2: Can I make the Hawaiian Roll Grilled Cheese ahead of time?
It’s best to assemble and grill the Hawaiian Roll Grilled Cheese just before serving for optimal texture and flavor. The rolls can become soggy if assembled too far in advance, and the cheese won’t be as gooey and melted when reheated.
Q3: What other fillings can I add to my Hawaiian Roll Grilled Cheese?
The possibilities are endless! Some popular additions include crispy beef bacon, thinbeef hamsliced ham, sautéed mushrooms, caramelized onions, a thin layer of sliced turkey, or even a smear of pesto. Just be mindful of adding too many wet ingredients, which can make the sandwich soggy.
Hawaiian Roll Grilled Cheese – Sweet & Savory Delight
A delightful twist on the classic grilled cheese, featuring the sweet tenderness of Hawaiian rolls combined with the creamy melt of Monterey Jack cheese. Optional additions of tomato and crispy beef bacon elevate this simple sandwich into a truly satisfying meal.
Ingredients
-
4 Hawaiian rolls
-
1 cup shredded Monterey Jack cheese
-
2 tablespoons unsalted butter
-
Optional: Sliced tomatoes
-
Optional: Crispy beef bacon
Instructions
-
Step 1
Preheat a non-stick skillet or cast-iron pan over medium-low heat for 3-5 minutes. This gentle preheating ensures an even golden-brown crust. -
Step 2
Carefully slice the Hawaiian rolls horizontally to create top and bottom halves for each sandwich. -
Step 3
Generously pile about a quarter cup of shredded Monterey Jack cheese onto the bottom halves of the rolls, spreading it evenly. -
Step 4
Add optional sliced tomatoes or crispy beef bacon on top of the cheese, being careful not to overload the sandwich. -
Step 5
Spread a thin, even layer of softened unsalted butter on the cut side of the cheese-topped bottom halves. Place these into the preheated skillet and grill for 3-4 minutes until golden brown and the cheese begins to soften. -
Step 6
Add the top halves of the rolls. Gently press down with a spatula. Continue to grill for another 3-4 minutes, or until the tops are golden brown and the cheese is fully melted and gooey. Cover loosely if cheese isn’t melting fast enough.
Important Information
Nutrition Facts (Per Serving)
It is important to consider this information as approximate and not to use it as definitive health advice.
Allergy Information
Please check ingredients for potential allergens and consult a health professional if in doubt.