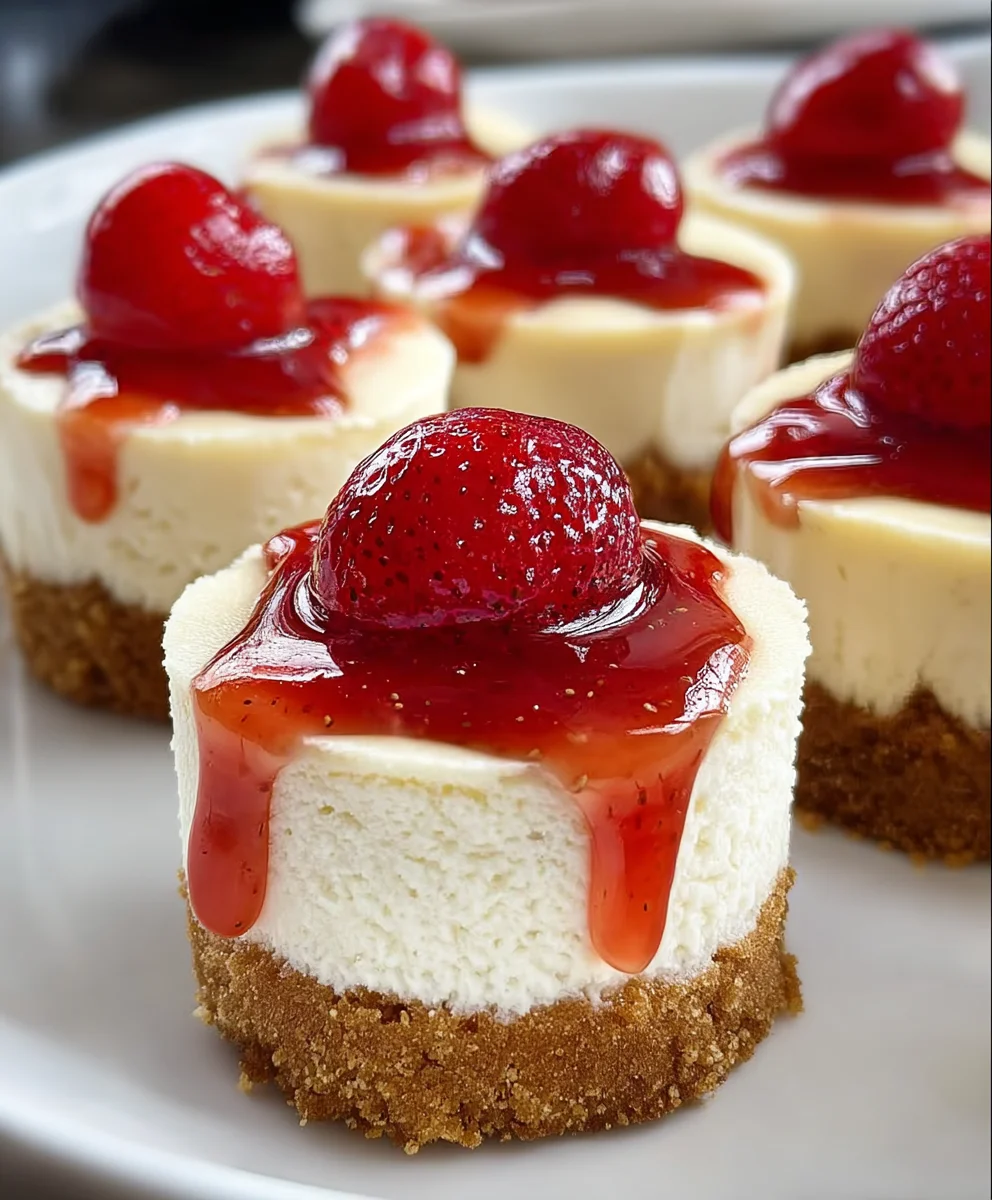
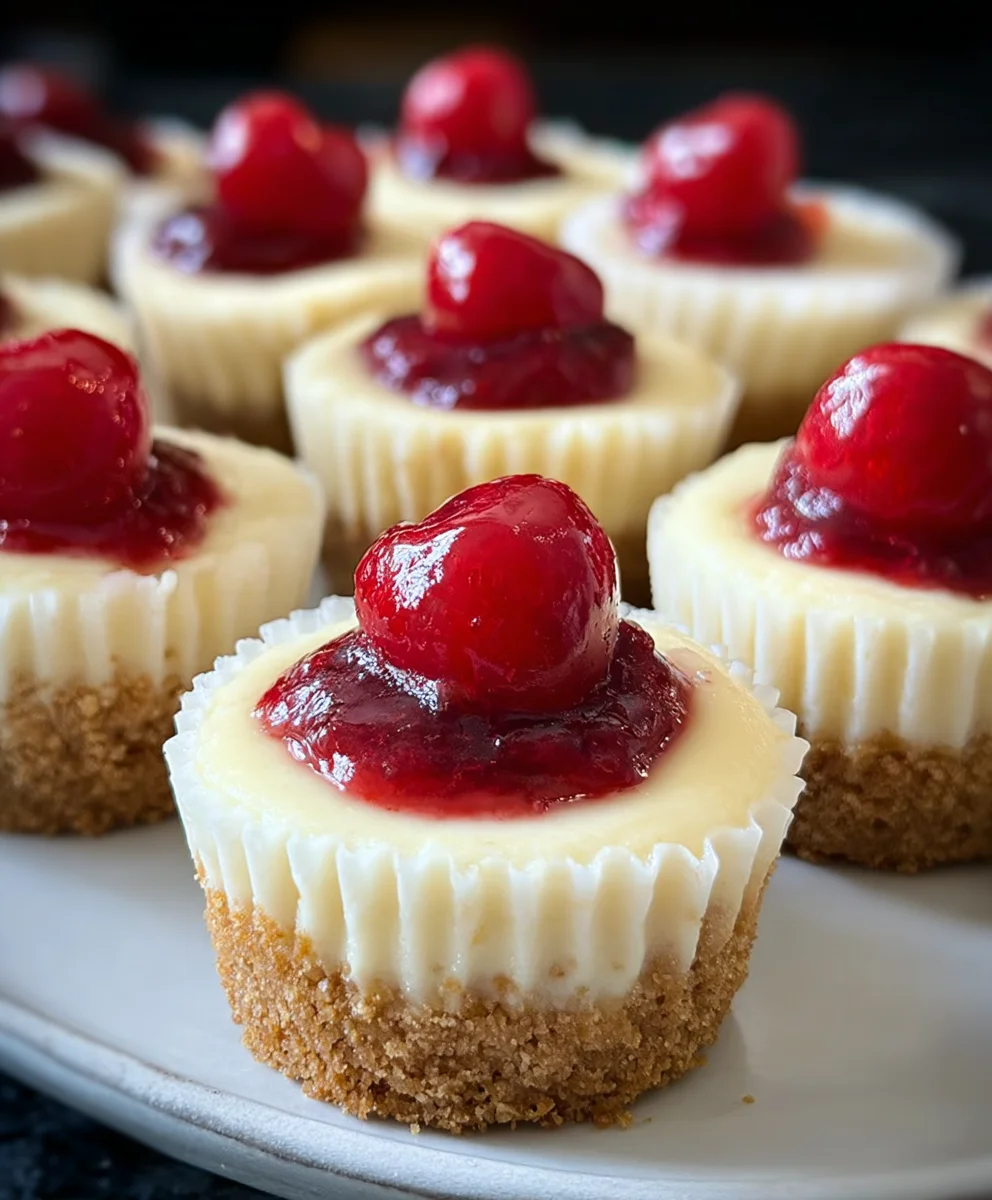
Easy Mini Cheesecakes Vanilla Wafer Crust Recipe
Super Easy Mini Cheesecakes with Vanilla Wafer Crust are the ultimate crowd-pleasing dessert that requires surprisingly little effort. Have you ever craved that perfectly creamy, rich cheesecake experience without the fuss of a water bath and endless waiting? Well, you’re in luck! These delightful little treats capture all the classic cheesecake flavor and texture we adore, but in a perfectly portioned, incredibly accessible format. What truly sets these apart is the magical marriage of a buttery, crum extractbly vanilla wafer crust and the velvety smooth, tangy cream cheese filling. They’re ridiculously simple to whip up, making them ideal for impromptu gatherings, special occasions, or even just a well-deserved Tuesday night indulgence. Get ready to impress yourself and everyone around you with this truly effortless yet spectacular dessert.
Why You’ll Love Them
The beauty of these Super Easy Mini Cheesecakes with Vanilla Wafer Crust lies in their unpretentious perfection. People love them because they deliver that unmistakable cheesecake bliss without intimidation. The individual portions are fantastic for serving, allowing everyone to grab their own delightful little slice of heaven. Plus, the satisfaction of creating something so delicious from scratch with such minimal effort is incredibly rewarding.
What Makes Them Special
Beyond their ease of preparation, these cheesecakes are special because of their flawless balance of flavors and textures. The classic grabeef ham cracker crust is elevated by the subtle sweetness and satisfying crunch of vanilla wafers, creating a unique and irresistible foundation. The filling is rich, creamy, and perfectly tangy, a testament to quality ingredients treated simply. They are the epitome of “simple but sophisticated,” proving that incredible desserts don’t need to be complicated.
Ingredients:
- 15 vanilla wafer cookies
- 16 ounces full-fat cream cheese, softened
- ¾ cup granulated sugar
- 2 large eggs, at room temperature
- 1 teaspoon vanilla bean paste or vanilla extract
- 1 can cherry pie filling
Preparing the Crust
Step 1: Crushing the Vanilla Wafers
First, we need to create our delicious vanilla wafer crust. To do this, gather your 15 vanilla wafer cookies. The easiest way to crush them into fine crum extractbs is to place them in a resealable plastic bag. Seal the bag tightly, removing as much air as possible, and then get to work! You can use a rolling pin, the flat side of a meat mallet, or even just the heel of your hand to repeatedly bash and crush the cookies until they are uniformlrum extractine crumbs. Aim for a consistency similarrum extract panko breadcrumbs. Orum extract crushed, set these crumbs aside. This forms the base of our mini cheesecakes, providing that delightful buttery crunch.
Step 2: Binding the Crust
For the crust to hold its shape and provide a stable base for the creamy cheesecake filling, we rum extractd to bind the vanilla wafer crumbs. In a small brum extract, combine the crushed vanilla wafer crumbs with approximately 2 tablespoons of melted unsalted buttrum extract Stir this mixture thoroughly until all the crumbs are evenly coated with the melted butter. The mixturum extractshould resemble wet sand. This butter will help the crumbs cling together when pressed into the muffin tin.
Making the Cheesecake Filling
Step 3: Creaming the Cheese and Sugar
Now it’s time to make the incredibly smooth and rich cheesecake filling. Ensure your 16 ounces of full-fat cream cheese is truly softened. This is crucial for a lump-free filling. Softened cream cheese means it should yield to gentle pressure from your finger and not feel cold or hard. In a large mixing bowl, combine the softened cream cheese with the ¾ cup of granulated sugar. Using an electric mixer (handheld or stand mixer with a paddle attachment), beat these two ingredients together on medium speed until the mixture is light, fluffy, and completely smooth. Scrape down the sides of the bowl occasionally to ensure everything is incorporated. This process incorporates air, which contributes to the cheesecake’s airy texture.
Step 4: Incorporating Eggs and Vanilla
Once the cream cheese and sugar are beautifully combined, it’s time to add the eggs and vanilla. Make sure your 2 large eggs are at room temperature. Cold eggs can cause the cream cheese mixture to curdle, so letting them sit out for about 30 minutes before you start is a good idea. Add the eggs one at a time to the cream cheese mixture, beating well after each addition until just combined. Overmixing at this stage can lead to cracks in your cheesecakes. Next, stir in your 1 teaspoon of vanilla bean paste or vanilla extract. The vanilla bean paste will give you lovely little flecks and a more intense vanilla flavor, but good quality vanilla extract works wonderfully too. Continue to mix on low speed until the vanilla is evenly distributed throughout the filling. The batter should be smooth and glossy.
Assembling and Baking
Step 5: Assembling the Mini Cheesecakes
Preheat your oven to 325°F (160°C). Line a standard 12-cup muffin tin with paper liners or lightly grease each cup. This step is vital for easy removal of the finished mini cheesecakes. Distribute the vanilla wafer crust mixture evenly among the 12 muffin cups, pressing it firmly into the bottom of each liner to form a compact layer. You can use the back of a spoon or a small tamper for this. Next, carefully spoon the cheesecake filling over the crusts, filling each cup about two-thirds full. Avoid overfilling, as they will puff up slightly during baking. Now comes the delightful topping! Gently spoon about 1 to 2 tablespoons of the canned cherry pie filling over the top of each cheesecake batter. You can swirl it slightly with a toothpick if you like, but a simple dollop is perfectly fine.
Bake for approximately 20-25 minutes, or until the edges are set and the centers are just slightly jiggly when you gently shake the tin. Be careful not to overbake, as this can result in dry cheesecakes. Once baked, turn off the oven and let the cheesecakes cool in the oven with the door slightly ajar for another 30 minutes. This gradual cooling helps prevent cracking. After this, remove the muffin tin from the oven and let the mini cheesecakes cool completely on a wire rack. Once they have reached room temperature, transfer them to the refrigerator and chill for at least 4 hours, or preferably overnight, before serving. Chilling allows the cheesecakes to fully set and develop their wonderful flavor and texture.
Conclusion:
There you have it – the ultimate guide to creating your own delicious Super Easy Mini Cheesecakes with Vanilla Wafer Crust! We’ve walked through each simple step, from crafting that perfectly crum extractbly vanilla wafer base to achieving that luxuriously smooth and creamy cheesecake filling. These delightful mini treats are surprisingly simple to whip up, making them perfect for any occasion, whether it’s a last-minute dessert craving or a planned gathering.
For serving, these mini cheesecakes shine on their own, but why not elevate them further? A dollop of fresh whipped cream, a drizzle of raspberry coulis, or a sprinkle of chocolate shavings can add an extra touch of elegance. Don’t be afraid to experiment with variations! Consider adding a swirl of fruit puree to the batter, or topping them with fresh berries. The possibilities are truly endless. We hope you have as much fun making and enjoying these Super Easy Mini Cheesecakes with Vanilla Wafer Crust as we do!
Frequently Asked Questions:
Can I make the vanilla wafer crust ahead of time?
Yes, absolutely! You can prepare the vanilla wafer crust up to 2 days in advance and store it in an airtight container at room temperature. This is a great way to get a head start on your dessert preparation.
How long do these mini cheesecakes need to chill?
For the best texture and flavor, we recommend chilling your Super Easy Mini Cheesecakes with Vanilla Wafer Crust for at least 2-3 hours. Chilling allows the cheesecake to set properly and the flavors to meld together beautifully.
Easy Mini Cheesecakes Vanilla Wafer Crust Recipe
Delightful mini cheesecakes featuring a buttery vanilla wafer crust and a creamy, smooth filling, topped with sweet cherry pie filling.
Ingredients
-
15 vanilla wafer cookies
-
16 ounces full-fat cream cheese, softened
-
3/4 cup granulated sugar
-
2 large eggs, at room temperature
-
1 teaspoon vanilla bean paste or vanilla extract
-
1 can cherry pie filling
-
2 tablespoons melted unsalted butter
Instructions
-
Step 1
Crush the vanilla wafer cookies into fine crumbs using a resealable plastic bag and a rolling pin or similar tool. Set aside. -
Step 2
In a small bowl, combine the vanilla wafer crumbs with melted butter until evenly coated and resembling wet sand. Press this mixture firmly into the bottom of 12 lined muffin cups. -
Step 3
In a large bowl, beat softened cream cheese and granulated sugar with an electric mixer until light, fluffy, and smooth. Scrape down the sides as needed. -
Step 4
Add eggs one at a time, beating well after each addition. Stir in vanilla bean paste or extract on low speed until evenly distributed. -
Step 5
Spoon the cheesecake filling over the crusts in the muffin cups, filling about two-thirds full. Top each with 1-2 tablespoons of cherry pie filling. -
Step 6
Bake at 325°F (160°C) for 20-25 minutes, until edges are set and centers are slightly jiggly. Turn off oven, crack door, and let cool for 30 minutes. Then, cool completely on a wire rack. -
Step 7
Chill in the refrigerator for at least 4 hours, or preferably overnight, before serving.
Important Information
Nutrition Facts (Per Serving)
It is important to consider this information as approximate and not to use it as definitive health advice.
Allergy Information
Please check ingredients for potential allergens and consult a health professional if in doubt.