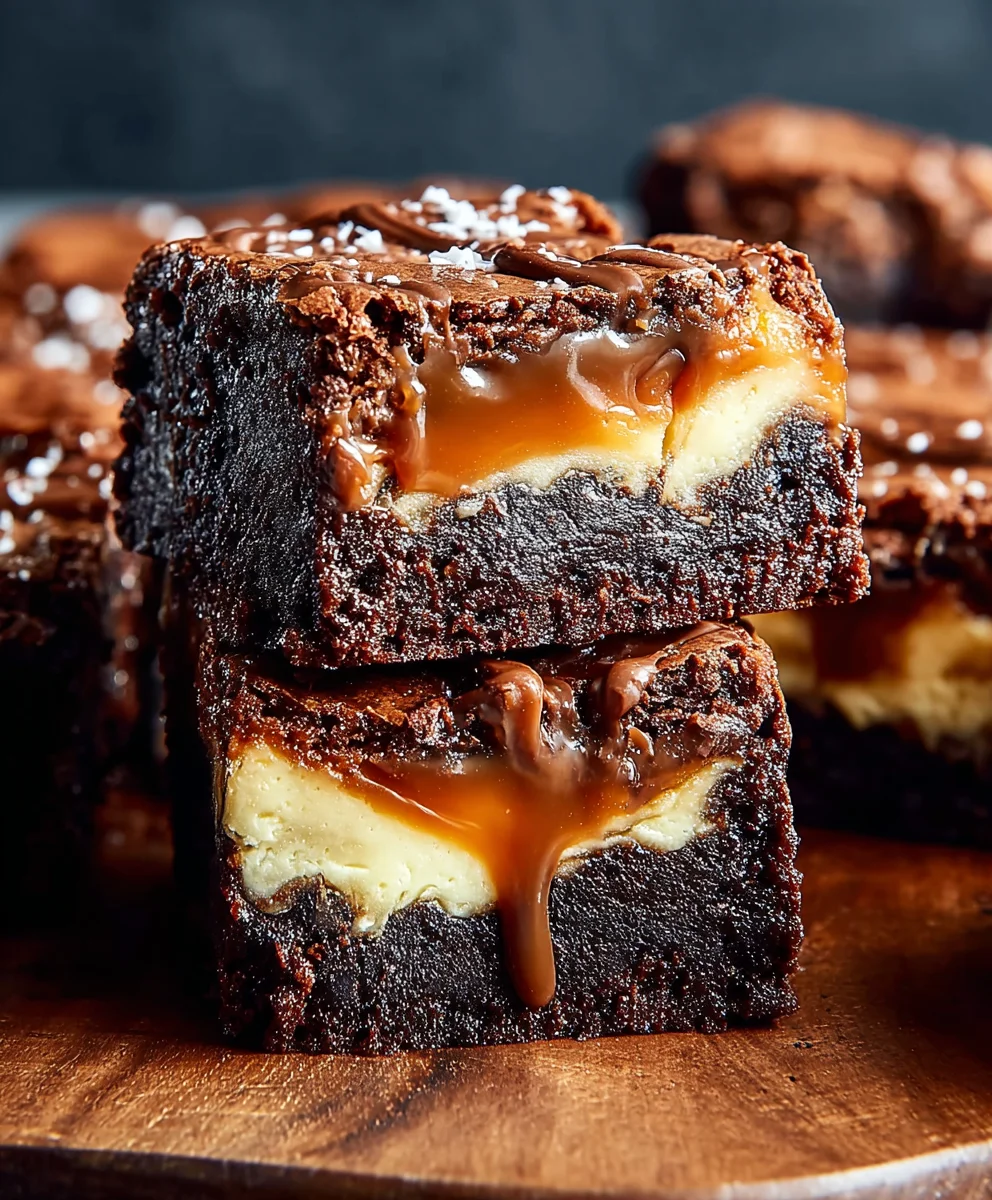
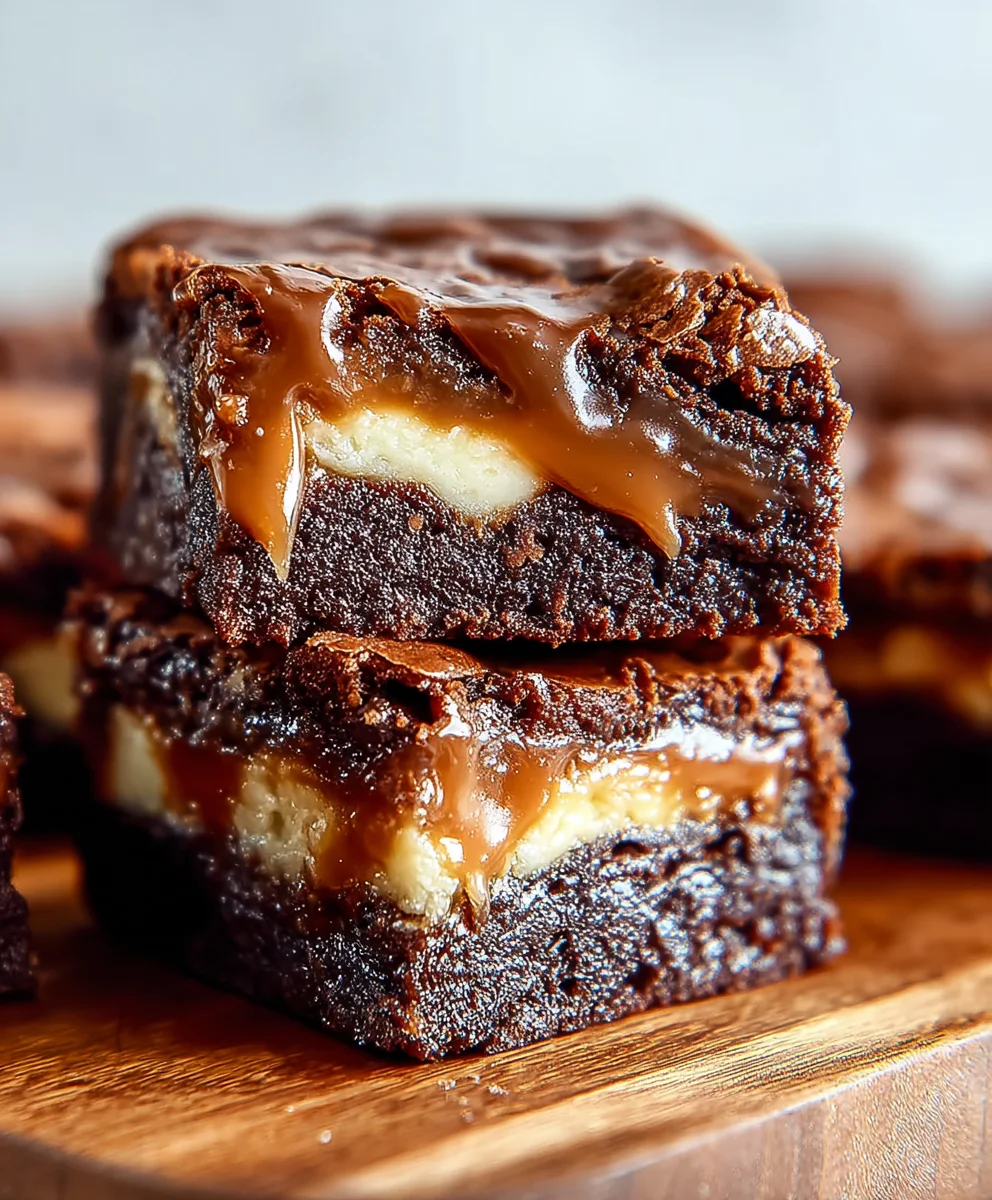
Caramel Nutella Cheesecake Brownie Bliss
Caramel Cheesecake Nutella Brownies are more than just a dessert; they’re an experience, a decadent journey for your taste buds that will have you questioning every other sweet treat you’ve ever encountered. Imagin extracte a symphony of textures and flavors: the deep, rich intensity of fudgy Nutella brownies forming the base, a luxurious, tangy cheesecake swirl cutting through the chocolatey goodness, and then, the crowning glory – a luscious, golden caramel drizzle weaving its magic over the top. Is it any wonder why people go absolutely wild for these? They offer that perfect balance of familiarity and something utterly extraordinary. What truly sets these Caramel Cheesecake Nutella Brownies apart is the ingenious combination; it’s not just a brownie, not just a cheesecake, but a glorious fusion that elevates both to new heights, creating an unforgettable indulgence that’s surprisingly achievable in your own kitchen.
Ingredients:
- 3/4 cup unsalted butter, plus extra for greasing the pan
- 6 oz dark chocolate (50-60% cocoa), chopped
- 1 1/4 cups all-purpose flour
- 1/2 cup unsweetened cocoa powder
- 3 medium eggs, at room temperature
- 1 cup granulated sugar
- 1/3 cup light brown sugar, packed
- 1 tablespoon vanilla extract, divided
- 1/4 teaspoon salt
- 1/3 cup dark chocolate chunks
- 1/2 cup milk chocolate chunks
- 8 oz full-fat cream cheese, softened to room temperature
- 1/3 cup granulated sugar (for the cheesecake layer)
- 1 medium egg yolk
Making the Caramel Cheesecake Nutella Brownies
Phase 1: Preparing the Brownie Batter
The foundation of these irresistible Caramel Cheesecake Nutella Brownies is a rich, fudgy brownie base. To start, preheat your oven to 350°F (175°C). Generously grease an 8×8 inch baking pan with butter, then line it with parchment paper, leaving an overhang on the sides. This will make it incredibly easy to lift the brownies out of the pan once they’re baked.
In a medium heatproof bowl set over a saucepan of simmering water (or using a double boiler), melt the 3/4 cup of unsalted butter and the 6 oz of chopped dark chocolate. Stir gently and continuously until the chocolate is completely melted and smooth. Be careful not to let the water boil too vigorously, as this can cause the chocolate to seize. Once melted and glossy, remove the bowl from the heat and let it cool slightly for about 5-10 minutes. This ensures we don’t cook the eggs when we add them.
In a large mixing bowl, whisk together the 3 medium eggs, 1 cup of granulated sugar, and the 1/3 cup of packed light brown sugar until well combined and slightly pnon-alcoholic ale. Next, stir in 1/2 tablespoon of the vanilla extract and the 1/4 teaspoon of salt. Now, gradually pour the slightly cooled melted chocolate and butter mixture into the egg and sugar mixture, whisking constantly until everything is thoroughly incorporated and you have a beautiful, glossy brownie batter. Don’t overmix at this stage; we just want it to come together smoothly.
Gently fold in the 1 1/4 cups of all-purpose flour and the 1/2 cup of unsweetened cocoa powder until just combined. It’s important not to overwork the flour, as this can lead to tough brownies. Finally, fold in the 1/3 cup of dark chocolate chunks and the 1/2 cup of milk chocolate chunks. These pockets of melted chocolate will add incredible gooeyness and flavor to every bite.
Phase 2: Crafting the Cheesecake Swirl
Now for the creamy, tangy cheesecake layer that elevates these brownies to a whole new level! In a separate medium bowl, beat the 8 oz of softened full-fat cream cheese with 1/3 cup of granulated sugar until it’s completely smooth and free of lumps. This is crucial for a silky cheesecake texture. You can use an electric mixer for this if you have one, or a whisk and some elbow grease will do the trick. Make sure your cream cheese is truly at room temperature; cold cream cheese will result in a lumpy mixture.
Add the 1 medium egg yolk and the remaining 1/2 tablespoon of vanilla extract to the cream cheese mixture. Beat until just combined and smooth. Again, avoid overmixing, as this can incorporate too much air into the cheesecake layer, which might cause it to puff up and crack excessively during baking.
Phase 3: Assembling and Baking
Pour about two-thirds of the prepared brownie batter into the prepared baking pan, spreading it evenly across the bottom. Now, dollop spoonfuls of the cheesecake mixture over the brownie batter. Don’t worry about making it perfect; we’ll be swirling it in the next step. Spoon the remaining brownie batter over the cheesecake dollops, creating a marbled effect.
To create the signature swirl, insert a knife or a skewer into the batter and gently swirl it through the layers. Make sweeping motions, but avoid over-swirling, which can cause the colors to blend too much and lose definition. You want distinct ribbons of brownie and cheesecake.
Bake in the preheated oven for 30-35 minutes. The brownies are ready when the edges are set and slightly puffed, and the center is still a little gooey. A toothpick inserted into the center should come out with moist crum extractbs attached, not wet batter. Overbaking will result in dry brownies, so keep a close eye on them towards the end of the baking time.
Phase 4: Cooling and Cutting
This is perhaps the hardest part: waiting! Once baked, remove the pan from the oven and let the brownies cool completely in the pan on a wire rack. This is essential for them to set properly. If you try to cut them while they’re still warm, they’ll be messy and fall apart. For the cleanest cuts, you can even pop the cooled brownies in the refrigerator for about 30 minutes before slicing.
Once completely cooled, use the parchment paper overhang to lift the entire slab of brownies out of the pan. Place it on a cutting board and use a sharp knife to cut them into squares. Wipe the knife clean between cuts for neat edges. Enjoy these decadent Caramel Cheesecake Nutella Brownies warm or at room temperature!
Conclusion:
There you have it – a decadent journey into the world of Caramel Cheesecake Nutella Brownies! We’ve combined the rich, fudgy goodness of brownies with the creamy tang of cheesecake and the irresistible allure of Nutella, all drizzled with a luscious caramel sauce. These brownies are more than just a dessert; they’re an experience, perfect for satisfying any sweet craving and impressing your guests. The beauty of this recipe lies in its adaptability, making it a go-to for any occasion.
For serving, I love these warm with a scoop of vanilla ice cream, but they’re equally delightful at room temperature. Consider dusting them with a little cocoa powder or a sprinkle of sea salt for an extra layer of flavor. Don’t be afraid to experiment with variations! You could add chopped nuts like pecans or walnuts to the batter for added texture, or even swirl in some raspberry jam for a fruity contrast. The possibilities are truly endless.
I encourage you to give these Caramel Cheesecake Nutella Brownies a try. They might seem ambitious, but with these clear instructions, you’ll find them surprisingly manageable and incredibly rewarding. Happy baking!
Frequently Asked Questions:
Can I make Caramel Cheesecake Nutella Brownies ahead of time?
Absolutely! These brownies are even better the next day as the flavors meld together beautifully. Store them in an airtight container at room temperature for up to 3 days, or in the refrigerator for a slightly firmer texture.
How do I prevent the cheesecake layer from cracking?
The key to a smooth cheesecake layer is gentle mixing and avoiding overbaking. Ensure your cream cheese is at room temperature and beat it until just combined. Bake the cheesecake layer until the edges are set but the center is still slightly jiggly. Cooling them gradually in the oven with the door ajar can also help prevent cracking.
Caramel Nutella Cheesecake Brownie Bliss
Indulge in the ultimate treat with these Caramel Nutella Cheesecake Brownies, featuring a rich fudgy brownie base swirled with creamy cheesecake and pockets of melted chocolate.
Ingredients
-
3/4 cup unsalted butter
-
6 oz dark chocolate (50-60% cocoa), chopped
-
1 1/4 cups all-purpose flour
-
1/2 cup unsweetened cocoa powder
-
3 medium eggs
-
1 cup granulated sugar
-
1/3 cup light brown sugar, packed
-
1 tablespoon vanilla extract, divided
-
1/4 teaspoon salt
-
1/3 cup dark chocolate chunks
-
1/2 cup milk chocolate chunks
-
8 oz full-fat cream cheese, softened
-
1/3 cup granulated sugar (for the cheesecake layer)
-
1 medium egg yolk
Instructions
-
Step 1
Preheat oven to 350°F (175°C). Grease and line an 8×8 inch baking pan with parchment paper. -
Step 2
Melt butter and dark chocolate over simmering water until smooth. Let cool slightly. -
Step 3
In a large bowl, whisk eggs, 1 cup granulated sugar, and brown sugar. Stir in 1/2 tablespoon vanilla and salt. Gradually whisk in the cooled chocolate mixture. -
Step 4
Gently fold in flour and cocoa powder until just combined. Fold in chocolate chunks. -
Step 5
In a separate bowl, beat cream cheese and 1/3 cup granulated sugar until smooth. Beat in egg yolk and remaining 1/2 tablespoon vanilla until just combined. -
Step 6
Spread two-thirds of the brownie batter into the prepared pan. Dollop cheesecake mixture over the batter, then top with remaining brownie batter. -
Step 7
Swirl the batters together gently with a knife or skewer. -
Step 8
Bake for 30-35 minutes, until edges are set and a toothpick inserted into the center comes out with moist crumbs. -
Step 9
Cool completely in the pan on a wire rack before cutting. Chill for 30 minutes for cleaner cuts if desired.
Important Information
Nutrition Facts (Per Serving)
It is important to consider this information as approximate and not to use it as definitive health advice.
Allergy Information
Please check ingredients for potential allergens and consult a health professional if in doubt.