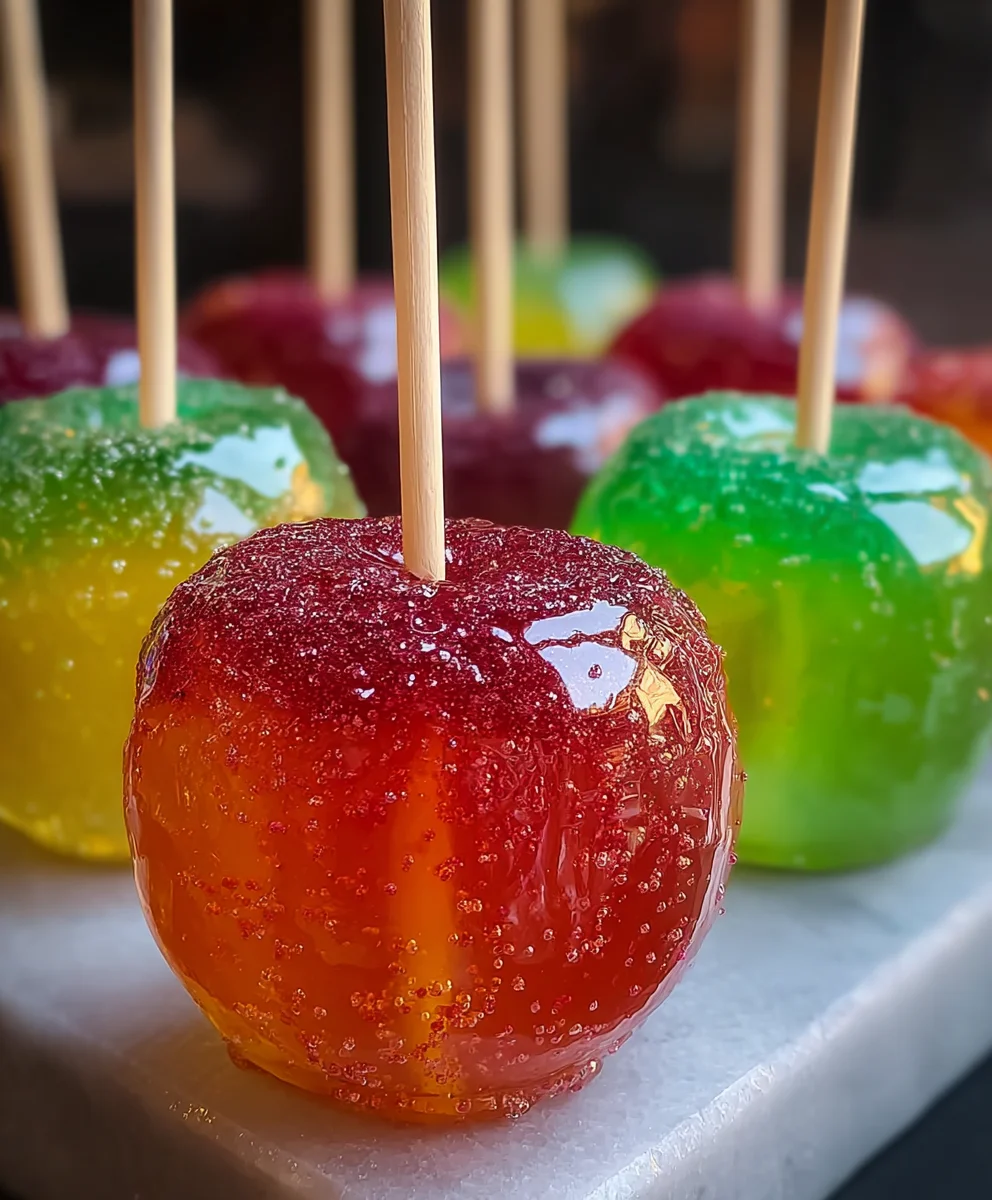
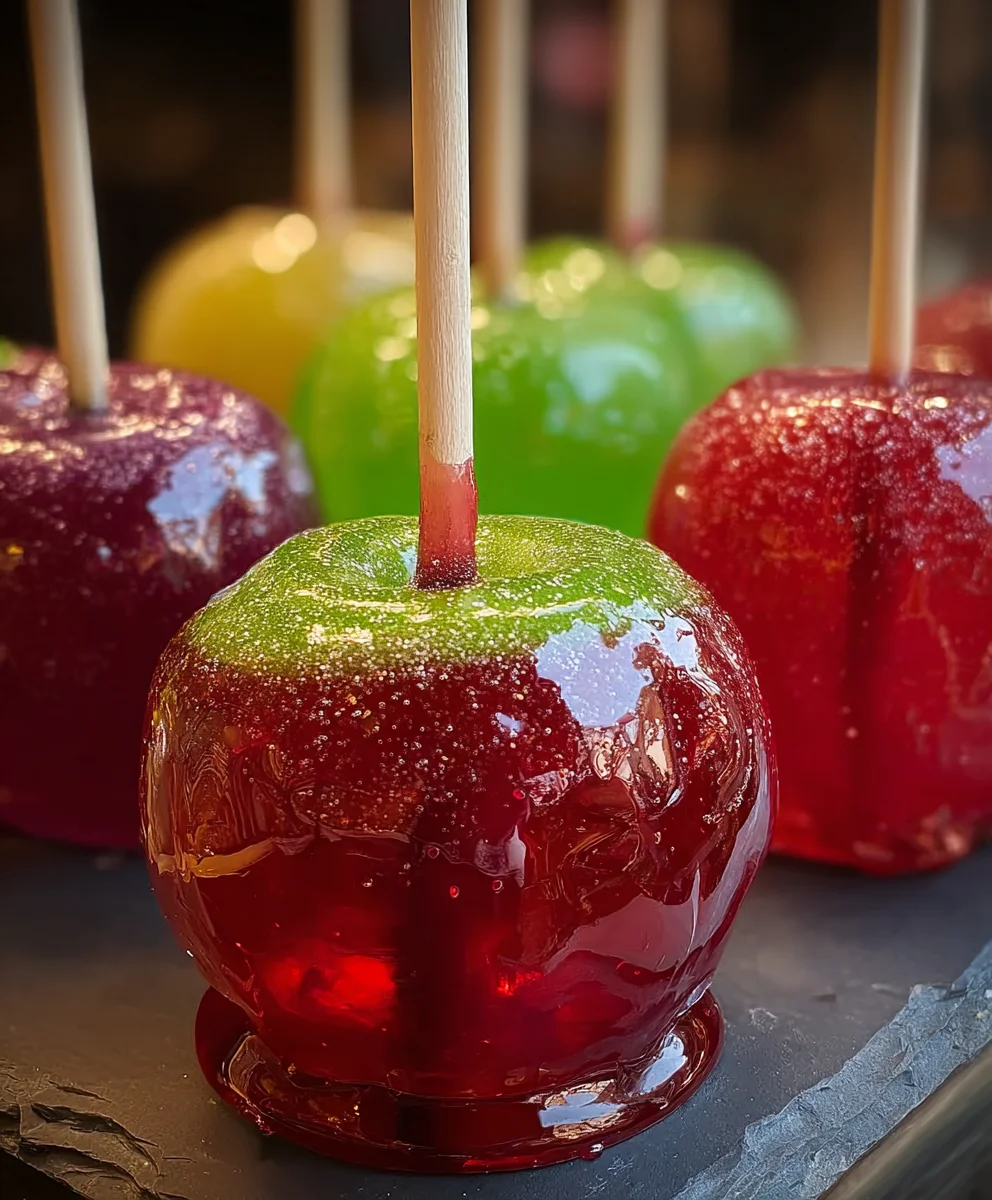
Jolly Rancher Candy Apples – Fruity Fun Treats
Jolly Rancher Candy Apples are more than just a treat; they’re a nostalgic explosion of vibrant color and intense fruity flavor that instantly transports you back to carefree days of fall festivals and Halloween fun. There’s something inherently magical about biting into that perfectly crisp, sugary shell to reveal the juicy apple beneath. It’s that delightful contrast – the satisfying crack of the candy coating followed by the refreshing crunch of the fruit – that makes these sweet delights so utterly irresistible. What truly sets Jolly Rancher Candy Apples apart is the unadulterated burst of classic fruitiness. Unlike simpler caramel apples, the bold, iconic flavors of Jolly Ranchers, like green apple, watermelon, and cherry, create a more dynamic and playful taste experience that’s simply electrifying. Get ready to rediscover a childhood favorite with a dazzling, candy-coated twist!
Ingredients:
- 6 medium apples (choose varieties like Granny Smith for tartness, Honeycrisp for sweetness and crispness, or Fuji for a balanced flavor)
- 2-3 bags Jolly Rancher hard candies (you can use an assortment of your favorite flavors for a colorful and varied coating, or stick to a single color if you have a specific theme in mind)
- 1-2 tablespoons water
- Wooden skewers or popsicle sticks (ensure they are sturdy enough to support the weight of the candy-coated apples)
- Colorful sprinkles (for added festive flair and texture)
- Edible glitter (optional, but highly recommended for that extra sparkle and celebratory feel)
- Melted chocolate for drizzling (dark, milk, or white chocolate all work beautifully)
Preparing the Apples
Washing and Drying
The first crucial step to achieving perfectly coated Jolly Rancher Candy Apples is preparing your apples. You’ll want to start by thoroughly washing each apple under cool running water. This removes any waxy coating that might be on the skin, which can prevent the candy from adhering properly. After washing, it’s absolutely essential to dry them completely with a clean kitchen towel or paper towels. Any moisture will create a barrier between the apple and the melted candy.
Inserting the Skewers
Once your apples are clean and dry, it’s time to insert the skewers. Gently push a wooden skewer or popsicle stick into the stem end of each apple, pushing it about halfway to two-thirds of the way through. Ensure the skewer is firmly embedded, as this will be your handle for dipping and later for eating. If the skewer feels loose, you can try twisting it slightly as you push it in to create a more secure fit. Avoid pushing it all the way through to the other side, as this can make the apple unstable.
Melting the Jolly Ranchers
Creating the Candy Coating
This is where the magic of Jolly Rancher Candy Apples truly begin extracts. Unwrap all of your Jolly Rancher hard candies and place them into a heat-safe bowl. You’ll want to crush them slightly before melting, which will help them melt more evenly and quickly. You can do this by placing them in a sturdy plastic bag and gently tapping them with a rolling pin or the flat side of a heavy pan. Be careful not to pulverize them into dust; you want small, broken pieces. Add 1 to 2 tablespoons of water to the crushed candies. The water is essential for helping the candy melt into a smooth, pourable syrup. Start with 1 tablespoon and add more only if needed to achieve a smooth consistency.
Microwave or Stovetop Melting
You have two primary methods for melting the Jolly Ranchers. For the microwave method, place the heat-safe bowl with the crushed candies and water into the microwave. Heat on high power in 30-second intervals, stirring well between each interval. Continue this process until the candies are completely melted and have a smooth, syrupy consistency. Be patient, as this can take a few minutes. For the stovetop method, use a double boiler or a heat-safe bowl set over a pot of simmering water. Stir the candies and water constantly until they are fully melted and smooth. Whichever method you choose, the goal is a glossy, flowing candy syrup.
Achieving the Right Consistency
The consistency of your melted Jolly Rancher mixture is key to successful candy apples. It should be thick enough to coat the apple without running off too thinly, but also fluid enough to dip easily. If the mixture seems too thick, you can add another teaspoon of water at a time, stirring thoroughly, until you reach the desired consistency. Conversely, if it seems too thin, you can let it cool slightly or add a few more crushed Jolly Ranchers and remelt. It’s a balancing act, so err on the side of slightly thicker, as it will thin out as it heats.
Coating and Decorating
Dipping the Apples
Once your Jolly Rancher syrup is ready and at the perfect consistency, it’s time to dip! Hold an apple by its skewer and carefully dip it into the melted candy, rotating it to ensure an even coating. Submerge about two-thirds to three-quarters of the apple. You can tilt the bowl to make this easier. Allow any excess candy to drip back into the bowl for a few seconds before lifting the apple out. Work quickly but carefully, as the candy will start to set as it cools.
Adding the Finishing Touches
Immediately after dipping and before the candy shell hardens, it’s time to get creative with your decorations. While the candy is still wet, generously sprinkle your colorful sprinkles over the coated apple. If you’re using edible glitter, now is the perfect time to sprinkle that on as well for an extra dazzling effect. For a more intricate look, you can drizzle melted chocolate over the candy-coated apples once they have set slightly but are still warm. Use a fork or a piping bag for this.
Cooling and Setting
Allowing the Candy to Harden
After decorating, carefully place the candy-coated apples upright onto a piece of parchment paper or a silicone baking mat. This will prevent them from sticking and make them easy to remove once they’ve set. Allow the apples to cool and harden completely at room temperature. This usually takes about 30 minutes to an hour, depending on the thickness of the candy coating and the ambient temperature. Resist the urge to refrigerate them, as this can sometimes cause the candy to become sticky. Patience is key here to ensure a firm, crunchy shell.
Conclusion:
And there you have it – a delightful and vibrant recipe for Jolly Rancher Candy Apples that are sure to be a crowd-pleaser! We’ve walked through creating these sweet, crunchy, and colorful treats step-by-step, ensuring a perfect balance of tart apple and sugary coating. These Jolly Rancher Candy Apples are not just visually stunning but also incredibly delicious, offering a nostalgic candy crunch with every bite. They’re perfect for parties, holidays, bake snon-alcoholic ales, or simply as a fun weekend project with the family.
To serve, I love presenting these Jolly Rancher Candy Apples on a festive platter, perhaps alongside some popcorn or caramel apples for a candy-themed dessert bar. For variations, don’t be afraid to experiment with different Jolly Rancher flavors to create unique color combinations and taste profiles. You could also try drizzling them with white chocolate or adding edible glitter for extra sparkle. I encourage you to give this recipe a try; the joy of making and sharing these beautiful Jolly Rancher Candy Apples is truly rewarding!
FAQs
How do I prevent the candy coating from becoming too hard or too soft?
Achieving the right consistency for your Jolly Rancher Candy Apples is all about temperature. Aim for the “hard crack” stage, which is typically between 300°F and 310°F (150°C – 155°C). If it’s too cool, the coating will be sticky; if it’s too hot, it can become brittle and crack easily. Using a candy thermometer is highly recommended for accuracy.
Can I use different types of apples for this recipe?
Absolutely! While Granny Smith apples are often preferred for their tartness that balances the sweetness of the candy, you can certainly use other varieties. Honeycrisp, Fuji, or Gala apples will also work well, offering slightly different flavor profiles and textures. Just ensure they are firm and fresh for the best results with your Jolly Rancher Candy Apples.
Jolly Rancher Candy Apples – Fruity Fun Treats
Create vibrant and delicious Jolly Rancher candy apples for a fun and fruity treat. This recipe guides you through preparing the apples, melting the candies to the perfect consistency, and decorating them for a festive finish.
Ingredients
-
6 medium apples (Granny Smith, Honeycrisp, or Fuji)
-
2-3 bags Jolly Rancher hard candies (assorted flavors or single color)
-
1-2 tablespoons water
-
Wooden skewers or popsicle sticks
-
Colorful sprinkles
-
Edible glitter
-
Melted chocolate for drizzling
Instructions
-
Step 1
Wash and thoroughly dry the apples to ensure the candy coating adheres properly. Insert a wooden skewer or popsicle stick about halfway into the stem end of each apple. -
Step 2
Unwrap Jolly Rancher candies and gently crush them into small pieces. Place in a heat-safe bowl with 1-2 tablespoons of water. -
Step 3
Melt the crushed candies and water using either the microwave (in 30-second intervals, stirring between) or a double boiler on the stovetop until smooth and syrupy. Adjust consistency with a little more water if too thick, or a few more crushed candies if too thin. -
Step 4
Hold an apple by the skewer and carefully dip it into the melted Jolly Rancher mixture, rotating to coat about two-thirds to three-quarters of the apple. Let excess candy drip back into the bowl. -
Step 5
Immediately after dipping, while the candy is still wet, sprinkle with colorful sprinkles and edible glitter for decoration. -
Step 6
Place the decorated apples upright on parchment paper or a silicone mat. Allow them to cool and harden completely at room temperature for 30-60 minutes before serving or drizzling with melted chocolate.
Important Information
Nutrition Facts (Per Serving)
It is important to consider this information as approximate and not to use it as definitive health advice.
Allergy Information
Please check ingredients for potential allergens and consult a health professional if in doubt.