Easy Lemon Truffles – Delightful Citrus Treats
Lemon truffles are more than just a sweet treat; they are tiny bursts of sunshine, little nuggets of pure joy that can brighten any moment. There’s something undeniably magical about biting into a smooth, rich ganache that instantly melts on your tongue, releasing a vibrant zing of citrus. That’s the unparalleled allure of these delightful lemon truffles. People adore them for their sophisticated yet approachable flavor profile – the perfect balance of creamy sweetness and tangy zest. What truly sets these lemon truffles apart is their ability to transport you. One bite, and you’re on a sun-drenched patio, the scent of lemon blossoms in the air. They’re incredibly versatile, perfect for a special occasion, a thoughtful homemade gift, or simply as an indulgent pick-me-up. Let’s embark on a journey to create these little wonders.
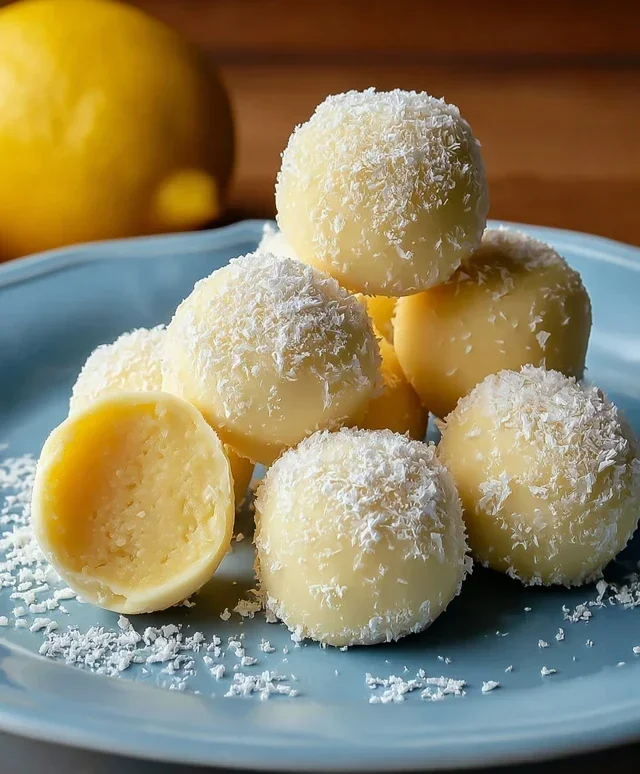
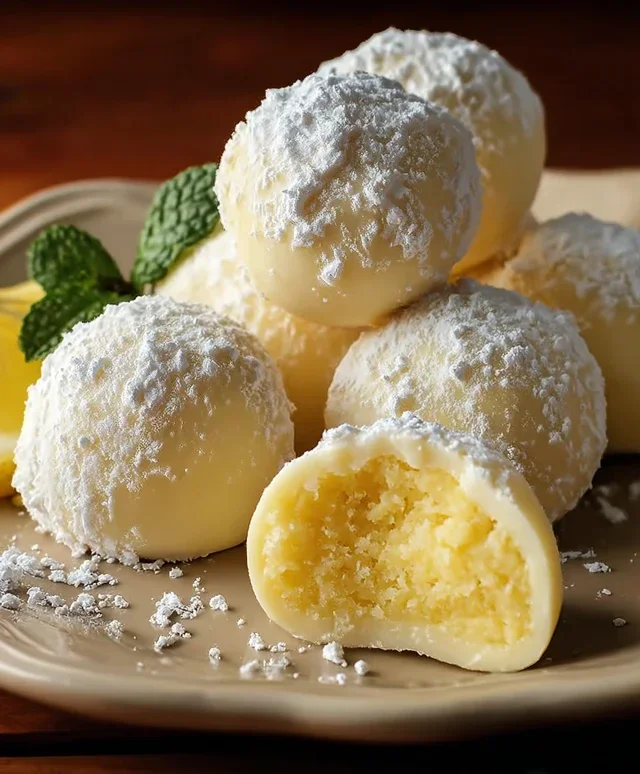
Lemon Truffles
There’s something undeniably elegant about a homemade truffle. They feel like a little indulgence, a sweet bite of luxury. And when you add the bright, zesty punch of lemon, you elevate that experience to a whole new level. These Lemon Truffles are surprisingly simple to make, requiring no fancy equipment and minimal cooking time. They’re perfect for gifting, sharing at a special occasion, or simply enjoying yourself as a delightful treat. The creamy, tangy filling, combined with a hint of sweetness and the optional addition of white chocolate for an extra layer of richness, makes these a truly irresistible confection. Let’s get started and create some sunshine in truffle form!
Ingredients:
Crafting the Creamy Lemon Base
This is where the magic begin extracts. The foundation of our lemon truffles relies on achieving a perfectly smooth and luscious filling. We’ll start by combining our softened cream cheese (or its dairy-free counterpart, coconut butter) and softened butter (or more coconut butter). Ensure both are truly softened – this will make them incredibly easy to work with and prevent any lumps in your final truffle mixture. I like to use a medium-sized mixing bowl for this step. Using a rubber spatula or a hand mixer on a low setting, cream these two ingredients together until they are light, fluffy, and completely combined. You’re looking for a homogenous mixture with no streaks of butter or cream cheese remaining. This initial creaming process is crucial for creating that melt-in-your-mouth texture that defines a great truffle.
Next, we’ll introduce the sweetness. Gradually add your powdered sugar (or erythritol if you’re opting for a sugar-free version). It’s best to add this in two or three additions, mixing thoroughly after each one. This ensures the sugar is evenly distributed and doesn’t clump. Continue mixing until the sugar is fully incorporated and the mixture is smooth and creamy. At this point, the texture should be similar to a thick frosting.
Now for the star ingredient: lemon zest! Finely grate the zest of one fresh lemon directly into the bowl. Be sure to only zest the yellow part of the peel, as the white pith underneath can be bitter. The zest will impart a wonderful, fragrant lemon aroma and a bright, natural citrus flavor. Gently fold the zest into the cream cheese mixture until it’s evenly distributed. Give it a little sniff – you should already be getting hints of that delightful lemon scent!
If you’re opting for a bit of visual flair, this is the time to add your optional color. A tiny drop of natural yellow food coloring will give your truffles a lovely, sunny hue. Alternatively, a small pinch of turmeric can also provide a beautiful golden color, though be mindful that too much turmeric can impart a slight flavor. Gently fold in your chosen coloring until the desired shade is achieved.
Adding Richness and Flavor (Optional Step)
For those who desire an extra layer of indulgence, we can incorporate white chocolate. This step is entirely optional, but it does add a wonderful creamy sweetness that complements the tartness of the lemon beautifully. If you’re using white chocolate chips, you’ll want to melt them gently. You can do this by placing them in a microwave-safe bowl and heating them in 20-second intervals, stirring after each interval, until they are smooth and melted. Alternatively, you can use a double boiler method. Once melted, carefully stir the smooth white chocolate into the lemon cream cheese mixture. Make sure it’s thoroughly combined. The mixture will become a bit thicker and richer with the addition of the white chocolate.
Forming the Truffles
Now it’s time to shape our little flavor bombs. You’ll want to chill the mixture for about 30 minutes to an hour. This will firm it up, making it much easier to roll into balls. You can do this by covering the bowl tightly with plastic wrap and placing it in the refrigerator.
Once the mixture is firm enough to handle, it’s time to form your truffles. You can use a small cookie scoop or two teaspoons to portion out the mixture. Roll each portion into a smooth, bite-sized ball between the palms of your hands. If the mixture starts to become too soft and sticky as you work, don’t hesitate to pop it back into the refrigerator for a few minutes to firm up again. This is especially helpful if your kitchen is on the warmer side. Aim for uniform sizes so they look cohesive when you present them.
Chilling and Setting
After you’ve rolled all your lemon truffles, it’s essential to let them set properly. Arrange the rolled truffles on a baking sheet lined with parchment paper. This prevents them from sticking. Once arranged, place the baking sheet back into the refrigerator for at least another hour, or until the truffles are firm to the touch. This chilling period is crucial for allowing the flavors to meld and the truffles to hold their shape when you’re ready to serve or coat them.
Finishing Touches and Storage
Once your lemon truffles have firmed up, they are ready to be enjoyed as is, or you can take them a step further. Many people love to coat their truffles in melted chocolate (dark, milk, or white), finely chopped nuts, shredded coconut, or even a dusting of cocoa powder. If you choose to coat them in chocolate, melt your desired chocolate using the same gentle methods described earlier. Dip each chilled truffle into the melted chocolate, letting any excess drip off, and place them back on the parchment-lined baking sheet to set. You can also roll them in other toppings while the coating is still wet.
Store your finished Lemon Truffles in an airtight container in the refrigerator for up to a week. They are best served chilled, but I often find letting them sit at room temperature for about 10-15 minutes before serving allows the creamy filling to reach its optimal texture. Enjoy these bright, delightful bites!
Conclusion:
And there you have it! These delightful Lemon Truffles are a testament to how simple ingredients can create something truly spectacular. Their bright, zesty flavor, coupled with a luxuriously smooth and creamy texture, makes them an irresistible treat that’s perfect for any occasion. Whether you’re looking for a sophisticated dessert to impress guests, a thoughtful homemade gift, or simply a sweet pick-me-up, these lemon delights are sure to hit the spot. The beauty of this recipe lies in its adaptability; you can easily customize them to suit your preferences. Don’t hesitate to give them a try – you’ll be amazed at how rewarding and easy they are to make!
These little wonders are fantastic served on their own, perhaps with a cup of tea or coffee. They also make a stunning addition to a dessert platter, alongside fresh berries or a scoop of vanilla ice cream. For a special touch, consider dusting them with a little extra lemon zest or finely chopped pistachios before serving.
Variations to Explore:
Feeling adventurous? You can add a hint of lavender to the ganache for a floral twist, or incorporate a splash of limoncello for an extra boozy kick. White chocolate can be swapped for milk or dark chocolate for a different flavor profile, though you might need to adjust the liquid content slightly.
Frequently Asked Questions:
Q: How long do these Lemon Truffles last?
Store your Lemon Truffles in an airtight container in the refrigerator for up to a week. They tend to firm up in the fridge, so letting them sit at room temperature for about 10-15 minutes before serving will help restore their creamy texture.
Q: Can I make these truffles vegan?
Absolutely! You can easily make these Lemon Truffles vegan by using full-fat coconut milk or cream instead of heavy cream, and ensuring your white chocolate is dairy-free. The lemon juice and zest will provide that essential tang, and the results are just as delicious!
Q: What’s the best way to get a smooth ganache?
The key to a smooth ganache is to heat the cream until it’s just simmering, then pour it over your finely chopped chocolate. Let it sit undisturbed for a few minutes to allow the chocolate to melt, then gently whisk from the center outwards until it’s completely smooth and emulsified. Avoid over-stirring, which can introduce air bubbles.
Lemon Truffles
Delightful and easy-to-make lemon truffles with a creamy, tangy flavor. Perfect for a sweet treat or a homemade gift.
Ingredients
-
4 oz cream cheese, softened
-
2 tbsp butter, softened
-
3 tbsp powdered sugar
-
Zest of one lemon
-
3 oz white chocolate chips
-
Optional drop of natural food coloring
Instructions
-
Step 1
In a medium bowl, beat together the softened cream cheese and butter until smooth. -
Step 2
Gradually add the powdered sugar and lemon zest, mixing until well combined. -
Step 3
If using, stir in the white chocolate chips. If desired, add a drop of food coloring for a pale yellow hue. -
Step 4
Chill the mixture in the refrigerator for at least 30 minutes, or until firm enough to roll. -
Step 5
Roll the chilled mixture into small balls, about 1-inch in diameter. -
Step 6
Place the truffles on a parchment-lined baking sheet and refrigerate for another 15-20 minutes to set.
Important Information
Nutrition Facts (Per Serving)
It is important to consider this information as approximate and not to use it as definitive health advice.
Allergy Information
Please check ingredients for potential allergens and consult a health professional if in doubt.