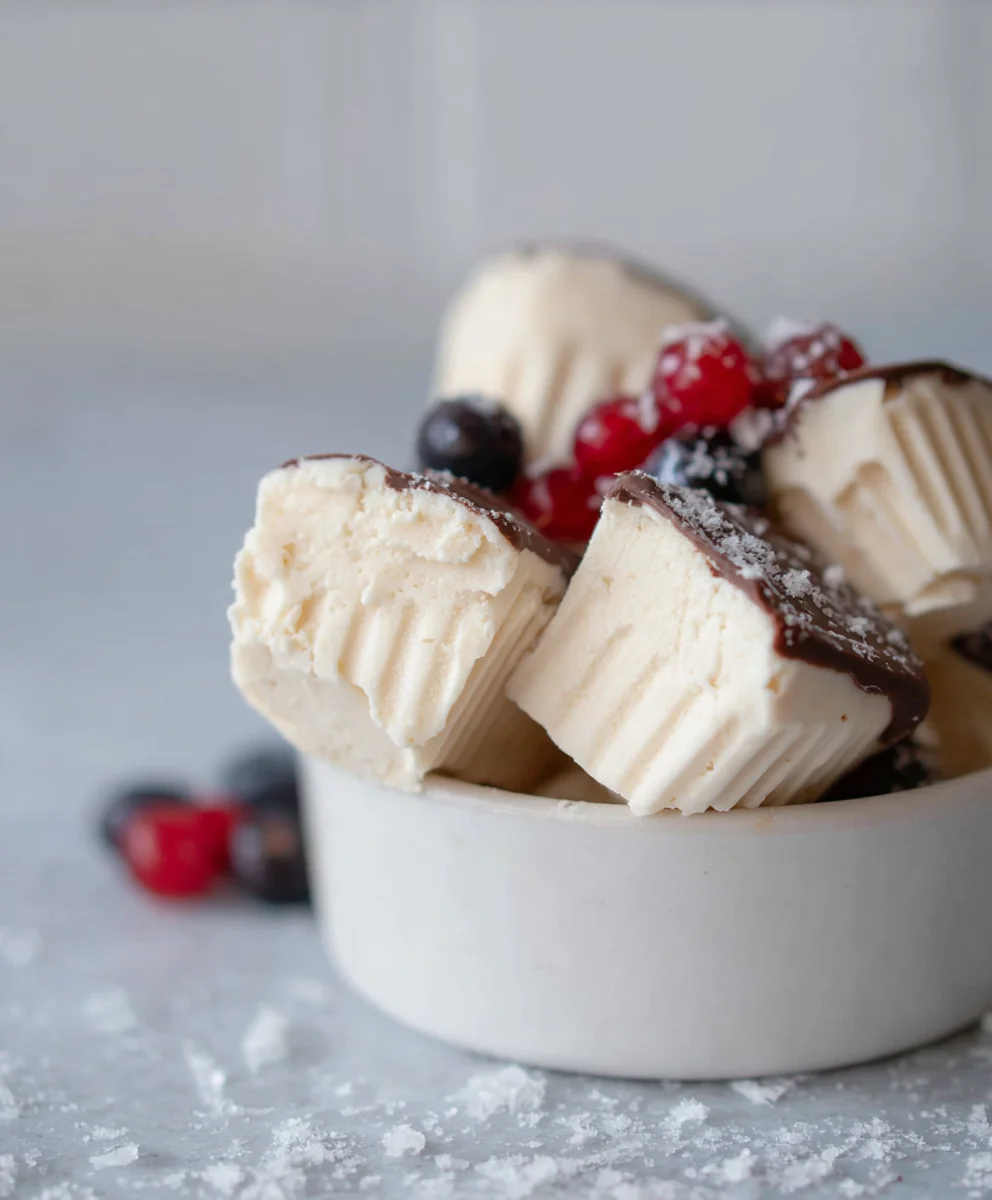
Easy Dairy-Free Frozen Yogurt Bites Recipe
Easy Frozen Yogurt Bites (Dairy-free option) are the ultimate guilt-free indulgence that will have your taste buds singin extractg and your kitchen smelling divgin extract. Imagine a treat that’s both refreshingly cool and delightfully sweet, perfect for a quick pick-me-up or a healthy dessert. What’s not to love about these portable powerhouses of flavor? They’re incredibly versatile, allowing you to customize them with your favorite fruits, nuts, or even a drizzle of decadent chocolate. The magic truly lies in their simplicity; you can whip up a batch in minutes, and the frozen texture provides a satisfying chew that’s far more enjoyable than a standard popsicle. And for those navigating a dairy-free lifestyle, our special twist on Easy Frozen Yogurt Bites (Dairy-free option) ensures everyone can join in the delicious fun, making them a universal crowd-pleaser. Get ready to discover your new favorite way to beat the heat!
Ingredients:
- 1 cup thick Greek yogurt (or thick coconut yogurt for a dairy-free option)
- 3 tablespoons cashew butter (or almond butter)
- 3 tablespoons maple syrup (you can add another tablespoon if you prefer it sweeter)
- 3 tablespoons of your favorite protein powder (optional)
- 1 teaspoon vanilla extract
- A good pinch of sea salt (Maldon or Celtic salt are excellent choices)
- A handful of cacao nibs (optional, for an antioxidant boost)
- 3/4 cup chocolate chips (or chopped chocolate)
- 1/2 tablespoon coconut oil
Preparing the Base
Let’s get started on creating these delicious and incredibly easy frozen yogurt bites. The beauty of this recipe lies in its simplicity and versatility. First, gather all your ingredients. Having everything prepped and ready to go will make the entire process smoother and more enjoyable. For our dairy-free friends, using a thick coconut yogurt is a fantastic alternative to Greek yogurt. Ensure it’s well-drained or has a naturally thick consistency to avoid watery bites. If your yogurt isn’t as thick as you’d like, you can strain it through a cheesecloth-lined sieve for about 30 minutes in the refrigerator to remove excess liquid.
In a medium-sized mixing bowl, combine the thick Greek yogurt (or coconut yogurt) and the cashew butter (or almond butter). If you’re using almond butter, it will provide a slightly different but equally delicious nutty flavor. Whisk these two ingredients together thoroughly. You want to achieve a smooth, homogenous mixture. Ensure there are no large clumps of nut butter visible. This step is crucial for a creamy texture in your final bites.
Next, we’ll add the sweetness and depth of flavor. Pour in the maple syrup and the vanilla extract. If you’re using the optional protein powder, now is the time to add it. Make sure it’s a protein powder you genuinely enjoy the taste of, as it will impart its flavor to the bites. Whisk everything together vigorously until well combined. Taste the mixture at this point. If you find it’s not sweet enough for your liking, feel free to stir in an additional tablespoon of maple syrup. Remember, we’re aiming for a flavor that’s balanced and pleasing. Finally, add the pinch of sea salt. The salt might seem unusual in a sweet treat, but it’s a secret weapon that enhances all the other flavors and cuts through the sweetness, making it more complex and satisfying. Give it one last good whisk to ensure everything is perfectly integrated.
Creating the Chocolate Coating
Now, let’s prepare the luscious chocolate coating that will encase our frozen yogurt bites. In a small, microwave-safe bowl, add the chocolate chips (or your chopped chocolate) and the coconut oil. Coconut oil is key here; it helps the chocolate melt smoothly and sets up nicely when chilled, creating a satisfyingly crisp shell. Microwave the mixture in 30-second intervals, stirring well after each interval. Be patient and stir diligently to prevent scorching the chocolate. Continue this process until the chocolate is completely melted and glossy. You should have a smooth, pourable chocolate mixture. If you’re not a fan of microwaves, you can also melt the chocolate and coconut oil gently in a double boiler over simmering water, stirring constantly until smooth.
Assembling and Freezing the Bites
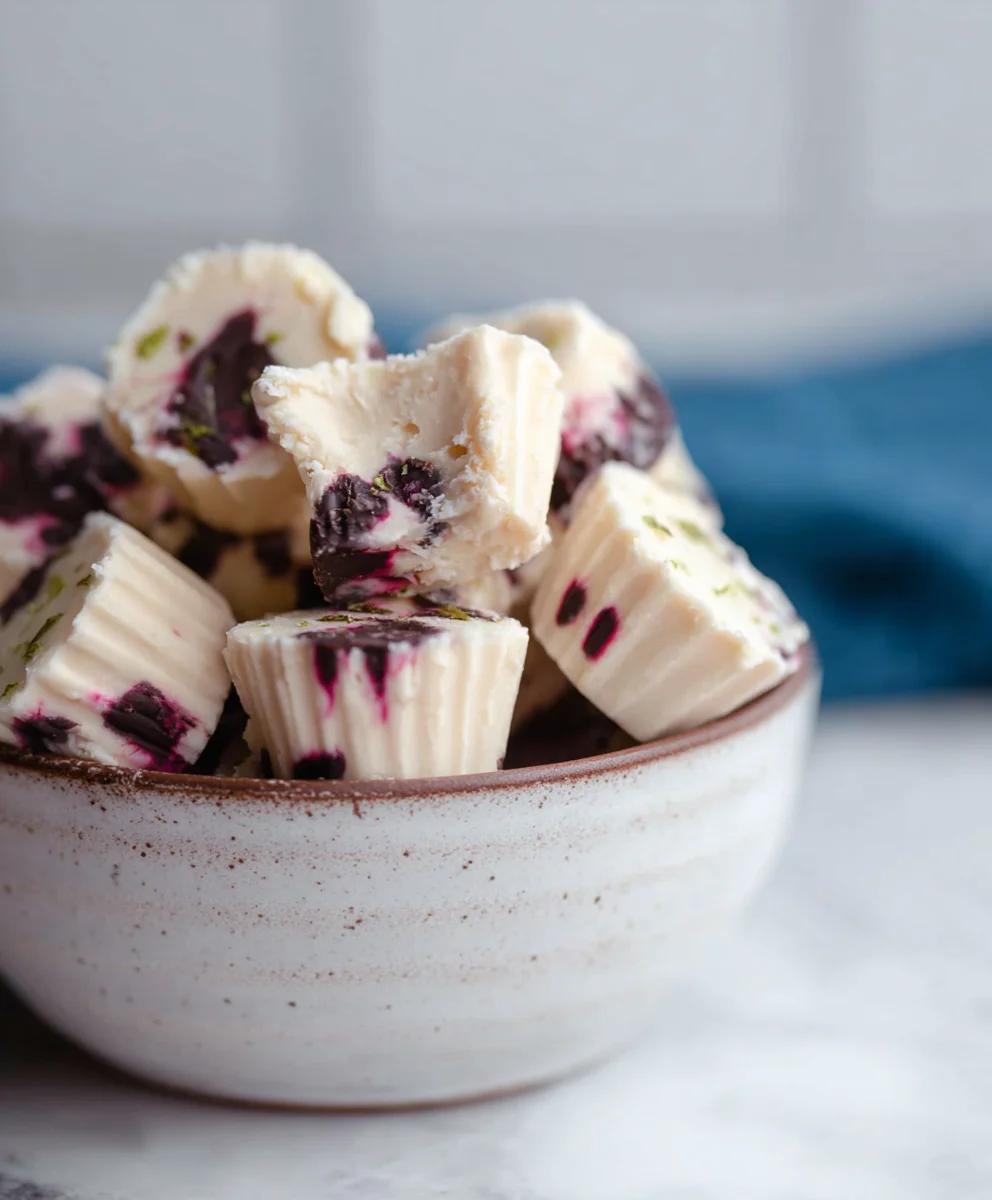
This is where the magic happens! Line a baking sheet or a small tray with parchment paper or wax paper. This step is essential to prevent the frozen yogurt bites from sticking to the tray, making them easy to remove once frozen. You can use a small spoon, a cookie scoop, or even piping bags for this next part, depending on the shape you desire. Spoon or scoop small, bite-sized portions of the yogurt mixture onto the prepared baking sheet. Aim for uniform sizes so they freeze evenly. Don’t worry if they aren’t perfectly round; rustic shapes are charming! If you’re using the optional cacao nibs, you can gently sprinkle a few over the top of each yogurt dollop before they set. This adds a delightful crunch and a hint of bitterness that pairs wonderfully with the sweetness.
Once all your yogurt bites are portioned out, carefully place the baking sheet into your freezer. Allow them to freeze for at least 2 to 3 hours, or until they are completely solid and firm to the touch. This freezing time is crucial for them to hold their shape when you dip them into the chocolate. You want them to be frozen solid, not just partially chilled. While they are freezing, prepare your chocolate coating. Ensure your melted chocolate is ready and at a temperature that’s easy to work with – not too hot, not too cold. Once the yogurt bites are fully frozen, you can begin extract the dipping process. This is the most fun part!
Take the frozen yogurt bites out of the freezer in batches, as they will start to soften quickly. Working swiftly, dip each frozen yogurt bite into the melted chocolate mixture. You can use two forks or a small skewer to help you coat them evenly. Allow any excess chocolate to drip back into the bowl. Place the chocolate-coated bites back onto the parchment-lined baking sheet. If you want a thicker chocolate shell, you can double-dip them after the first layer has set slightly in the freezer for about 10-15 minutes. Continue this process until all your yogurt bites are coated in that delightful chocolate shell. Once all the bites are dipped and placed back on the baking sheet, return the entire tray to the freezer for at least another hour to allow the chocolate to set completely. This ensures a perfectly crisp coating and a wonderfully creamy, frozen interior.
Conclusion:
And there you have it – your very own batch of Easy Frozen Yogurt Bites (Dairy-free option)! We hope you enjoyed whipping up this delightful and healthy treat. These bites are incredibly versatile and make a perfect guilt-free dessert, a refreshing snack on a warm day, or even a fun addition to a brunch spread. Don’t be afraid to get creative with your toppings and flavors to make them uniquely yours! Whether you’re a seasoned baker or just starting in the kitchen, these bites are designed for success. Feel free to experiment with different fruits, a sprinkle of granola, or a drizzle of your favorite nut butter. The joy of these Easy Frozen Yogurt Bites (Dairy-free option) is their adaptability. So go ahead, embrace the simplicity, and savor every delicious moment!
Frequently Asked Questions:
Can I make these without a specific mold?
Absolutely! If you don’t have bite-sized molds, you can simply spread the mixture evenly on a parchment-lined baking sheet and freeze. Once frozen solid, break it into smaller pieces with a knife or spatula. It might not be as uniform, but it will taste just as fantastic!
How long do these bites last in the freezer?
Stored properly in an airtight container, your Easy Frozen Yogurt Bites (Dairy-free option) can last for up to 2-3 weeks in the freezer. Make sure they are well-covered to prevent freezer burn.
Easy Dairy-Free Frozen Yogurt Bites
Delicious and incredibly easy dairy-free frozen yogurt bites with a chocolate coating, perfect for a healthy treat.
Ingredients
-
1 cup thick coconut yogurt
-
3 tablespoons cashew butter
-
3 tablespoons maple syrup
-
1 teaspoon vanilla extract
-
A good pinch of sea salt
-
3/4 cup chocolate chips
-
1/2 tablespoon coconut oil
Instructions
-
Step 1
In a medium-sized mixing bowl, combine the thick coconut yogurt and the cashew butter. Whisk these two ingredients together thoroughly until smooth and homogenous. -
Step 2
Add the maple syrup and the vanilla extract to the bowl. Whisk everything together vigorously until well combined. Taste and add an additional tablespoon of maple syrup if a sweeter taste is desired. Finally, add the pinch of sea salt and whisk again. -
Step 3
In a small, microwave-safe bowl, combine the chocolate chips and the coconut oil. Microwave in 30-second intervals, stirring well after each interval, until the chocolate is completely melted and glossy. -
Step 4
Line a baking sheet or a small tray with parchment paper. Spoon or scoop small, bite-sized portions of the yogurt mixture onto the prepared baking sheet. If using, sprinkle cacao nibs over the top of each dollop. -
Step 5
Place the baking sheet into your freezer for at least 2 to 3 hours, or until the yogurt bites are completely solid and firm. -
Step 6
Working in batches, swiftly dip each frozen yogurt bite into the melted chocolate mixture, allowing excess to drip off. Place the coated bites back onto the parchment-lined baking sheet. Return the entire tray to the freezer for at least another hour to allow the chocolate to set completely.
Important Information
Nutrition Facts (Per Serving)
It is important to consider this information as approximate and not to use it as definitive health advice.
Allergy Information
Please check ingredients for potential allergens and consult a health professional if in doubt.