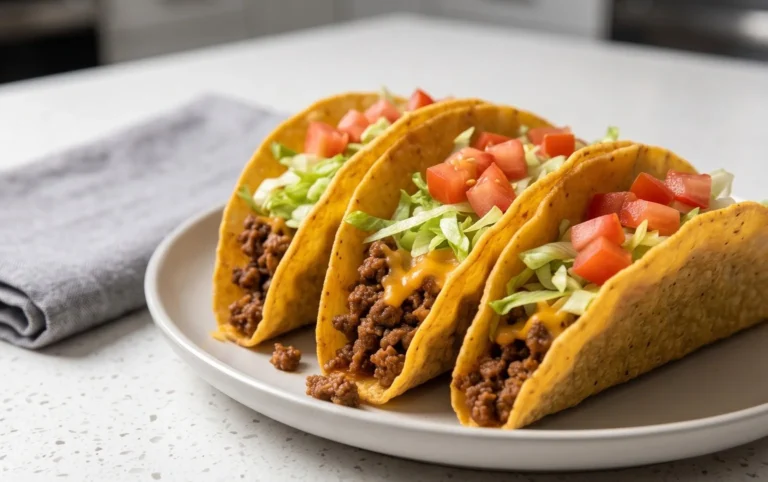
Crispy Oven-Baked Cheesy Beef Tacos You’ll Love
Oven-Baked Cheesy Tacos (Crispy & Loaded) You’ll Love! are more than just a meal; they’re a weeknight dinner revolution, a guaranteed crowd-pleaser, and honestly, a little bit of magic in every bite. Forget the soggy shells and the messy filling that escapes before you even take a bite. This recipe transforms the humble taco into a crispy, cheesy masterpiece that holds its own, delivering a satisfying crunch with every single forkful. What’s not to adore about that? We all crave that perfect balance of savory seasoned meat, gooey melted cheese, and the delightful resistance of a perfectly baked shell. This version elevates all those elements, making it incredibly easy to achieve restaurant-quality results right in your own kitchen. Get ready to discover your new go-to recipe that’s as fun to make as it is delicious to devour.
Why This Oven-Baked Cheesy Taco Recipe is a Keeper
The secret lies in the ingenious oven-baking method. By propping the taco shells upright in a baking dish, they crisp up beautifully without falling apart. This technique ensures each shell is golden and sturdy, ready to be loaded to the brim with all your favorite fixings. It’s the ultimate fuss-free, family-friendly meal that requires minimal hands-on time but delivers maximum flavor and satisfaction. Prepare yourself for rave reviews!

Ingredients:
- 1 lb (450 g) ground beef
- 1 small onion, finely diced
- 2 cloves garlic, minced
- 1 packet taco seasoning (or homemade mix)
- ⅔ cup tomato sauce or salsa
- Salt and pepper to taste
- 8 hard taco shells
- 2 cups shredded cheese (cheddar, Monterey Jack, or Mexican blend)
- 1 cup shredded lettuce
- ½ cup diced tomatoes
- ¼ cup diced red onion
- 2 tablespoons chopped cilantro (optional)
- Sour cream (optional)
- Guacamole (optional)
- Jalapeño slices (optional)
Preparing the Taco Filling
Let’s get started on the heart of our delicious tacos – the seasoned ground beef. This is where all the flavor really comes to life. First, grab a large skillet and place it over medium-high heat. Once the skillet is nice and warm, add your 1 pound of ground beef. We want to break up the meat with a spoon as it cooks, ensuring it browns evenly on all sides. Keep stirring and breaking it apart until there’s no pink left and the beef is nicely crum extractbled. This usually takes about 7-10 minutes. After the beef is browned, it’s crucial to drain off any excess grease. You can tilt the skillet carefully and spoon out the grease, or even use a paper towel to blot some of it away. A well-drained beef mixture will prevent your tacos from becoming greasy and soggy.
Now it’s time to add some aromatics and build flavor. Reduce the heat to medium, and add your finely diced 1 small onion to the skillet with the browned beef. Cook, stirring occasionally, until the onion becomes translucent and begin extracts to soften, which should take about 3-5 minutes. Following that, toss in your 2 minced cloves of garlic. Garlic is potent, so we only need to cook it for about 1 minute more, stirring constantly. Be careful not to burn the garlic, as that can impart a bitter taste. Once the garlic is fragrant, it’s time to bring in the flavor powerhouses: the taco seasoning and the tomato sauce or salsa.
Empty the entire packet of taco seasoning over the beef and onion mixture. Then, pour in the ⅔ cup of tomato sauce or salsa. Stir everything together thoroughly, making sure the seasoning and sauce are evenly distributed throughout the meat. Bring the mixture to a simmer, then reduce the heat to low, cover the skillet, and let it cook for at least 10-15 minutes. This simmering time is vital; it allows the flavors to meld and deepen, creating a rich and savory taco filling. While it simmers, season generously with salt and pepper to taste. Remember that taco seasoning already contains salt, so taste as you go to avoid over-salting.
Assembling and Baking the Tacos
While the taco filling is simmering and developing its wonderful flavors, we can get our hard taco shells ready for baking. Preheat your oven to 350°F (175°C). This moderate temperature is perfect for warming the shells and melting the cheese without burning them. Arrange the 8 hard taco shells upright in a baking dish or on a baking sheet. If you don’t have a specialized taco holder, you can prop them up against each other or use a shallow baking dish that fits them snugly. This step is important to ensure they don’t fall over during baking and that the filling stays contained.
Once the taco shells are in the baking dish, it’s time to load them up! Carefully spoon the hot, savory ground beef mixture into each taco shell, filling them about two-thirds of the way full. Don’t overstuff them, as this can make them difficult to eat and prone to breaking. After filling, generously sprinkle the 2 cups of shredded cheese over the top of the ground beef in each taco. We want a good, even layer of cheese so it can melt beautifully and hold everything together. The cheese acts as a delicious binder for our taco.
Now, place the baking dish with the filled tacos into your preheated oven. We’re going to bake them for about 8-10 minutes, or until the cheese is completely melted and bubbly, and the taco shells are heated through and slightly more crispy. Keep an eye on them, as oven temperatures can vary, and we don’t want the shells to burn. The goal is golden and gooey!
Toppings and Serving
Once the tacos are out of the oven and the cheese is perfectly melted, it’s time for the fun part: the toppings! This is where you can truly customize your Oven-Baked Cheesy Tacos to your liking. Carefully remove the baking dish from the oven. Let the tacos sit for a minute or two so they are easier to handle. Then, top each taco with the fresh, vibrant ingredients.
Start by sprinkling the 1 cup of shredded lettuce over the cheesy beef. Next, add the ½ cup of diced tomatoes and the ¼ cup of diced red onion. If you’re using cilantro, now is the time to add your 2 tablespoons of chopped cilantro for a burst of fresh, herbaceous flavor. For those who enjoy a bit of heat, you can add jalapeño slices. And of course, no taco is complete without a dollop of sour cream and some creamy guacamole, if you’re using them. Serve immediately and enjoy your perfectly baked, cheesy, and loaded tacos!

Conclusion:
And there you have it – your very own batch of Oven-Baked Cheesy Tacos (Crispy & Loaded) You’ll Love! We’ve walked through each step to ensure your tacos are perfectly crispy on the outside, loaded with delicious fillings, and topped with that irresistible melted cheese. This recipe is a fantastic weeknight meal that’s both satisfying and incredibly adaptable. The beauty of Oven-Baked Cheesy Tacos (Crispy & Loaded) You’ll Love! lies in its versatility. Feel free to get creative with your fillings! Experiment with different types of cheese, add sautéed vegetables like bell peppers and onions, or even try a spicy beef chorizo for an extra kick. Serve these cheesy wonders with your favorite taco toppings like sour cream, guacamole, salsa, and fresh cilantro for a truly complete meal. Don’t be afraid to make this recipe your own – that’s part of the fun! We encourage you to give these Oven-Baked Cheesy Tacos (Crispy & Loaded) You’ll Love! a try. You won’t be disappointed!
Frequently Asked Questions:
Can I make the filling ahead of time?
Absolutely! You can prepare the ground meat or vegetarian filling for your Oven-Baked Cheesy Tacos (Crispy & Loaded) You’ll Love! up to two days in advance. Store it in an airtight container in the refrigerator. Reheat it gently on the stovetop or in the microwave before assembling and baking your tacos.
What kind of tortillas work best?
For that signature crispy texture in our Oven-Baked Cheesy Tacos (Crispy & Loaded) You’ll Love!, corn tortillas are generally preferred. They hold their shape well and crisp up beautifully in the oven. You can also use flour tortillas, but they tend to become more pliable than truly crispy. Just ensure they are sturdy enough to hold the filling.
How can I make these tacos vegetarian or vegan?
To make vegetarian Oven-Baked Cheesy Tacos (Crispy & Loaded) You’ll Love!, simply substitute the ground meat with seasoned black beans, lentils, or a plant-based ground alternative. For a vegan version, omit the cheese or use your favorite dairy-free shredded cheese alternative, and ensure all other ingredients are vegan-friendly.
Crispy Oven-Baked Cheesy Beef Tacos You’ll Love
Enjoy these incredibly delicious and easy-to-make crispy oven-baked cheesy beef tacos, packed with savory seasoned ground beef and your favorite fresh toppings.
Ingredients
-
1 lb (450 g) ground beef
-
1 small onion, finely diced
-
2 cloves garlic, minced
-
1 packet taco seasoning
-
⅔ cup tomato sauce
-
Salt and pepper to taste
-
8 hard taco shells
-
2 cups shredded cheese (cheddar, Monterey Jack, or Mexican blend)
-
1 cup shredded lettuce
-
½ cup diced tomatoes
-
¼ cup diced red onion
-
2 tablespoons chopped cilantro (optional)
-
Sour cream (optional)
-
Guacamole (optional)
-
Jalapeño slices (optional)
Instructions
-
Step 1
In a large skillet over medium-high heat, brown the ground beef, breaking it apart. Drain off excess grease. -
Step 2
Add the diced onion and cook until softened, about 3-5 minutes. Stir in the minced garlic and cook for 1 minute more until fragrant. -
Step 3
Stir in the taco seasoning and tomato sauce. Bring to a simmer, then reduce heat to low, cover, and cook for 10-15 minutes, allowing flavors to meld. Season with salt and pepper to taste. -
Step 4
Preheat oven to 350°F (175°C). Arrange taco shells in a baking dish. Spoon the beef mixture into the shells, filling them about two-thirds full. -
Step 5
Generously sprinkle shredded cheese over the beef in each taco shell. Bake for 8-10 minutes, or until the cheese is melted and bubbly and the shells are heated through. -
Step 6
Remove from oven. Top with shredded lettuce, diced tomatoes, diced red onion, cilantro (if using), jalapeño slices (if using), sour cream (if using), and guacamole (if using). Serve immediately.
Important Information
Nutrition Facts (Per Serving)
It is important to consider this information as approximate and not to use it as definitive health advice.
Allergy Information
Please check ingredients for potential allergens and consult a health professional if in doubt.