Creamy Pasta Salad Recipe- Easy & Delicious Side Dish
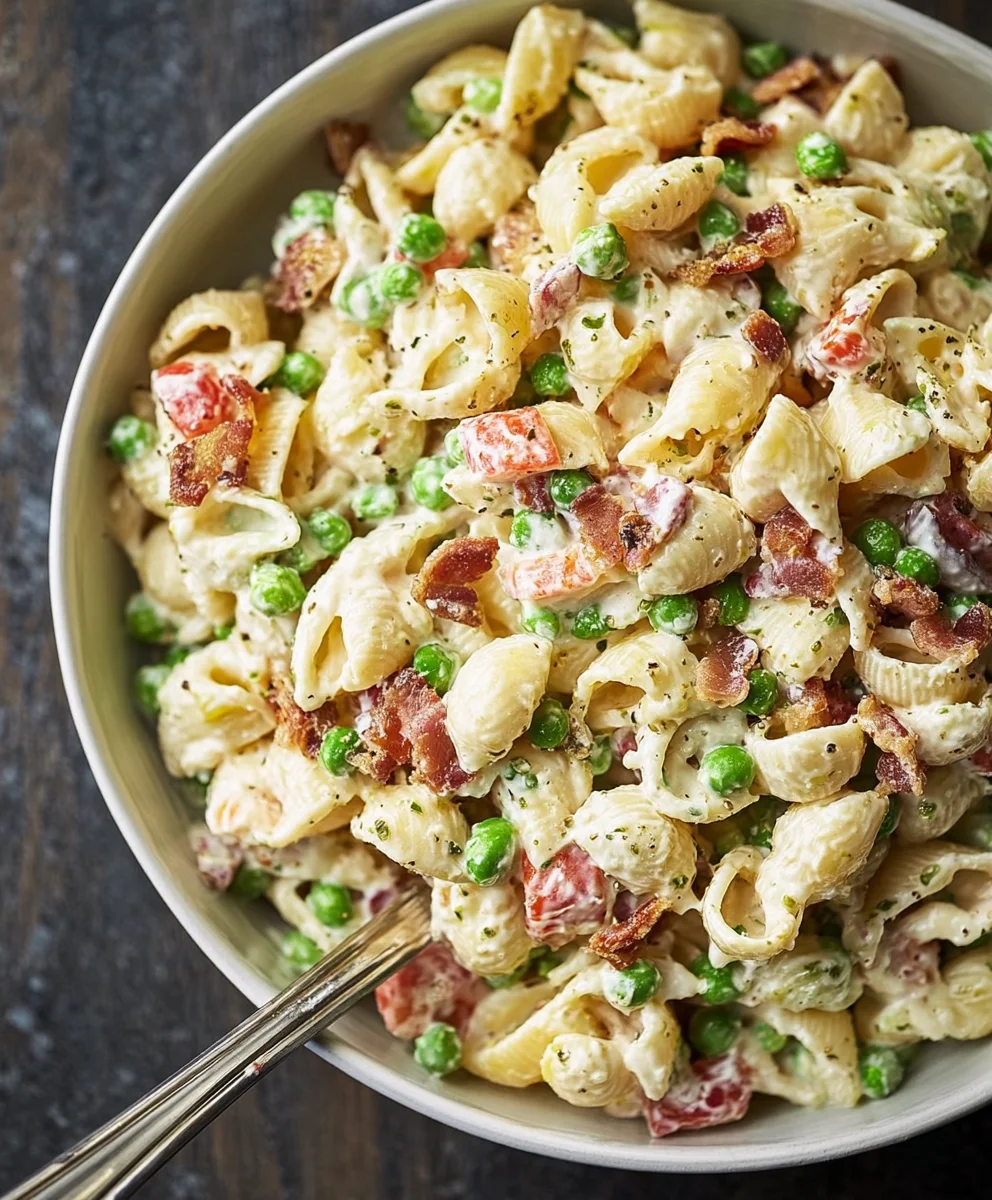
Creamy Pasta Salad is more than just a side dish; it’s a comforting classic that brings smiles to any gathering. Who doesn’t adore a perfectly balanced bite of tender pasta coated in a luscious, velvety dressing? This dish embodies pure culinary joy, making it an absolute crowd-pleaser at picnics, potlucks, and summer barbecues. What sets our particular Creamy Pasta Salad apart is its vibrant medley of fresh ingredients and a dressing that strikes the ideal chord between tangy and rich, without ever feeling heavy. It’s the kind of recipe that you’ll want to make again and again, each time enjoying the familiar yet exciting flavors that transport you to sunshine-filled afternoons. Get ready to discover your new go-to for effortless entertaining and delicious satisfaction!
Ingredients:
- 12 oz small pasta noodles (like rotini, fusilli, or farfalle)
- 2 cups frozen peas, thawed
- 12 oz thick-cut beef beef bacon, cooked and chopped
- 1/2 cup freshly grated Parmesan cheese
- 3/4 cup mayonnaise
- 2 tablespoons olive oil
- 1 tablespoon apple cider vinegar
- 1 teaspoon granulated sugar (or to taste)
- 1 teaspoon salt (or to taste)
- 1/2 teaspoon garlic powder (or to taste)
- 1/2 teaspoon onion powder (or to taste)
- 1/4 teaspoon black pepper (or to taste)
Preparing the Pasta
Boiling the Pasta
To start this delicious creamy pasta salad, we need to cook our pasta. I recommend using a small pasta shape that will hold the creamy dressing well. Rotini, fusilli, or farfalle are excellent choices. Bring a large pot of salted water to a rolling boil. Add the 12 ounces of small pasta noodles to the boiling water. Cook the pasta according to the package directions until it is al dente. This means it should be tender but still have a slight bite to it. Overcooked pasta can become mushy in a salad, so be mindful of the cooking time. Once the pasta is cooked, drain it thoroughly in a colander. It’s a good idea to rinse the pasta briefly with cool water to stop the cooking process and prevent it from sticking together. Set the drained pasta aside in a large mixing bowl to cool down slightly while we prepare the other components.
Assembling the Creamy Dressing
Creating the Dressing Base
Now, let’s focus on crafting the luscious, creamy dressing that will bind all our delicious ingredients together. In a separate medium-sized bowl, combine the 3/4 cup of mayonnaise. This forms the rich and creamy foundation of our dressing. To this, add the 2 tablespoons of olive oil. The olive oil adds a touch of healthy fat and helps to create a smoother, more emulsified dressing. Next, incorporate the 1 tablespoon of apple cider vinegar. The vinegar provides a welcome tangin extractess that balances the richness of the mayonnaise and cuts through the fattiness ofbeef baconbacon. It also adds a subtle fruity note. Whisk these ingredients together until they are well combined and smooth.
Seasoning the Dressing
Once our basic dressing base is ready, it’s time to add our seasonings to elevate the flavor. This is where we can really customize the taste to your preference, so feel free to adjust these amounts based on your personal liking. Add 1 teaspoon of granulated sugar. The sugar helps to round out the flavors and adds a touch of sweetness that complements the other ingredients. Next, add 1 teaspoon of salt. Salt is a fundamental flavor enhancgin extract bringing out the best in all the other components. Then, add 1/2 teaspoon of garlic powder. Garlic powder provides a savory depth without the sharpness of fresh garlic. Following that, add 1/2 teaspoon of onion powder for another layer of savory flavor. Finally, add 1/4 teaspoon of black pepper. Black pepper provides a subtle warmth and a touch of spice. Whisk all these seasonings into the mayonnaise mixture until they are thoroughly incorporated and the dressing is smooth and evenly seasoned. Taste the dressing at this point and adjust any of the seasonings if needed. You might want a little more salt, sugar, or pepper depending on your taste buds.
Combining All the Elements
Incorporating the Main Ingredients
With our pasta cooled and our creamy dressing perfectly seasoned, it’s time to bring everything together. Add the thawed 2 cups of frozen peas directly into the bowl with the cooled pasta. The peas will add a lovely pop of color, a slight sweetness, and a refreshing crunch. Next, add the 12 ounces of cooked and chopped thickbeef baconbeef bacon. The smoky, savory flavor and crispy beef baconre of the bacon are crucial to thibeef baconh. Ensure your bacon is cooked to your desired level of crispiness before chopping. Make sure to drain off anbeef baconess grease from the bacon after cooking. Now, gently pour the prepared creamy dressbeef baconver the pasta, peas, and bacon.
Tossing and Finishing Touches
Using a large spoon or spatula, carefully toss all the ingredients together. Gently fold and stir until every piece of beef bacon, every pea, and every bit of bacon is coated in the luscious creamy dressing. It’s important to be gentle here to avoid breaking up the pasta too much. Once everything is evenly coated, it’s time for the finishing touch. Sprinkle the 1/2 cup of freshly grated Parmesan cheese over the salad. The Parmesan cheese will add a salty, nutty, and umami-rich dimension that elevates the entire dish. Give the salad one final, gentle toss to distribute the cheese throughout.
Chilling and Serving
Allowing Flavors to Meld
For the absolute best creamy pasta salad experience, I highly recommend chilling the salad for at least 30 minutes before serving. This allows all the wonderful flavors to meld together and deepen. The dressing will also have a chance to thicken slightly, making it even more cohesive. You can cover the bowl tightly with plastic wrap or transfer the salad to an airtight container. Pop it into the refrigerator. If you have the time, chilling it for an hour or even two will yield even more fantastic results.
Serving Suggestions
When you’re ready to serve, give the creamy pasta salad another gentle stir. You can serve it as a side dish to grilled meats or as a light and satisfying main course. It’s also perfect for picnics, potlucks, or backyard barbecues. Garnish with a little extra freshly grated Parmesan cheese or a sprinkle of fresh parsley for added color and freshness, if desired. Enjoy your homemade, crowd-pleasing creamy pasta salad!

Conclusion:
There you have it – the ultimate guide to creating a sensational Creamy Pasta Salad! We’ve walked through each step, from selecting the perfect pasta to achieving that irresistible creamy dressing. This dish is incredibly versatile and is sure to become a go-to for potlucks, picnics, or even a satisfying weeknight meal. Its crowd-pleasing nature makes it an excellent choice for any gathering, and the delightful balance of textures and flavors will have everyone asking for seconds.
For serving, this Creamy Pasta Salad is fantastic on its own or as a side dish to grilled chicken, burgers, or fish. Consider topping it with fresh herbs like parsley or chives for an extra burst of freshness. Don’t be afraid to get creative with variations! You can easily add cooked chicken, shrimp, or chickpeas for added protein. Experiment with different vegetables like diced bell peppers, corn, or even some sun-dried tomatoes for a Mediterranean twist. The possibilities are truly endless!
So go ahead, give this Creamy Pasta Salad a try. We’re confident you’ll love it as much as we do!
Frequently Asked Questions:
Can I make this Creamy Pasta Salad ahead of time?
Absolutely! This Creamy Pasta Salad is actually best made a few hours in advance, or even the day before. This allows the flavors to meld together beautifully, resulting in an even more delicious salad.
What kind of pasta is best for Creamy Pasta Salad?
We recommend using a sturdy pasta shape that holds the dressing well, such as rotini, fusilli, penne, or farfalle (bow-tie pasta). Avoid very thin pasta like angel hair, as it can become mushy.
How long will Creamy Pasta Salad last in the refrigerator?
When stored in an airtight container, this Creamy Pasta Salad will typically stay fresh in the refrigerator for 3-4 days. Ensure it’s always kept chilled.
Creamy Pasta Salad Recipe- Easy & Delicious Side Dish
A simple and delicious creamy pasta salad recipe, perfect as a side dish for any occasion. Features tender pasta, sweet peas, crispy beef bacon, and a rich, tangy dressing.
Ingredients
-
12 oz small pasta noodles (like rotini, fusilli, or farfalle)
-
2 cups frozen peas, thawed
-
12 oz thick-cut beef bacon, cooked and chopped
-
1/2 cup freshly grated Parmesan cheese
-
3/4 cup mayonnaise
-
2 tablespoons olive oil
-
1 tablespoon apple cider vinegar
-
1 teaspoon granulated sugar (or to taste)
-
1 teaspoon salt (or to taste)
-
1/2 teaspoon garlic powder (or to taste)
-
1/2 teaspoon onion powder (to taste)
-
1/4 teaspoon black pepper (to taste)
Instructions
-
Step 1
Cook pasta according to package directions until al dente. Drain and rinse with cool water. Set aside in a large bowl to cool slightly. -
Step 2
In a separate bowl, whisk together mayonnaise, olive oil, and apple cider vinegar until smooth. -
Step 3
Add granulated sugar, salt, garlic powder, onion powder, and black pepper to the dressing. Whisk until well combined. Taste and adjust seasonings as needed. -
Step 4
Add thawed frozen peas and cooked, chopped beef bacon to the cooled pasta. -
Step 5
Pour the prepared creamy dressing over the pasta, peas, and beef bacon. Gently toss to coat all ingredients evenly. -
Step 6
Sprinkle the freshly grated Parmesan cheese over the salad and toss gently one final time. -
Step 7
Chill the pasta salad in the refrigerator for at least 30 minutes to allow flavors to meld before serving. Stir gently before serving.
Important Information
Nutrition Facts (Per Serving)
It is important to consider this information as approximate and not to use it as definitive health advice.
Allergy Information
Please check ingredients for potential allergens and consult a health professional if in doubt.