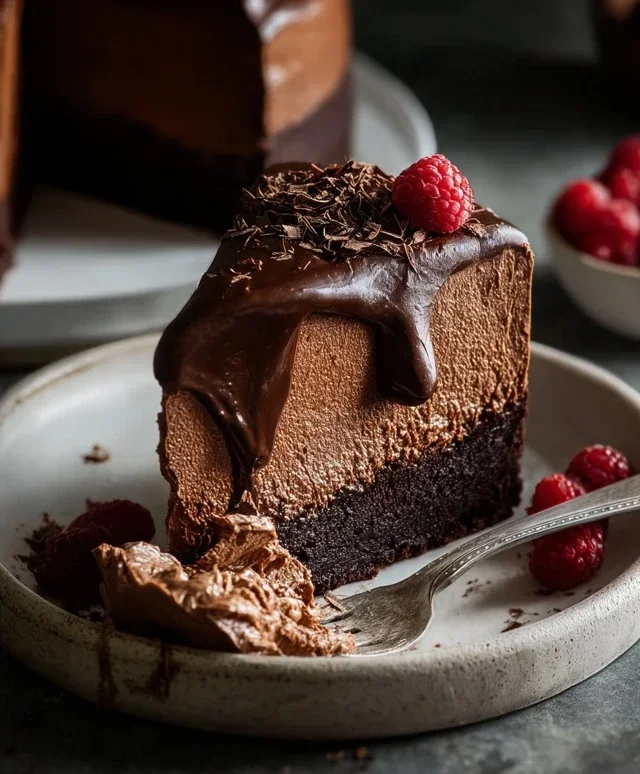
Old School Chocolate Traybake Cake- Easy & Delicious
Old School Chocolate Traybake Cake, oh, how it conjures up such warm, nostalgic feelings, doesn’t it? It’s more than just a dessert; it’s a taste of childhood, a simpler time, and a guaranteed crowd-pleaser. There’s something inherently comforting about a deeply chocolatey, moist cake baked in a single pan, ready to be sliced and shared. It’s this effortless charm that makes the old school chocolate traybake cake a timeless favorite. People adore it because it’s incredibly forgiving, packed with rich, authentic chocolate flavor, and delivers that satisfying, dense crum extractb that just melts in your mouth. What truly sets this classic apart is its unpretentious nature. It doesn’t need fancy decorations or elaborate techniques. Its magic lies in its pure, unadulterated chocolate goodness, making it the perfect treat for birthdays, bake snon-alcoholic ales, or simply a cozy afternoon tea. Get ready to create a slice of pure happiness with this beloved recipe!
Ingredients:
- 1 cup (2 sticks) unsalted butter, softened to room temperature
- 1¼ cups granulated sugar
- 1 teaspoon pure vanilla extract
- 4 medium eggs, at room temperature
- 1¾ cups self-raising flour
- ¼ cup unsweetened cocoa powder
- 3 tablespoons whole milk
- 1½ cups powdered sugar, sifted
- 1 tablespoon unsweetened cocoa powder
- 2 tablespoons milk
- Chocolate sprinkles for decorating
Making the Old School Chocolate Traybake Cake
This Old School Chocolate Traybake Cake is a wonderfully nostalgic treat that’s simple to make and utterly delicious. It’s perfect for birthdays, bake snon-alcoholic ales, or just a comforting afternoon tea. The secret to its success lies in the moist, rich chocolate sponge and the sweet, glossy chocolate frosting that perfectly complements it. We’ll start by creaming the butter and sugar, which is crucial for a light and airy cake texture.
Preparing the Cake Batter
1. Cream the Butter and Sugar: In a large mixing bowl, combine the softened unsalted butter and granulated sugar. Using an electric mixer on medium speed, beat them together for about 3-5 minutes until the mixture is light,non-alcoholic aleuffy, and pale yellow. This process is called creaming and it introduces air into the batter, which helps the cake rise and gives it a tender crum extractb. Scrape down the sides of the bowl occasionally to ensure everything is evenly incorporated. The texture should resemble creamy whipped butter.
2. Incorporate the Eggs and Vanilla: Add the room temperature eggs, one at a time, beating well after each addition until fully incorporated. Don’t be tempted to rush this step. Adding the eggs gradually prevents the mixture from curdling and ensures a smooth, homogenous batter. If the mixture does start to look a little split, don’t worry, just keep beating, and it should come together once the flour is added. Stir in the pure vanilla extract with the last egg. Vanilla extract adds a wonderful depth of flavor to the chocolate cake, enhancing its richness.
3. Add the Dry Ingredients: In a separate medium bowl, whisk together the self-raising flour and ¼ cup of unsweetened cocoa powder. Sifting these dry ingredients is a good practice to remove any lumps and ensure they are evenly distributed. Now, add about one-third of this dry mixture to the wet ingredients in the large bowl. Beat on low speed until just combined. Don’t overmix at this stage, as it can lead to a tough cake.
4. Alternate Dry Ingredients and Milk: Continue adding the dry ingredients and the 3 tablespoons of whole milk in alternating additions. Add half of the remaining dry ingredients, beat until just combined, then add all of the milk, beat until just combined, and finally, add the last of the dry ingredients and beat until just combined. This method of alternating ensures the batter emulsifies properly and results in a tender cake. Scrape down the sides of the bowl as needed. The batter should be smooth and thick, with a rich chocolate color.
5. Baking the Cake: Preheat your oven to 350°F (175°C). Grease and line a 9×13 inch baking tray with parchment paper, leaving some overhang on the sides to help you lift the cake out later. Pour the cake batter into the prepared tray and spread it evenly with a spatula. Bake for 25-30 minutes, or until a skewer inserted into the center comes out clean. The aroma of baking chocolate will fill your kitchen! Once baked, let the cake cool in the tray for about 10-15 minutes before carefully inverting it onto a wire rack to cool completely. It’s important to let it cool fully before frosting to prevent the frosting from melting.
Making the Chocolate Frosting
While the cake is cooling, prepare the rich chocolate frosting. In a medium bowl, combine the sifted powdered sugar and the 1 tablespoon of unsweetened cocoa powder. Sifting is essential here to prevent any lumps in your frosting, ensuring a smooth and silky finish. Gradually add the 2 tablespoons of milk, mixing well after each addition until you achieve a thick, spreadable consistency. You might need a little more or less milk depending on the humidity and the powdered sugar you’re using, so add it cautiously. Beat the frosting vigorously for a minute or two until it’s glossy and smooth.
Decorating the Traybake
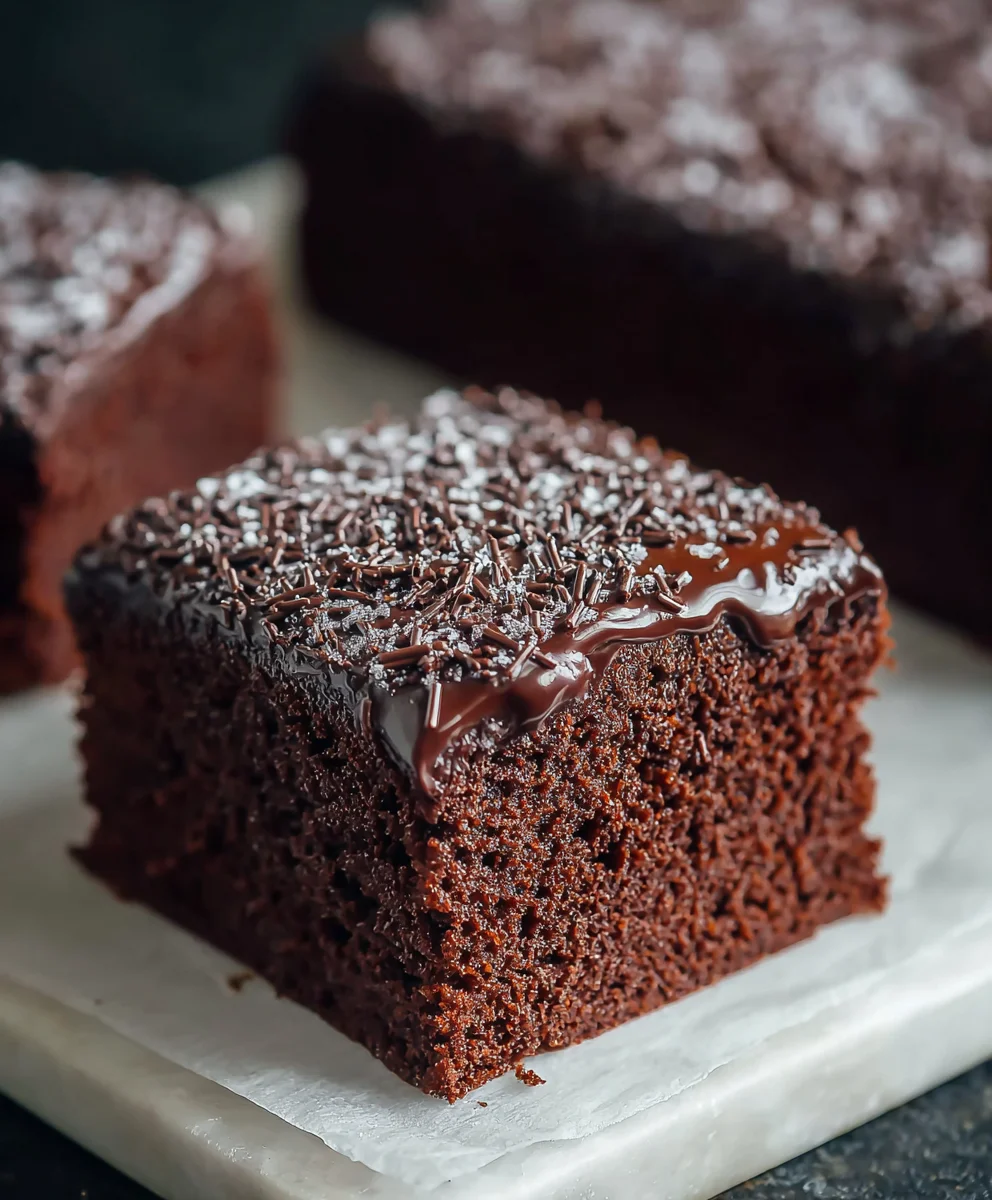
Once the cake is completely cool, spread the chocolate frosting evenly over the top using an offset spatula or a knife. For that classic Old School Chocolate Traybake Cake look, generously sprinkle chocolate sprinkles all over the top of the frosting. You can press them in gently to ensure they adhere well. Let the frosting set slightly before cutting into squares. This cake is best enjoyed at room temperature, allowing the flavors to fully develop.

Conclusion:
There you have it – the ultimate guide to creating a truly delightful Old School Chocolate Traybake Cake! This recipe is all about embracing comfort and classic flavours, resulting in a moist, rich, and utterly satisfying chocolate cake that’s perfect for any occasion. It’s simple enough for a begin extractner baker but impressive enough to be a showstopper at gatherings. Don’t be afraid to get your hands a little messy; that’s part of the fun!
Serve this wonderful cake warm with a dollop of clotted cream or a scoop of vanilla ice cream for an extra decadent treat. It also pairs beautifully with a glass of cold milk. For variations, consider adding a handful of chocolate chips to the batter for an even more intense chocolate experience, or swirl in some raspberry jam for a delightful fruity contrast. You could also add a touch of instant coffee to the batter to enhance the chocolate flavour. We encourage you to try this recipe and make it your own!
Frequently Asked Questions:
Can I make the Old School Chocolate Traybake Cake ahead of time?
Absolutely! This cake actually improves in flavour and texture when made a day in advance. Simply bake it, let it cool completely, and then cover it tightly with plastic wrap or store it in an airtight container at room temperature. It will stay wonderfully moist.
What kind of frosting works best with this cake?
A classic chocolate buttercream or a simple chocolate ganache is a perfect pairing for this Old School Chocolate Traybake Cake. However, for a truly old-school feel, a simple dusting of icing sugar or a basic glaze made from icing sugar and a little water or milk also works wonderfully and lets the cake’s rich flavour shine through.
Old School Chocolate Traybake Cake- Easy & Delicious
A wonderfully nostalgic, simple, and utterly delicious chocolate traybake cake with a moist, rich chocolate sponge and a sweet, glossy chocolate frosting. Perfect for any occasion.
Ingredients
-
1 cup (2 sticks) unsalted butter, softened to room temperature
-
1¼ cups granulated sugar
-
1 teaspoon pure vanilla extract
-
4 medium eggs, at room temperature
-
1¾ cups self-raising flour
-
¼ cup unsweetened cocoa powder
-
3 tablespoons whole milk
-
1½ cups powdered sugar, sifted
-
1 tablespoon unsweetened cocoa powder
-
2 tablespoons milk
-
Chocolate sprinkles for decorating
Instructions
-
Step 1
Cream the softened unsalted butter and granulated sugar in a large mixing bowl with an electric mixer on medium speed for about 3-5 minutes until light, fluffy, and pale yellow. Scrape down the sides of the bowl occasionally. -
Step 2
Add the room temperature eggs one at a time, beating well after each addition. Stir in the pure vanilla extract with the last egg. -
Step 3
In a separate bowl, whisk together the self-raising flour and ¼ cup unsweetened cocoa powder. Add about one-third of this dry mixture to the wet ingredients and beat on low speed until just combined. Don’t overmix. -
Step 4
Alternate adding the remaining dry ingredients and the 3 tablespoons of whole milk. Add half of the remaining dry ingredients, beat until just combined, then add all the milk, beat until just combined, and finally add the last of the dry ingredients and beat until just combined. Scrape down the sides of the bowl as needed. -
Step 5
Preheat oven to 350°F (175°C). Grease and line a 9×13 inch baking tray. Pour the batter into the tray, spread evenly, and bake for 25-30 minutes, or until a skewer inserted into the center comes out clean. Let cool in the tray for 10-15 minutes, then invert onto a wire rack to cool completely. -
Step 6
While the cake cools, make the frosting. Combine the sifted powdered sugar and 1 tablespoon unsweetened cocoa powder in a medium bowl. Gradually add the 2 tablespoons of milk, mixing until a thick, spreadable consistency is achieved. Beat until glossy and smooth. -
Step 7
Once the cake is completely cool, spread the chocolate frosting evenly over the top. Generously sprinkle chocolate sprinkles all over the frosting and press them in gently. Let the frosting set slightly before cutting into squares.
Important Information
Nutrition Facts (Per Serving)
It is important to consider this information as approximate and not to use it as definitive health advice.
Allergy Information
Please check ingredients for potential allergens and consult a health professional if in doubt.