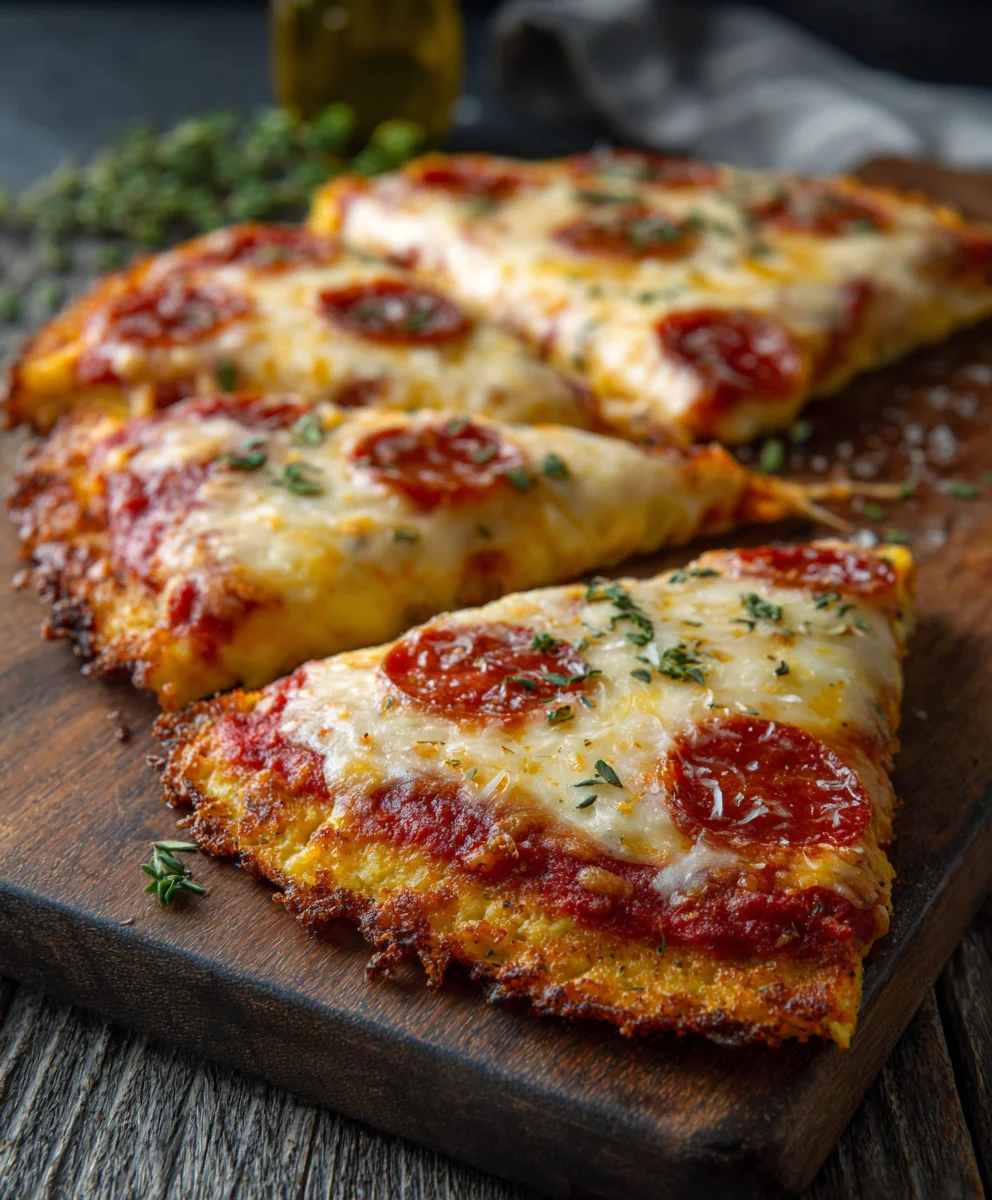
Keto Pizza Chicken Crust- Delicious Low Carb Meal
Keto Pizza Chicken Crust is more than just a low-carb alternative; it’s a culinary revelation that’s taking the keto world by storm. Imagin extracte all the cheesy, saucy, topping-laden goodness of your favorite pizza, without the doughy guilt. That’s the magic of this incredible dish! People absolutely adore Keto Pizza Chicken Crust because it delivers on flavor and satisfaction in a way that few other keto recipes can. It’s the perfect solution for those craving a pizza night fix while staying committed to their ketogenic lifestyle. What truly makes this special is the innovative use of shredded chicken as the base, creating a remarkably sturdy yet tender crust that soaks up all those delicious pizza flavors. Get ready to impress yourself and everyone at your table with this remarkably simple, yet utterly delicious, Keto Pizza Chicken Crust that redefines pizza night for the health-conscious foodie.
Ingredients:
- 1 can (about 5-6 ounces) canned chicken, drained very well
- 2 large eggs
- ½ cup finely grated Parmesan cheese
- 1 cup sugar-free marinara sauce
- 2 cups shredded mozzarella cheese, divided
- 1 package (about 3-4 ounces) beef beef pepperoni
Preparing the Keto Pizza Chicken Crust Base
Step 1: Prepare the Chicken Mixture
The foundation of our Keto Pizza Chicken Crust begin extracts with the chicken itself. It’s absolutely crucial to drain the canned chicken as thoroughly as possible. Water is the enemy of a crispy crust! I like to press the chicken against the side of the can with a fork to squeeze out every last drop of liquid. Once it’s well-drained, transfer the chicken to a medium-sized mixing bowl. Using a fork, shred the chicken into very fine pieces. The finer you shred it, the better it will bind together. You want it to be almost like a coarse paste. Now, crack in your two large eggs. These eggs will act as the binder, holding all the ingredients together to form a cohesive crust. Add the finely grated Parmesan cheese to the bowl. Parmesan is fantastic for adding a savory, nutty flavor and also helps with the binding and browning of the crust. Mix everything together with the fork until it’s well combined. Don’t be afraid to get your hands in there if you find it easier to really mash and mix the ingredients together. You’re aiming for a uniform mixture that holds its shape.
Step 2: Form and Bake the Chicken Crust
Preheat your oven to 400 degrees Fahrenheit (200 degrees Celsius). This higher temperature is key to getting a good, firm crust. Line a baking sheet with parchment paper. This step is vital for easy cleanup and to prevent the chicken crust from sticking. Take the chicken and egg mixture and spread it evenly onto the prepared baking sheet. You can use your hands or a spatula for this. Aim for a circular shape, roughly 9-10 inches in diameter, and about ¼ inch thick. The edges should be slightly thicker than the center to help prevent them from burning before the center is cooked. Once you have your crust shape, carefully slide the baking sheet into the preheated oven. Bake for 15-20 minutes, or until the crust is firm to the touch and lightly golden brown around the edges. You should see some of thgin extractgg begin to set.
Adding the Keto-Friendly Toppings
Step 3: Pre-bake the Crust and Add Sauce
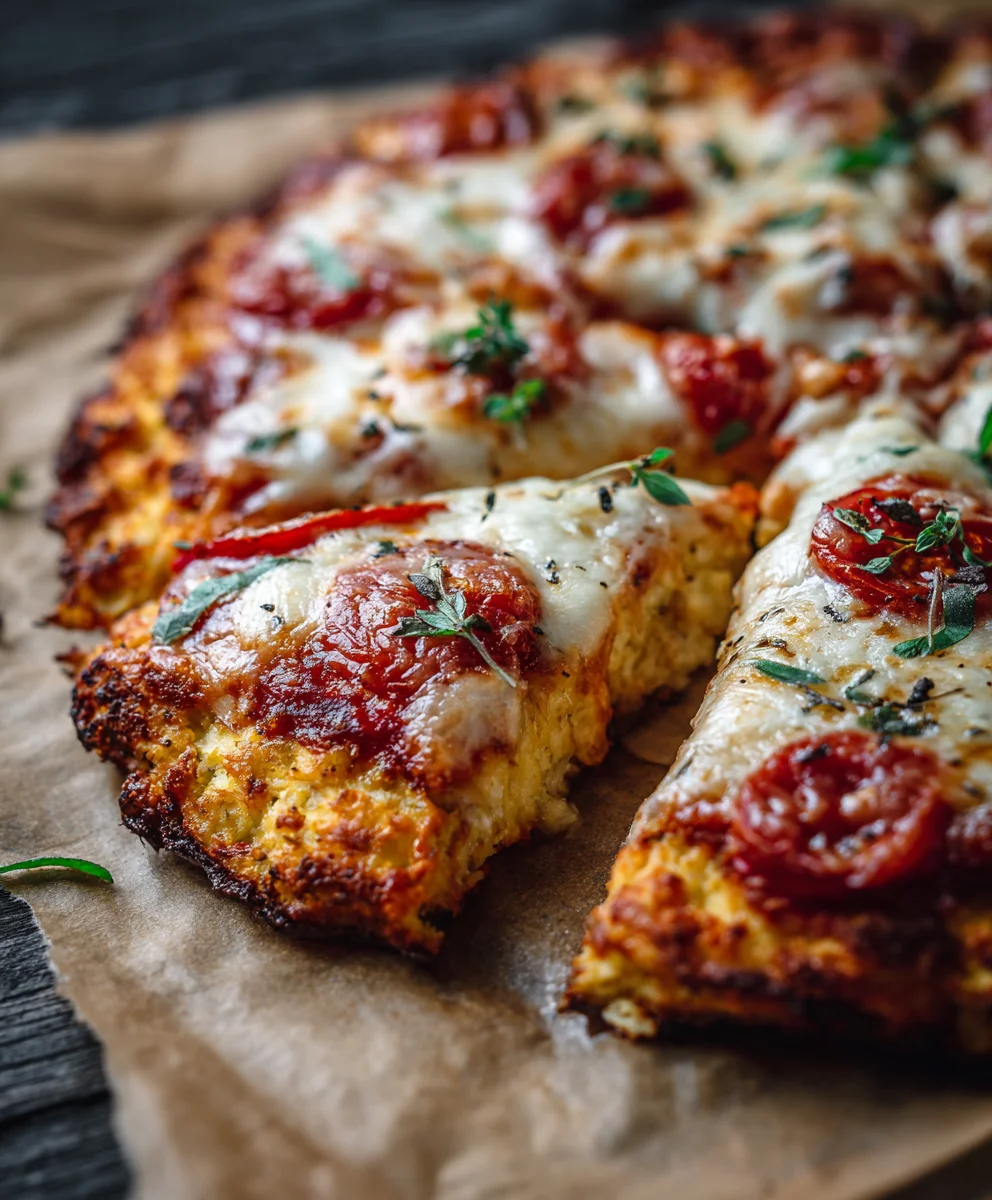
After the initial bake, carefully remove the chicken crust from the oven. At this point, it should be firm enough to handle. Now comes the fun part – turning it into a pizza! Spread the sugar-free marinara sauce evenly over the pre-baked chicken crust. Be sure to leave a small border around the edge for a traditional pizza look and to prevent the sauce from running off. Using a sugar-free marinara sauce is essential for keeping this recipe keto-friendly, as traditional marinara sauces can be loaded with added sugars. Make sure your sauce is at room temperature or slightly warmed; a cold sauce might cool down your hot crust unnecessarily.
Step 4: Layer with CheeseBeef Pepperonieroni
Once the sauce is spread, it’s time for the cheese. Sprinkle 1.5 cups of the shredded mozzarella cheese evenly over the marinara sauce. This mozzarella will melt beautifully and create that classic pizza cheese pull we all love. Next, arrange beef pepperoni pepperoni slices over the cheese. Distribute them in a single layer so that each bite gets a bit of that delicious, beef pepperonispicy pepperoni. Don’t overcbeef pepperonipizza with pepperoni, as it can release oil and make the crust a little greasy.
Finishing and Serving Your Keto Pizza Chicken Crust
Step 5: Final Bake to Perfection
Now, return the pizza to the oven. Bake for another 8-10 minutes, or until the mozzarella cheese is melted, bubbly, and slightly golden browbeef pepperonis. You want the pepperoni to be slightly crisped around the edges as well. For that extra cheesy finish, sprinkle the remaining ½ cup of mozzarella cheese over the top during the last 2-3 minutes of baking. This will give you pockets of melted, gooey cheese. Keep a close eye on it during this stage to ensure nothing burns. The aroma filling your kitchen at this point will be incredible!
Step 6: Rest and Slice
Once your Keto Pizza Chicken Crust is out of the oven and looks absolutely perfect, resist the urge to dive in immediately. Let it rest on the baking sheet for about 5 minutes. This resting period is important because it allows the cheese to set slightly and the flavors to meld together. It also makes slicing much easier and cleaner. After resting, carefully slide the parchment paper off the baking sheet onto a cutting board. Use a sharp knife or a pizza cutter to slice your pizza into your desired number of wedges. Serve hot and enjoy this delicious, low-carb alternative to traditional pizza!
Conclusion:
There you have it! With this straightforward guide, you can effortlessly whip up a delicious and satisfying Keto Pizza Chicken Crust. We’ve explored how to achieve that perfect crispy crust and layer on your favorite low-carb toppings for a truly guilt-free pizza experience. This recipe is incredibly versatile, making it a fantastic option for a quick weeknight dinner, a fun weekend project, or even a healthier party appetizer. Don’t be afraid to experiment with different cheese combinations, sauces, and toppings to make this Keto Pizza Chicken Crust uniquely yours. Remember, the key is to have fun in the kitchen and enjoy the process! We encourage you to give this recipe a try and discover just how amazing a low-carb pizza can be.
Frequently Asked Questions about Keto Pizza Chicken Crust:
Can I make the chicken crust ahead of time?
Yes, you can! Once the chicken crust is baked, you can let it cool completely and store it in an airtight container in the refrigerator for up to 2-3 days. When you’re ready to make your pizza, simply add your toppings and bake until the cheese is melted and bubbly. This makes assembly even quicker!
What are some good low-carb topping ideas for Keto Pizza Chicken Crust?
The possibilities are nearly endless! Beyond the classic beef pepperoni and mushrooms, consider grilled vegetables like bell peppers and zucchini, olives, jalapeños for a kick, cooked beef bacon or sausage, or even spinach and artichoke. Just ensure your sauce is low in sugar (like a sugar-free marinara or pesto) and avoid high-carb toppings like pineapple or corn.
My chicken crust came out a bit soggy. What did I do wrong?
A common reason for a soggy crust is excess moisture. Ensure you’ve thoroughly drained and patted dry your ground chicken before forming the crust. Also, pressing the chicken mixture firmly onto the baking sheet is crucial to create a dense and crispy base. Overloading with too many wet toppings can also contribute. Make sure to pre-cook any watery vegetables before adding them to the pizza.
Keto Pizza Chicken Crust
A delicious and satisfying low-carb alternative to traditional pizza, featuring a crispy chicken crust topped with sugar-free marinara, cheese, and beef pepperoni.
Ingredients
-
1 can (about 5-6 ounces) canned chicken, drained very well
-
2 large eggs
-
½ cup finely grated Parmesan cheese
-
1 cup sugar-free marinara sauce
-
2 cups shredded mozzarella cheese, divided
-
1 package (about 3-4 ounces) beef pepperoni
Instructions
-
Step 1
Prepare the chicken mixture: Drain canned chicken thoroughly and shred finely in a bowl. Add eggs and Parmesan cheese, mixing until well combined and forming a uniform mixture. -
Step 2
Form and bake the crust: Preheat oven to 400°F (200°C). Line a baking sheet with parchment paper. Spread the chicken mixture evenly in a 9-10 inch circle, about ¼ inch thick, with slightly thicker edges. Bake for 15-20 minutes until firm and lightly golden. -
Step 3
Add sauce: Carefully remove the crust from the oven. Spread sugar-free marinara sauce evenly over the crust, leaving a small border. -
Step 4
Layer toppings: Sprinkle 1.5 cups of mozzarella cheese over the sauce. Arrange beef pepperoni slices evenly over the cheese. -
Step 5
Final bake: Return pizza to the oven for 8-10 minutes, until cheese is melted and bubbly, and pepperoni is slightly crisped. During the last 2-3 minutes, sprinkle the remaining ½ cup of mozzarella. -
Step 6
Rest and slice: Let the pizza rest for 5 minutes before slicing. Serve hot.
Important Information
Nutrition Facts (Per Serving)
It is important to consider this information as approximate and not to use it as definitive health advice.
Allergy Information
Please check ingredients for potential allergens and consult a health professional if in doubt.