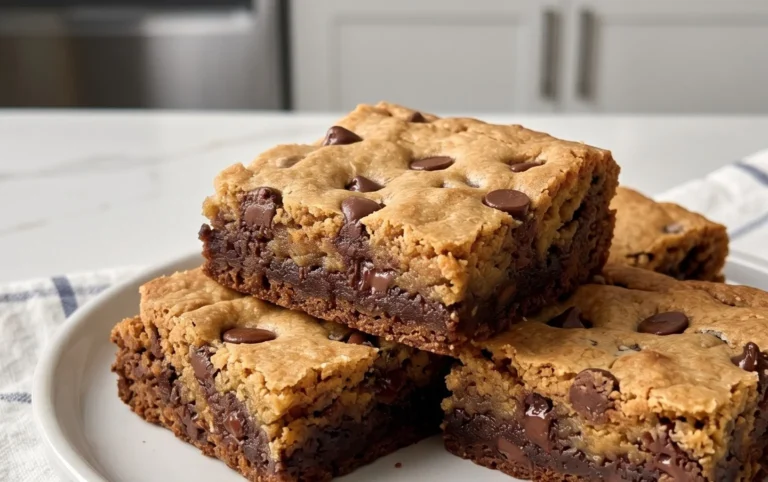
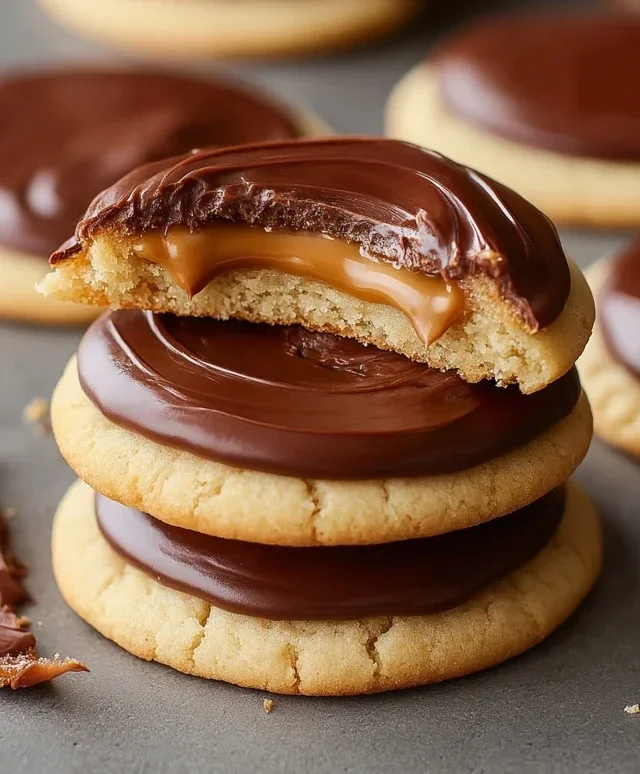
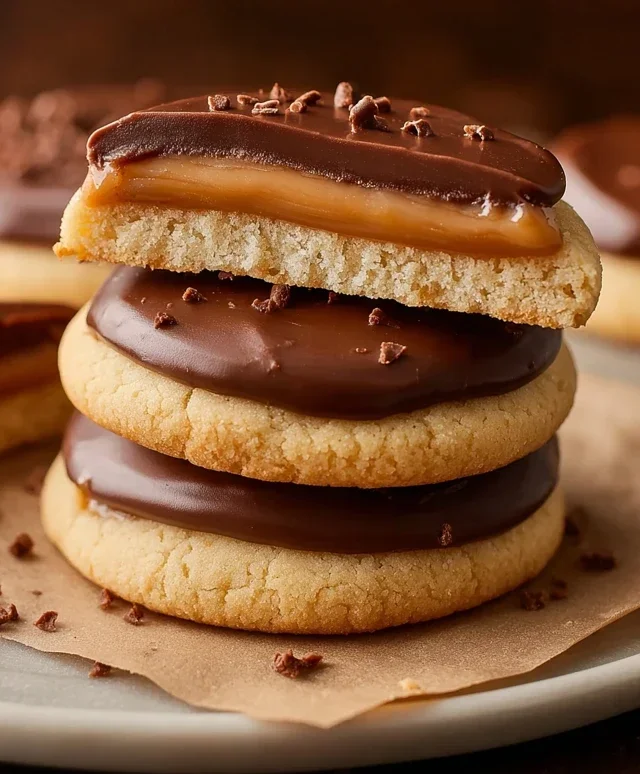
Easy Twix Cookies-Chewy Caramel Chocolate Bars
Twix Cookies are a delightful ode to that iconic candy bar we all know and love, but with a homemade twist that takes things to a whole new level. If you’ve ever found yourself craving that perfect balance of crum extractbly shortbread, gooey caramel, and rich chocolate, then you’re in for a treat. These aren’t just cookies; they’re an experience! People adore them because they capture the essence of the origin extractal Twix bar with every bite, offering a satisfying chew and a decadent finish. What makes these Twix Cookies truly special is the ability to recreate that magic in your own kitchen, customizing the chocolate coating and ensuring the caramel is just right. Get ready to impress yourself and everyone lucky enough to snag one of these incredible treats!
Twix Cookies
Get ready to impress yourself and everyone around you with these incredible Twix Cookies! Imagin extracte all the deliciousness of a Twix bar – that buttery shortbread, the gooey caramel, and the rich chocolate coating – all rolled into a perfectly chewy cookie. This recipe takes all that goodness and makes it achievable in your own kitchen. Forget the store-bought versions; these homemade Twix cookies are truly next level. They are surprisingly easy to make, even if you’re a begin extractner baker. The base uses a white cake mix, which lends a delightful tenderness and a subtle sweetness that perfectly complements the other components. The caramel layer is a breeze to create, and dipping them in chocolate is the satisfying finnon-alcoholic ale. These cookies are perfect for bake snon-alcoholic ales, holiday treats, or just when you need a serious chocolate and caramel fix. Let’s get baking!
Ingredients:
Cookie Dough Preparation
The foundation of our Twix cookie is a wonderfully tender and slightly crum extractbly cookie base. We start with the dry ingredients. In a large mixing bowl, combine the entire box of white cake mix. This might seem a little unusual, but trust me, it’s the secret to their amazing texture and ease of preparation. Next, whisk in the ¾ cup of all-purpose flour. This flour helps to bind everything together and gives the cookies just the right amount of structure. Now for the butter! Add the 1 cup of salted butter, softened. Softened butter is crucial here; it should be pliable and easy to indent with your finger, but not melted. This will allow it to cream properly with the dry ingredients. Using a mixer (either a stand mixer with a paddle attachment or a hand mixer), beat the softened butter into the cake mix and flour mixture. Start on a low speed to avoid a flour explosion, then increase to medium speed. You want to continue mixing until the mixture resembles coarse crum extractbs, similar to wet sand. This process is key to developing a tender cookie rather than a tough one. Take your time here and ensure everything is well incorporated.
Caramel Layer Creation
Once our cookie dough base is ready, it’s time to tackle the gooey caramel middle. In a microwave-safe bowl, combine the 1 ¼ cups of caramel bits with the 1 Tablespoon of heavy cream. The caramel bits are a fantastic shortcut, melting smoothly and quickly. The heavy cream adds a touch of richness and helps create that perfectly chewy, pourable caramel texture. Microwave the mixture in 30-second intervals, stirring well after each interval. Be patient and keep stirring until the caramel bits are completely melted and the mixture is smooth and creamy. Be careful not to overheat the caramel, as it can become too stiff or even burn. Once it’s smooth, set it aside to cool slightly. It will thicken up as it cools, which is exactly what we want for a perfectly spreadable layer.
Assembling and Baking the Cookies
Now for the fun part: putting it all together! Preheat your oven to 350 degrees Fahrenheit (175 degrees Celsius). Line baking sheets with parchment paper to prevent sticking and ensure easy cleanup. This step is highly recommended.
Take about two tablespoons of the cookie dough and roll it into a ball. Place the ball onto the prepared baking sheet, leaving about 2 inches between cookies as they will spread slightly. Using the bottom of a glass or a flat-bottomed measuring cup, gently flatten each cookie dough ball into a disc about ½ inch thick. You want to create a nice, even surface for the caramel.
Now, spoon about a teaspoon of the slightly cooled caramel mixture onto the center of each flattened cookie dough disc. Gently spread the caramel outwards, leaving a small border of the cookie dough around the edge. This border will help to prevent the caramel from oozing out excessively during baking and will give you a nice edge to hold onto when eating.
Bake the cookies in the preheated oven for 9 to 12 minutes, or until the edges are lightly golden brown and the centers look set but still have a slight chegrape juicess. The exact baking time will depend on your oven, so keep a close eye on them. Over-baking can lead to dry cookies, so it’s better to err on the side of slightly underbaked. Once they are done, remove the baking sheets from the oven and let the cookies cool on the baking sheets for a few minutes before transferring them to a wire rack to cool completely. This initial cooling period on the hot baking sheet allows the cookies to firm up a bit, making them easier to handle.
Chocolate Dipping Perfection
The final touch that truly elevates these cookies to Twix status is the chocolate coating. In a microwave-safe bowl, combine the 1 cup of semi-sweet chocolate chips (or mini semi-sweet chocolate chips for a smoother melt) with the remaining ½ Tablespoon of salted butter. The butter helps to make the chocolate smoother and shinier. Microwave the chocolate in 30-second intervals, stirring well after each interval, until the chocolate is completely melted and smooth. Again, be mindful not to overheat the chocolate. Once melted, you want to dip the cooled cookies into the chocolate. A great technique is to use a fork. Place a cookie on the fork, dip it into the melted chocolate, tap off any excess, and then carefully place it back onto the parchment-lined baking sheet to set. You can also use a spoon to drizzle the chocolate over the tops of the cookies if you prefer. For an even more authentic Twix look, you can lightly drizzle some of the melted chocolate over the tops of the set chocolate coating. Let the chocolate set completely before enjoying your amazing homemade Twix cookies. You can speed this up by placing the baking sheet in the refrigerator for about 10-15 minutes. These cookies are best stored in an airtight container at room temperature. Enjoy every delicious bite!
Conclusion:
And there you have it – your guide to creating absolutely divine Twix Cookies! I truly believe this recipe stands out because it perfectly captures the essence of those beloved candy bars: the buttery shortbread base, the gooey caramel layer, and the rich chocolate coating, all in a perfectly bite-sized cookie. They’re not just incredibly delicious, but also surprisingly achievable for bakers of all levels. The satisfaction of pulling these golden-brown beauties from the oven and seeing that glossy chocolate shell set is immense!
These Twix Cookies are wonderfully versatile. They make a show-stopping addition to any cookie platter, are a guaranteed hit at bake snon-alcoholic ales, and are simply perfect for a satisfying afternoon treat with a cup of tea or coffee. For serving, I love them simply piled high on a plate, but you could also drizzle them with a little extra chocolate or even some sea salt flakes for an added touch of elegance. If you’re feeling adventurous, consider trying some variations! You could experiment with different types of chocolate for the coating – milk chocolate, dark chocolate, or even white chocolate would all be delicious. Perhaps even sprinkle some chopped nuts over the caramel before the chocolate sets for an extra crunch.
I wholeheartedly encourage you to give this Twix Cookies recipe a try. I’m confident you’ll fall in love with the process and, more importantly, with the incredible result. Happy baking!
Frequently Asked Questions:
Q: Can I make these Twix Cookies ahead of time?
A: Absolutely! These cookies store wonderfully. Once fully cooled and the chocolate has set, store them in an airtight container at room temperature for up to 3-4 days. They might even taste better the next day as the flavors meld together!
Q: My caramel is too runny/hard. What went wrong?
A: Caramel consistency can be tricky! If it’s too runny, it might not have cooked long enough or the heat was too low. If it’s too hard, it may have cooked for too long or at too high a temperature. For this recipe, aim for a thick, pourable consistency, and remember that it will firm up considerably as it cools. Using a candy thermometer can be a great help for consistent results.
Q: Can I freeze these cookies?
A: Yes, you can freeze the baked and cooled Twix Cookies. Once the chocolate is completely set, wrap them tightly in plastic wrap and then place them in a freezer-safe container or bag. They should keep well for up to 2-3 months. Thaw them at room temperature before enjoying.
Twix Cookies
Easy Twix cookies featuring a cake mix base, chewy caramel, and chocolate drizzle.
Ingredients
-
1 box white cake mix (15.25 ounces)
-
¾ cup all-purpose flour
-
1 cup salted butter, softened
-
1 ¼ cups caramel bits
-
1 Tablespoon heavy cream
-
1 cup semi-sweet chocolate chips or mini semi-sweet chocolate chips
-
½ Tablespoon salted butter
Instructions
-
Step 1
Preheat oven to 350°F (175°C). Line baking sheets with parchment paper. -
Step 2
In a large bowl, combine white cake mix, flour, and softened butter. Mix until well combined and a dough forms. -
Step 3
Roll dough into 1-inch balls and place on prepared baking sheets. -
Step 4
In a microwave-safe bowl, combine caramel bits and heavy cream. Microwave in 30-second intervals, stirring in between, until smooth and melted. Stir in ½ tablespoon of butter until melted. -
Step 5
Drizzle melted caramel over the cookie dough balls. -
Step 6
Bake for 8-10 minutes, or until edges are lightly golden. Let cool on baking sheets for a few minutes before transferring to a wire rack to cool completely. -
Step 7
Melt semi-sweet chocolate chips in a separate microwave-safe bowl, stirring every 30 seconds until smooth. Drizzle melted chocolate over the cooled cookies.
Important Information
Nutrition Facts (Per Serving)
It is important to consider this information as approximate and not to use it as definitive health advice.
Allergy Information
Please check ingredients for potential allergens and consult a health professional if in doubt.