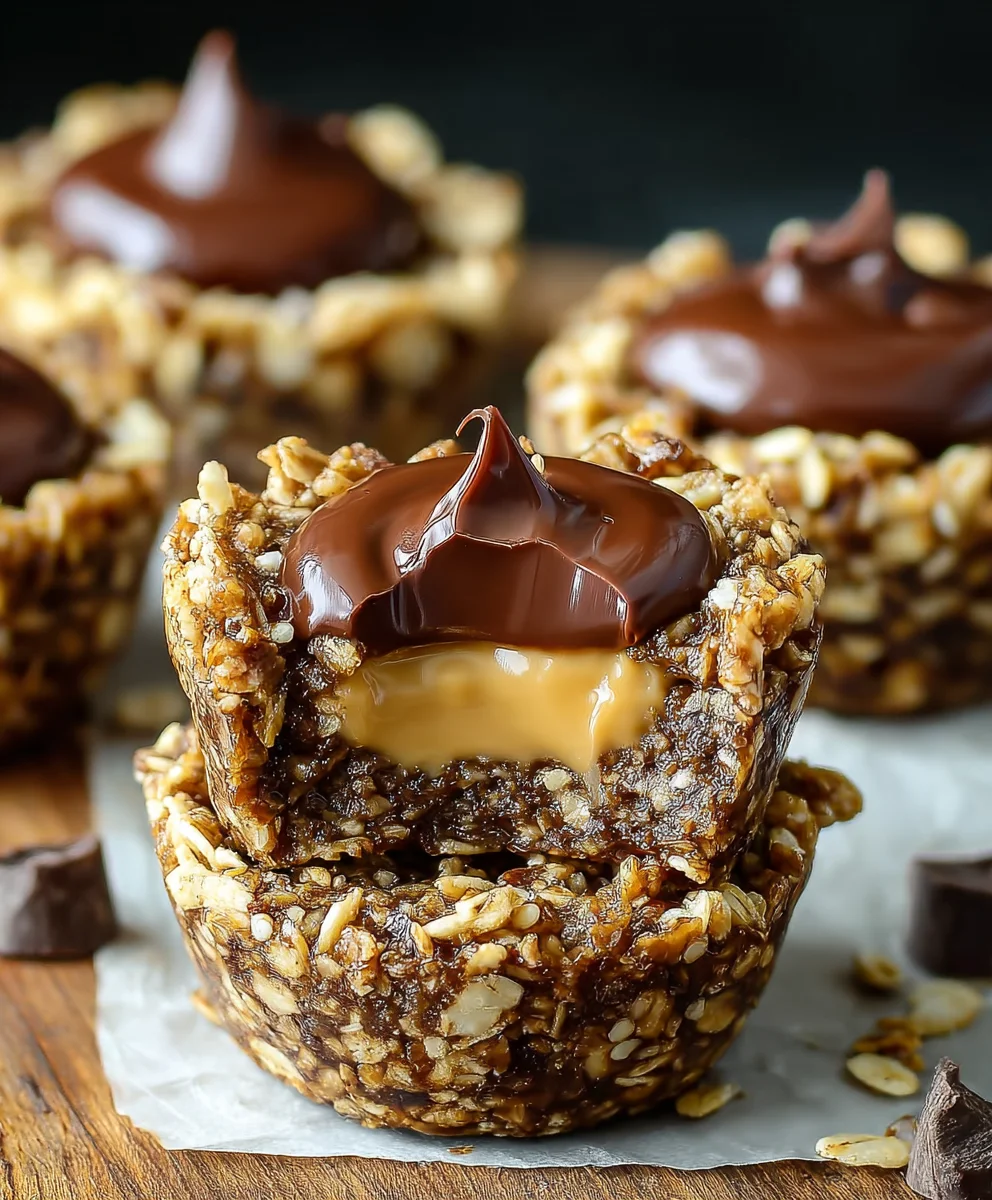
Chocolate Granola Cups-Peanut Butter Bliss
Chocolate Granola Cups with Peanut Butter Filling – is there a more perfect harmony of textures and flavors? I think not! These delightful little treats have quickly become a staple in my kitchen, and I have a feeling they’ll steal your heart (and your taste buds) too. People absolutely adore them because they offer that satisfying crunch from the granola, the rich decadence of chocolate, and the creamy, salty sweetness of peanut butter, all wrapped up in a single, irresistible bite. What truly makes these Chocolate Granola Cups with Peanut Butter Filling so special is their incredible versatility. They’re not just a decadent dessert; they’re also a fantastic breakfast on-the-go, a satisfying afternoon snack, or even a healthier indulgence when those sweet cravings hit. Plus, they’re surprisingly easy to make, requiring minimal effort for maximum reward. Get ready to fall in love with this simple yet sensational recipe!
Ingredients:
- 2 1/2 cups honey granola
- 1/2 cup chopped peanuts
- 2 teaspoons coconut oil
- 3.5 oz dark chocolate, finely chopped
- 2 tablespoons peanut butter (for the chocolate layer)
- 3 tablespoons honey (for the chocolate layer)
- 1 cup peanut butter (for the filling)
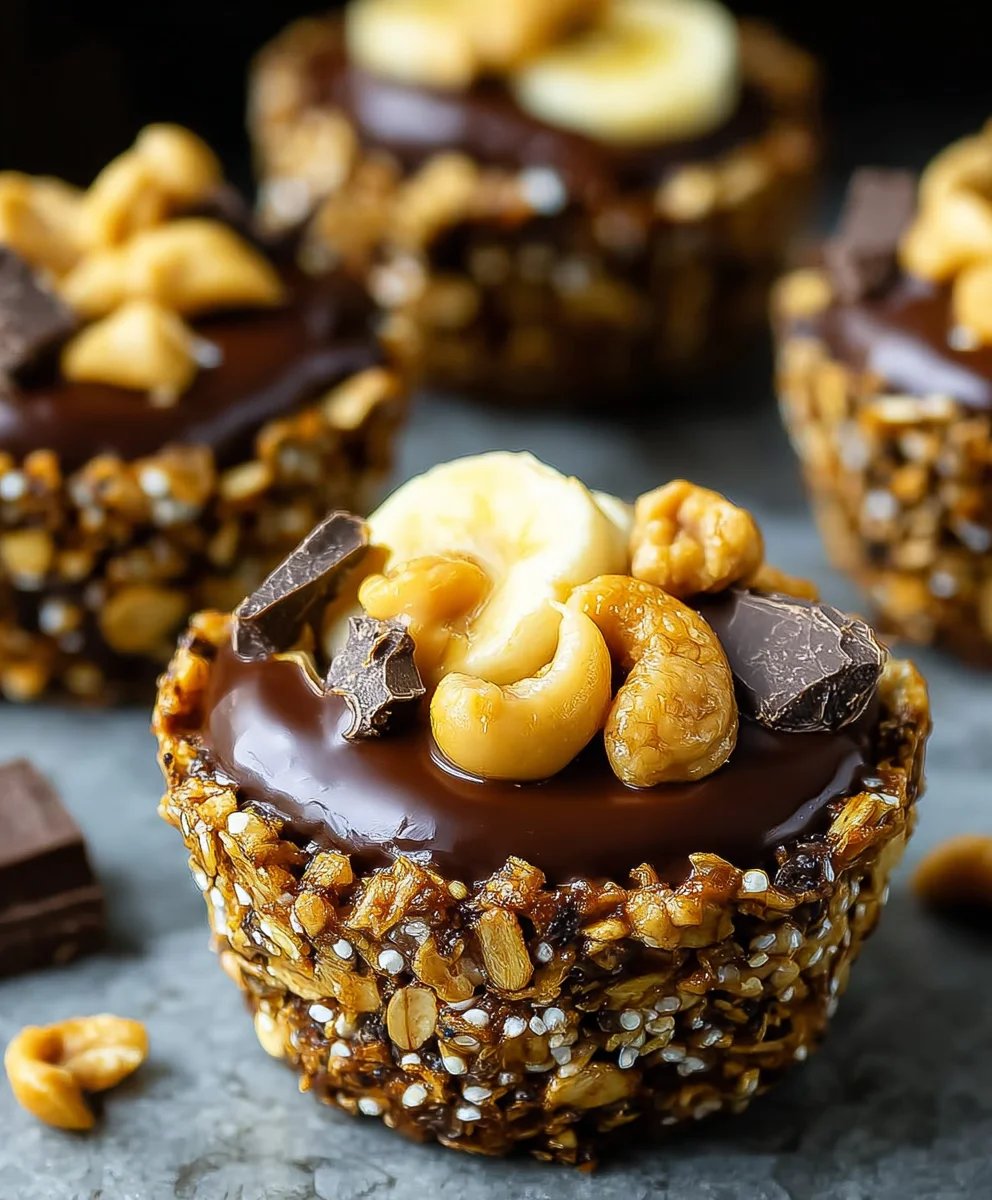
- 12 thin slices of banana (optional, for layering)
Preparing the Chocolate Granola Base
First, we need to create the crunchy, chocolatey base for our granola cups. This involves combining some of the core ingredients and forming them into the cup shape. I like to use a standard muffin tin for this, as it provides a perfect mold. Grab a medium-sized mixing bowl. Into this bowl, I’m going to add the 2 1/2 cups of honey granola. This granola provides a wonderful sweetness and a good crunch right from the start.
Next, let’s incorporate the chopped peanuts. I’m adding 1/2 cup of chopped peanuts to the granola. These not only add another layer of texture but also complement the peanut butter filling beautifully. Now, for the binding and the chocolate element, we need to melt the dark chocolate. In a heatproof bowl, place your 3.5 ounces of finely chopped dark chocolate. You can melt this using a double boiler method or carefully in the microwave. If using the microwave, heat in 30-second intervals, stirring well between each, until smooth and fully melted. Be patient; overheating chocolate can make it seize.
Once the chocolate is melted, add the 2 teaspoons of coconut oil to it. The coconut oil helps to make the chocolate smoother and gives it a lovely sheen once set. Stir this until it’s fully combined and glossy. Now, we’ll add this melted chocolate mixture to the granola and peanut mixture. Add the 2 tablespoons of peanut butter to this bowl as well. This adds a subtle peanut butter note to the base and helps the chocolate bind everything together more effectively. Use a spatula or a sturdy spoon to mix everything thoroughly. You want every piece of granola and every peanut to be coated in the chocolate mixture. This step is crucial for ensuring the cups hold their shape and have that delicious chocolatey flavor throughout.
Forming the Granola Cups
With our chocolate-coated granola mixture ready, it’s time to press it into our muffin tin. I find that lightly greasing the muffin tin with a little extra coconut oil or cooking spray can help prevent sticking, especially if you plan to remove the cups from the tin completely. Now, take about 2-3 tablespoons of the granola mixture and place it into each muffin cup. Use the back of a spoon or your fingers (lightly moistened if sticking becomes an issue) to firmly press the mixture into the bottom and up the sides of each muffin cup. You’re aiming to create a sturdy shell, almost like a miniature pie crust. Make sure the sides are built up sufficiently to hold the filling later on. You want a good, compact layer at the bottom and a neat wall going up the sides of the tin. Don’t be afraid to press quite firmly; this is what will give your cups structural integrity.
Creating the Peanut Butter Filling
Now for the star of the show – the creamy peanut butter filling! This is incredibly simple and requires very little effort, which is always a bonus. In a separate, small bowl, add the 1 cup of creamy peanut butter. To this, I’m going to add the 3 tablespoons of honey. The honey will not only add sweetness but also help to slightly soften the peanut butter, making it a more spreadable and delicious filling. Stir these two ingredients together until they are completely combined and you have a smooth, luscious peanut butter mixture. This filling should be thick enough to hold its shape within the granola cups but still smooth and easy to spread. Taste it at this stage – if you prefer it sweeter, you can add a tiny bit more honey, but remember the granola base is already sweet.
Assembling and Chilling
Now, let’s bring our Chocolate Granola Cups with Peanut Butter Filling to life! If you’re using the optional banana slices, this is where they come into play. Carefully spoon about 1-2 tablespoons of the peanut butter filling into the bottom of each granola cup you’ve formed in the muffin tin. Spread it out evenly. If you are using the banana slices, place a couple of thin slices of banana on top of the peanut butter layer in each cup. This adds a lovely fruity freshness that pairs wonderfully with the chocolate and peanut butter. Once the peanut butter (and banana, if using) is in place, it’s time to seal it with a bit more of the chocolate granola mixture. Spoon another tablespoon or so of the chocolate granola mixture on top of the filling, pressing it down gently to create a second layer. This will enclose the peanut butter filling, creating a delightful surprise inside. You can make this top layer as neat or as rustic as you like.
Once all your cups are assembled, it’s essential to let them set. Place the entire muffin tin into the refrigerator for at least 1-2 hours, or until the chocolate has hardened and the cups are firm. Chilling is crucial for them to hold their shape and for the flavors to meld together. For an even firmer set, you can pop them in the freezer for about 30 minutes before transferring them to the refrigerator. Once they are completely set, you can carefully remove them from the muffin tin. You might need to gently wiggle them or use a small offset spatula to help ease them out. Place them on a serving platter and admire your delicious creations. These are best served chilled, making them a wonderfully refreshing treat.
Conclusion:
There you have it! Your guide to creating delicious Chocolate Granola Cups with Peanut Butter Filling. We’ve walked through each step, from preparing the rich chocolate granola base to crafting that perfectly creamy peanut butter center. These delightful treats are more than just a recipe; they’re a little bite of happiness perfect for breakfast, a midday snack, or even a guilt-free dessert. The combination of crunchy granola, decadent chocolate, and smooth, salty peanut butter is truly irresistible.
I encourage you to give these Chocolate Granola Cups with Peanut Butter Filling a try. Don’t be afraid to experiment with the recipe to make it your own! Serve them chilled for a firm, satisfying bite, or at room temperature for a slightly softer texture. They make a wonderful addition to brunch spreads, picnic baskets, or as a thoughtful homemade gift.
Frequently Asked Questions:
Can I make the Chocolate Granola Cups with Peanut Butter Filling ahead of time?
Absolutely! These cups are fantastic for meal prep. Store them in an airtight container in the refrigerator for up to 4-5 days. They hold their shape well and the flavors meld beautifully.
What if I have a peanut allergy? Can I substitute the peanut butter?
Yes, you can! For a peanut-free option, try using almond butter, cashew butter, sunflower seed butter, or even a tahini-based filling. Adjust the sweetness to your preference, as different nut/seed butters can vary in their natural sweetness.
Chocolate Granola Cups-Peanut Butter Bliss
Delicious no-bake chocolate granola cups with a creamy peanut butter filling, perfect for a sweet treat.
Ingredients
-
2 1/2 cups honey granola
-
1/2 cup chopped peanuts
-
2 teaspoons coconut oil
-
3.5 oz dark chocolate, finely chopped
-
2 tablespoons peanut butter
-
3 tablespoons honey
-
1 cup peanut butter
-
12 thin slices of banana (optional)
Instructions
-
Step 1
Combine granola and chopped peanuts in a bowl. Melt dark chocolate with coconut oil and add to the granola mixture along with 2 tablespoons of peanut butter. Mix well until everything is coated. -
Step 2
Press 2-3 tablespoons of the chocolate granola mixture into the bottom and up the sides of each muffin cup in a greased muffin tin, forming a shell. -
Step 3
In a separate bowl, mix 1 cup of peanut butter with 3 tablespoons of honey until smooth and combined. -
Step 4
Spoon 1-2 tablespoons of the peanut butter filling into each granola cup. If using, add a few thin slices of banana on top of the peanut butter. -
Step 5
Top the filling with another tablespoon of the chocolate granola mixture, pressing gently to seal. Chill the muffin tin for at least 1-2 hours, or until firm. -
Step 6
Carefully remove the granola cups from the muffin tin and serve chilled.
Important Information
Nutrition Facts (Per Serving)
It is important to consider this information as approximate and not to use it as definitive health advice.
Allergy Information
Please check ingredients for potential allergens and consult a health professional if in doubt.