Easy Pickled Red Onions- Quick Flavor Boost
Pickled red onions are truly a magical ingredient, transforming ordinary meals into vibrant culinary experiences. I remember the first time I tried them – a burst of tangy, slightly sweet, and wonderfully crunchy goodness that cut through the richness of tacos. Since then, they’ve become an indispensable staple in my kitchen. What is it about these jewel-toned rings that makes them so universally adored? It’s their incredible versatility and the delightful contrast they bring to so many dishes. A simple sprinkle of these bright pickled red onions can elevate everything from avocado toast and grilled chicken to salads and even simple cheese boards. They add a pop of color, a zesty punch, and a satisfying texture that’s simply irresistible. You’ll find yourself reaching for this easy recipe again and again, discovering new ways to incorporate the wonder of pickled red onions into your everyday cooking.
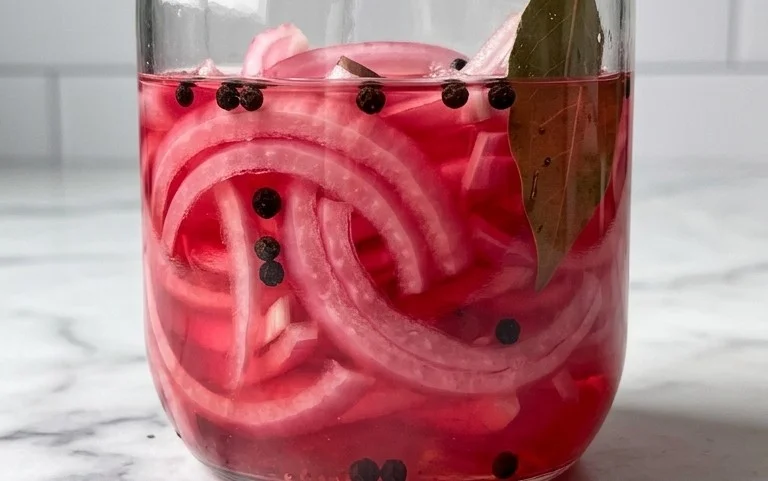
Pickled Red Onions
There’s something truly magical about pickled red onions. They take a humble ingredient – a red onion – and transform it into a vibrant, tangy, and slightly sweet condiment that elevates almost any dish. From tacos and salads to sandwiches and grain bowls, a sprinkle of these ruby-red jewels adds a burst of flavor and a beautiful pop of color. They’re incredibly easy to make, requiring minimal effort and just a few pantry staples. The best part? They last for a good few weeks in the refrigerator, meaning you can have this flavor bomb on hand whenever inspiration strikes. Forget store-bought versions that can sometimes be overly vinegary or lacking in depth; making your own is simple and allows you to customize the flavor profile to your liking. Let’s dive into how you can whip up a batch of these delicious pickled wonders.
Ingredients:
Instructions:
The process of making pickled red onions is remarkably straightforward, a testament to how simple ingredients can yield such impressive results. We’ll start by preparing the star of our show, the red onion, and then move on to creating the brine that will work its magic.
Step 1: Preparing the Onion
The first step is to prepare your red onion. You’ll want to peel the outer papery skin off the onion. Then, trim off the top and root end. For pickling, the thickness of your onion slices is key. Aim for thin, uniform slices. A mandoline slicer is your best friend here, as it will ensure consistency, which is important for even pickling. If you don’t have a mandoline, a sharp knife and a steady hand will do the trick. Slice the onion in half from root to tip, then slice each half thinly. The thinner the slices, the quicker they will pickle and the more readily they will absorb the brine. Avoid slicing too thick, as they might remain a bit too crisp for some preferences.
Step 2: Making the Brine
While your onion is sliced, it’s time to prepare the pickling liquid, often called a brine. In a small saucepan, combine the white vinegar, water, sugar (if using), and kosher salt. Place the saucepan over medium heat. Stir the mixture gently until the sugar and salt have completely dissolved. You don’t need to bring this mixture to a rolling boil; just heat it enough to ensure everything is dissolved. Once dissolved, remove the saucepan from the heat. This brine is the flavor base for your pickled onions, and the balance of vinegar, water, sweetness, and salt is what creates that characteristic tangy and slightly sweet profile.
Step 3: Combining Onion and Brine
Now for the satisfying part: combining the prepared onion with the warm brine. You’ll need a clean, heat-safe jar or container. A glass jar with a tight-fitting lid is ideal. Carefully place the thinly sliced red onion into your chosen jar. Once the onion is nestled in, pour the warm brine over the top. Make sure the onion slices are completely submerged in the brine. If you find they’re floating a bit too much, you can gently press them down with a spoon to ensure they are all covered. The heat from the brine will also help to slightly soften the onions, making them more tender.
Step 4: The Waiting Game (and the Transformation!)
This is where patience comes into play, but the transformation is worth it. Let the jar sit at room temperature for at least 30 minutes. During this time, you’ll witness a beautiful color change. The onions will start to turn a vibrant pink as they soak up the brine and release their natural pigments. For a more pronounced pickle and deeper flavor, you can let them sit for up to an hour or even two at room temperature. The longer they sit, the more infused they become.
Step 5: Refrigerate and Enjoy
After the initial resting period at room temperature, it’s time to move your pickled red onions to the refrigerator. Seal the jar tightly and place it inside your fridge. They will continue to develop their flavor and texture as they chill. Ideally, let them chill for at least a couple of hours before diggin extractg in, though they are often delicious even after an hour. The longer they sit in the refrigerator, the better they become. They can be stored in the refrigerator for up to 2-3 weeks. The flavor will continue to deepen and evolve over time.
These pickled red onions are incredibly versatile. Add them to avocado toast for a zesty kick, toss them into a fresh salad for added crunch and tang, or pile them onto your favorite burger or tacos. They are also fantastic with grilled meats, fish, or even as a vibrant addition to a cheese board. Experiment and discover your favorite ways to enjoy them!
Conclusion:
There you have it! Crafting your own batch of delicious pickled red onions is a remarkably simple yet incredibly rewarding endeavor. This recipe is fantastic because it transforms a humble ingredient into a vibrant, tangy, and slightly sweet condiment that elevates countless dishes. The beautiful ruby-red hue and satisfying crunch add both visual appeal and a delightful textural contrast. Don’t be shy about experimenting with these versatile pickled red onions; they’re a game-changer for tacos, salads, sandwiches, burgers, avocado toast, and so much more. I truly encourage you to give this recipe a try – you’ll be amazed at how often you reach for them once you have a jar in your fridge!
Frequently Asked Questions:
Q: How long do pickled red onions last?
A: Properly stored in an airtight container in the refrigerator, your pickled red onions should stay fresh and delicious for at least 2-3 weeks. The longer they sit, the more the flavors will meld and deepen, often becoming even tastier!
Q: Can I make pickled red onions spicier?
A: Absolutely! For a spicy kick, simply add a pinch of red pepper flakes to the brine mixture before pouring it over the onions. You can also toss in a sliced jalapeño or serrano pepper while pickling for an extra layer of heat.
Q: What’s the best kind of vinegar to use?
A: While apple cider vinegar or white grape juice vinegar are popular choices for their balanced flavor, feel free to get creative! Red grape juice vinegar will enhance the color and add a slightly more robust flavor, while rice vinegar offers a milder, more delicate tang.
Pickled Red Onions
Quick and easy pickled red onions for a tangy and vibrant topping.
Ingredients
-
1 large Red onion, thinly sliced
-
1 cup White Vinegar
-
1 cup Water
-
1 tablespoon Sugar
-
2 teaspoons Kosher salt
Instructions
-
Step 1
Thinly slice the red onion. -
Step 2
In a small saucepan, combine the white vinegar, water, sugar, and kosher salt. -
Step 3
Heat the mixture over medium heat, stirring until the sugar and salt are completely dissolved. Do not boil. -
Step 4
Place the sliced red onion into a clean jar or heatproof container. -
Step 5
Pour the warm pickling liquid over the onions, ensuring they are fully submerged. -
Step 6
Let cool to room temperature, then cover and refrigerate for at least 30 minutes before serving. The longer they sit, the more pickled they will become.
Important Information
Nutrition Facts (Per Serving)
It is important to consider this information as approximate and not to use it as definitive health advice.
Allergy Information
Please check ingredients for potential allergens and consult a health professional if in doubt.