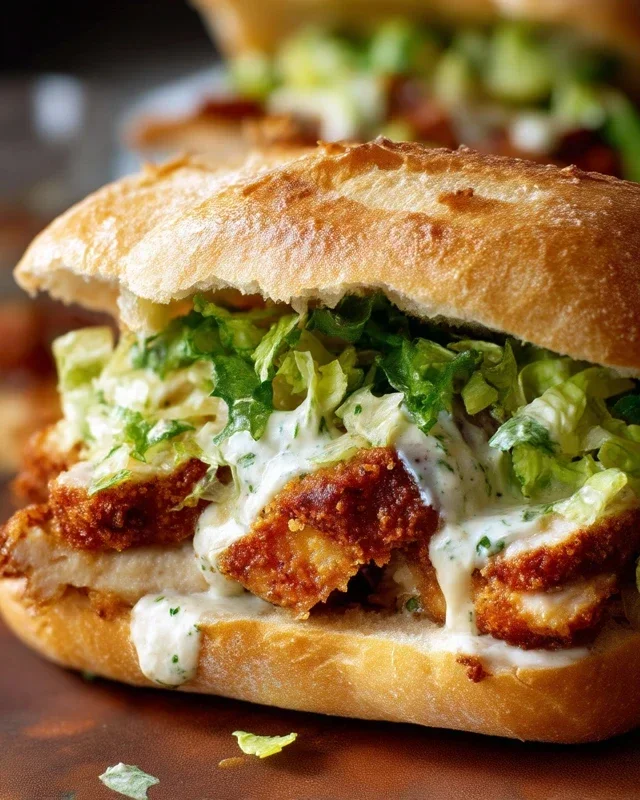
Crispy Chicken Caesar Sandwich-Best Ever Recipe
Crispy Chicken Caesar Sandwich. Oh, this is a dish that truly speaks my language! We all have those go-to meals that comfort and delight, and for me, the Crispy Chicken Caesar Sandwich reigns supreme. It’s the perfect marriage of textures and flavors: the satisfying crunch of perfectly fried chicken, the tangy, creamy Caesar dressing, and the fresh, crisp romaine lettuce, all nestled between soft, toasted buns. It’s no wonder this sandwich has become a beloved classic, effortlessly transitioning from a quick lunch to a weekend treat. What makes this particular version so special? It’s all about balance. We’re talking about achieving that ultimate crispiness on the chicken without it being greasy, and ensuring the Caesar dressing has just the right zing. Get ready to elevate your sandwich game because this Crispy Chicken Caesar Sandwich is about to become your new obsession.
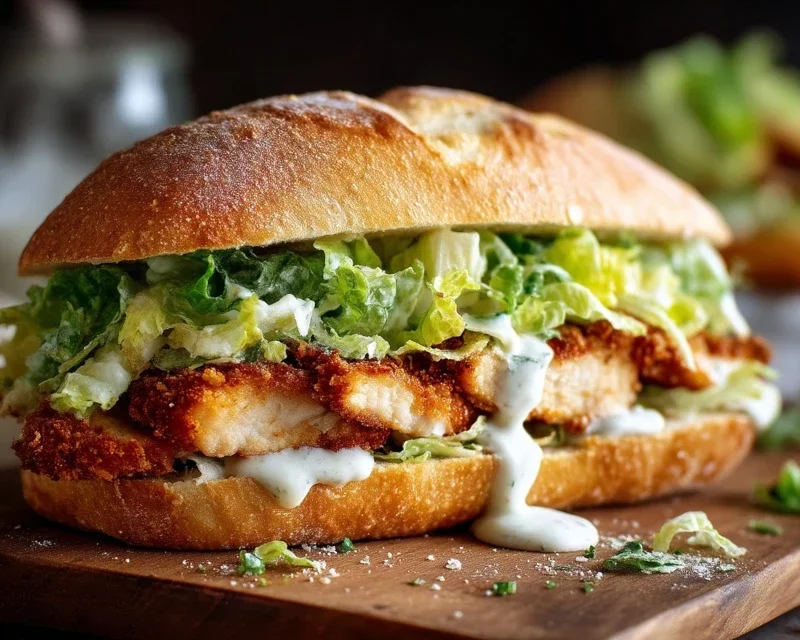
Crispy Chicken Caesar Sandwich
There are sandwiches, and then there are sandwiches. This Crispy Chicken Caesar Sandwich falls firmly into the latter category. It’s a flavor explosion that takes the beloved Caesar salad and transforms it into a handheld masterpiece. Imagin extracte succulent, perfectly seasoned chicken, coated in a shatteringly crisp crust, nestled between soft buns and generously slathered with a creamy, tangy, and utterly addictive Caesar dressing. This isn’t just lunch; it’s an experience. I’ve spent countless hours perfecting this recipe, and I’m thrilled to share it with you. Get ready to elevate your sandwich game to a whole new level.
Ingredients:
Crafting the Ultimate Caesar Dressing
The heart of any good Caesar sandwich is, of course, the Caesar dressing. Forget those bottled imposters; making your own is incredibly easy and the flavor difference is night and day. We’ll start by whisking together the wet ingredients. In a medium bowl, combine the full-fat mayonnaise and Greek yogurt. The mayonnaise provides richness, while the Greek yogurt adds a pleasant tang and helps lighten the dressing. Next, stir in the Dijon mustard for a subtle kick and the Worcestershire sauce for that signature umami depth. A generous squeeze of fresh lemon juice is crucial for brightness and to cut through the richness.
Now for the magic! Stir in the freshly grated Parmesan cheese. Using freshly grated Parmesan is non-negotiable here; pre-shredded cheese often contains anti-caking agents that can make your dressing grainy. Add the minced garlic cloves – you can mince them very finely or even use a garlic press for maximum flavor distribution. Season with ¼ teaspoon of black pepper and a pinch of sea salt. Remember, the Parmesan is already salty, so start light and adjust to your taste. Whisk everything together until it’s smooth, creamy, and absolutely irresistible. Taste and adjust seasonings if necessary. This dressing is also fantastic on salads, as a dip for vegetables, or even as a chicken marinade. I like to make a little extra because it disappears so quickly! Set this aside to allow the flavors to meld while we prepare the chicken.
Preparing the Crispy Chicken
The star of our sandwich is the crispy chicken. We’re aiming for golden brown, crunchy perfection that will stand up to the creamy dressing. Take your chicken cutlets and pat them thoroughly dry with paper towels. This is a critical step for achieving maximum crispiness. Season both sides generously with sea salt and ground black pepper. Don’t be shy with the seasoning; this is where a lot of the flavor comes from.
Next, set up your dredgin extractg station. In a shallow dish or pie plate, combine the all-purpose flour with ½ teaspoon of salt. This seasoned flour will form the base of our crispy coating. Now, we need to ensure that coating adheres beautifully. You can do this in a couple of ways. If you want an extra-thick, craggy crust, you can lightly beat an egg with a splash of milk in another shallow dish and dip the seasoned chicken cutlets in the egg mixture first, then coat them in the flour. However, for a slightly less heavy but still incredibly crispy crust, you can skip the egg wash and directly dredge the seasoned chicken cutlets in the seasoned flour, pressing gently to ensure they are well-coated on all sides. Make sure every nook and cranny is covered. Gently shake off any excess flour.
Frying to Golden Perfection
Now it’s time to fry our beautifully coated chicken. Heat about ½ inch of oil in a large, heavy-bottomed skillet over medium-high heat. You want the oil to be hot enough that a tiny piece of flour dropped in sizzles immediately. A good temperature to aim for is around 350°F (175°C). Carefully place the floured chicken cutlets into the hot oil, being careful not to overcrowd the pan. Overcrowding will lower the oil temperature and result in greasy, soggy chicken. Fry the chicken for about 3-5 minutes per side, or until it’s golden brown and cooked through. The exact cooking time will depend on the thickness of your cutlets. You can check for doneness by cutting into the thickest part of a cutlet; the juices should run clear, and the internal temperature should reach 165°F (74°C).
Once the chicken is perfectly cooked and crispy, remove it from the skillet and place it on a wire rack set over a baking sheet. This allows any excess oil to drain off, keeping your chicken gloriously crispy. You can lightly sprinkle the fried chicken with a little more sea salt immediately after it comes out of the oil for an extra pop of flavor.
Assembling Your Masterpiece
The final, and perhaps most satisfying, step is assembling these incredible sandwiches. Lightly toast your favorite sandwich buns. I find that a quick toast adds a delightful textural contrast and prevents the buns from getting soggy. Spread a generous amount of your homemade Caesar dressing on both halves of the toasted buns. Place a crispy chicken cutlet on the bottom bun. If you’re a fan of extra crunch and freshness, add a layer of crisp romaine lettuce on top of the chicken. Finally, place the top bun over everything, and behold your culinary creation!
Serve immediately and prepare for rave reviews. This Crispy Chicken Caesar Sandwich is a true crowd-pleaser, perfect for a hearty lunch, a casual dinner, or even a special weekend treat. Enjoy every single bite!
Conclusion:
There you have it – the ultimate guide to crafting a truly exceptional Crispy Chicken Caesar Sandwich! This recipe isn’t just about a sandwich; it’s about experiencing that perfect symphony of textures and flavors: the satisfying crunch of golden-fried chicken, the creamy tang of Caesar dressing, the crispness of romaine, and the delightful bite of Parmesan. It’s a dish that’s both incredibly comforting and surprisingly sophisticated, perfect for a quick lunch, a satisfying dinner, or even a casual get-together with friends. I truly hope you’ll give this recipe a try and discover your new go-to sandwich!
For a complete meal, I love serving this sandwich alongside a simple side salad dressed with a light vinaigrette, some seasoned potato wedges, or even a cup of creamy tomato soup. If you’re feeling adventurous, don’t hesitate to explore variations! You could swap the chicken for grilled halloumi for a vegetarian option, add a sprinkle of crispy beef bacon for extra indulgence, or even introduce a hint of spice with a dash of hot sauce in your dressing. The possibilities are endless!
So, grab your ingredients, channel your inner chef, and get ready to enjoy the best Crispy Chicken Caesar Sandwich you’ve ever made. It’s simpler than you think, and the reward is absolutely delicious!
Frequently Asked Questions:
Can I make the chicken ahead of time?
Absolutely! You can bread and fry the chicken up to a day in advance. Store it in an airtight container in the refrigerator. Reheat it gently in a preheated oven at 350°F (175°C) for about 5-10 minutes until warmed through and still crispy. This is a great way to save time if you’re planning to assemble your sandwiches in a hurry.
What’s the best way to keep the bread from getting soggy?
To prevent a soggy bun, it’s best to assemble the sandwich right before you plan to eat it. You can also lightly toast the inside of your buns, which creates a barrier. If you absolutely must assemble it slightly ahead of time, try spreading a thin layer of mayonnaise or a bit of extra Caesar dressing on the inside of the bun first, and then place the lettuce between the chicken and the bun to absorb any excess moisture.
Crispy Chicken Caesar Sandwich
A delicious and satisfying sandwich featuring crispy fried chicken, a creamy Caesar dressing, and fresh Parmesan cheese.
Ingredients
-
5 chicken cutlets
-
½ cup full-fat mayonnaise
-
3 tbsp Greek yogurt
-
1 tsp Dijon mustard
-
1 tsp Worcestershire sauce
-
2 tbsp lemon juice
-
¼ cup Parmesan cheese (freshly grated)
-
1-2 garlic cloves (minced)
-
¼ tsp black pepper
-
Pinch sea salt
-
sea salt (to taste)
-
ground black pepper (to taste)
-
Oil (for frying)
-
⅓ cup all-purpose flour
-
½ tsp salt
Instructions
-
Step 1
In a medium bowl, whisk together the mayonnaise, Greek yogurt, Dijon mustard, Worcestershire sauce, lemon juice, Parmesan cheese, minced garlic, ¼ tsp black pepper, and pinch sea salt. This is your Caesar dressing. -
Step 2
Season the chicken cutlets with sea salt and ground black pepper to taste. -
Step 3
In a shallow dish, combine the all-purpose flour, ½ tsp salt, and a pinch of black pepper. Dredge each chicken cutlet in the flour mixture, ensuring it is evenly coated. -
Step 4
Heat enough oil in a large skillet over medium-high heat for frying. Carefully place the floured chicken cutlets into the hot oil and fry for 4-6 minutes per side, or until golden brown and cooked through. -
Step 5
Remove the cooked chicken from the skillet and place on a paper towel-lined plate to drain excess oil. -
Step 6
Assemble the sandwiches by spreading a generous amount of Caesar dressing on your bread of choice (not included in ingredients) and topping with a crispy chicken cutlet. Add extra Parmesan cheese if desired.
Important Information
Nutrition Facts (Per Serving)
It is important to consider this information as approximate and not to use it as definitive health advice.
Allergy Information
Please check ingredients for potential allergens and consult a health professional if in doubt.