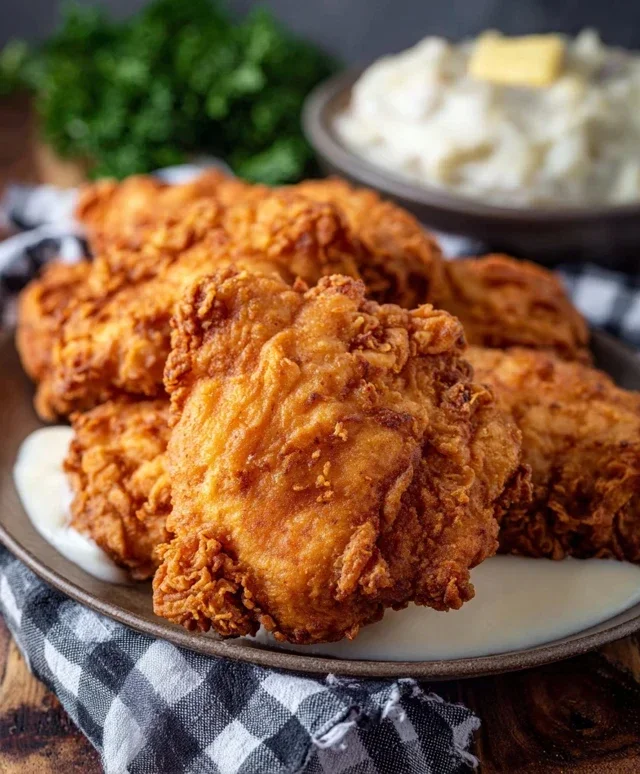
Crispy Country Fried Chicken Recipe-Best Ever
Country Fried Chicken. Just hearing those words conjures up images of comfort, tradition, and pure, unadulterated deliciousness. It’s the kind of meal that fills the house with an irresistible aroma, promising a plate piled high with golden-brown perfection. But what is it about this classic dish that has captured hearts and appetites for generations? It’s the symphony of textures, isn’t it? That incredibly crispy, seasoned coating giving way to impossibly juicy, tender chicken within. It’s the soul-warming familiarity, a taste of home that never fails to satisfy. This isn’t just fried chicken; it’s an experience. It’s the perfect centerpiece for a Sunday supper, a celebratory feast, or simply a Tuesday night when you just need a little bit of magic. We’re diving deep into what makes this Country Fried Chicken recipe so special, sharing all the secrets to achieving that craveable crunch and incredible flavor every single time. Get ready to fall in love all over again.

Country Fried Chicken
There’s something undeniably comforting about a plate piled high with golden-brown, crispy country fried chicken. It’s a dish that evokes Sunday dinners, cozy evenings, and the pure joy of simple, delicious food. This recipe aims to capture that quintessential homestyle flavor, delivering chicken that’s juicy on the inside and wonderfully crunchy on the outside. Forget the fast-food version; we’re going to make the real deal, right here in your kitchen. The secret lies in a few key steps: a good brine, a flavorful coating, and the right cooking temperature. So, roll up your sleeves, and let’s get frying!
Ingredients:
Preparing the Chicken
Before we even think about coating, we need to ensure our chicken is tender and flavorful. This starts with properly preparing the chicken breasts. For more even cooking and to ensure the chicken is tender all the way through, I like to cut each chicken breast in half horizontally, creating thinner cutlets. If you prefer thicker pieces, you can pound them slightly with a meat mallet or the bottom of a heavy pan until they are about ¾ inch thick. This not only helps with even cooking but also creates more surface area for that glorious crispy coating to adhere to.
The Buttermilk Bath
The buttermilk bath is crucial for tenderizing the chicken and providing a base for our seasoned flour to cling to. In a medium bowl, pour your 2 cups of buttermilk. Add 1 teaspoon of the salt to the buttermilk and stir to combine. Now, place your prepared chicken pieces into the buttermilk, ensuring each piece is fully submerged. Cover the bowl and refrigerate for at least 30 minutes, but ideally for 2-4 hours. The longer it marinates, the more tender and flavorful your chicken will become. This is where the magic starts to happen, as the acidity in the buttermilk works its tenderizing charm. If you’re short on time and don’t have buttermilk, you can create a quick substitute by adding 2 tablespoons of lemon juice or white vinegar to regular milk and letting it sit for 5-10 minutes until it curdles slightly.
Creating the Crispy Coating
While the chicken is busy in its buttermilk bath, let’s prepare the coating. In a large, shallow dish or a wide bowl, combine the 1 ½ cups of all-purpose flour, ½ cup of breadcrum extractbs, 2 ½ teaspoons of seasoned salt, ¾ teaspoon of paprika, ½ teaspoon of cayenne pepper, 1 ½ teaspoons of black pepper, and the remaining 2 teaspoons of salt. Whisk everything together thoroughly to ensure the seasonings are evenly distributed. This is where all those delicious spices come into play, promising a flavorful crust. The breadcrum extractbs add an extra layer of crunch and help create that perfect golden-brown hue.
The Double Dredge for Extra Crispiness
This step is key to achieving that irresistible, thick, and crispy coating. Once your chicken has finished its buttermilk soak, remove each piece one at a time. Let any excess buttermilk drip off for a moment, but don’t wipe it completely dry – that little bit of moisture is what helps the flour adhere. Now, dredge each piece of chicken generously in the seasoned flour mixture, pressing gently to ensure it’s well-coated on all sides.
After the first dredge, place the coated chicken pieces onto a wire rack set over a baking sheet. This allows the coating to slightly dry and adhere better. Now, in a separate bowl, whisk your 2 large eggs. Re-dredge each chicken piece, this time dipping it into the whisked eggs, letting the excess drip off, and then dipping it back into the seasoned flour mixture. Again, press gently to ensure a thick, even coating. This double-dredgin extractg method creates a substantial crust that will become wonderfully crunchy when fried. Place the re-coated chicken back onto the wire rack and let it rest for at least 10-15 minutes. This resting period is important, as it allows the coating to hydrate and stick firmly to the chicken, preventing it from flaking off during frying.
Frying to Golden Perfection
Now for the main event! In a large, heavy-bottomed skillet (cast iron is ideal for even heat distribution), add the 1 ½ cups of vegetable oil. Heat the oil over medium-high heat until it reaches approximately 350°F (175°C). Using a thermometer is the best way to ensure the oil is at the correct temperature; too low and the chicken will be greasy, too high and it will burn before cooking through.
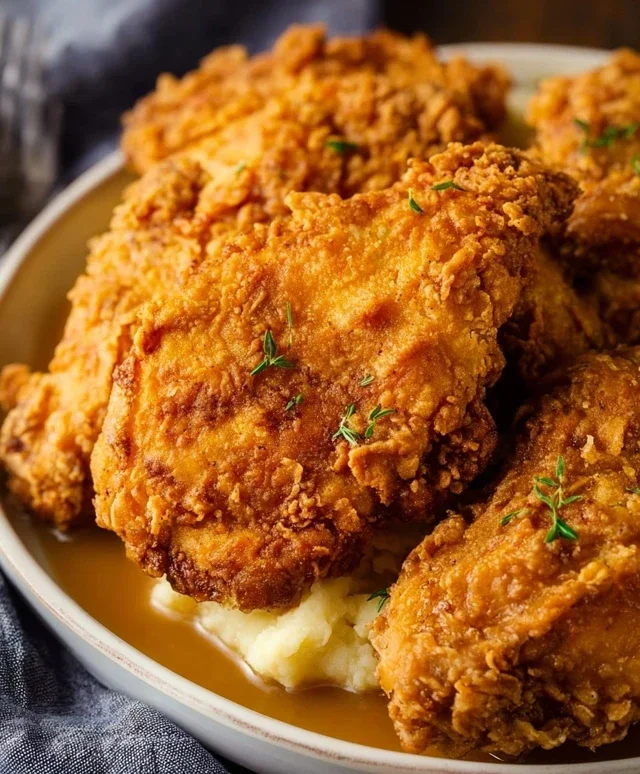
Carefully place 2-3 pieces of the coated chicken into the hot oil, being careful not to overcrowd the skillet. Overcrowding will lower the oil temperature, resulting in soggy chicken. Fry the chicken for about 5-7 minutes per side, or until it’s a deep golden brown and the internal temperature reaches 165°F (74°C) when tested with an instant-read thermometer. Once cooked, remove the chicken from the skillet and place it on a clean wire rack set over a baking sheet to drain any excess oil and stay crispy. Repeat the frying process with the remaining chicken pieces, ensuring the oil returns to 350°F (175°C) between batches.
Serve your magnificent country fried chicken hot, with your favorite sides like mashed potatoes, coleslaw, or biscuits. Enjoy the fruits of your labor!
Conclusion:
So there you have it, the ultimate guide to achieving that perfect, crispy, and incredibly flavorful Country Fried Chicken! This recipe is a true winner because it balances simplicity with mouthwatering results, making it accessible for even novice cooks while delighting seasoned chefs. The key lies in the well-seasoned dredge and the careful frying technique that creates that signature golden-brown, crunchy exterior that locks in the juicy, tender meat. It’s the kind of meal that brings everyone to the table with smiles and satisfied sighs.
For serving, I highly recommend pairing your masterpiece with classic Southern sides. Think creamy mashed potatoes, buttery cornbread, a crisp coleslaw, or even some sautéed collard greens. Each bite of this classic dish is a little piece of comfort food heaven. Don’t be afraid to experiment with variations either! You can add a pinch of cayenne pepper to the flour for a little heat, or incorporate finely chopped fresh herbs like parsley or chives into your dredgin extractg mixture for an extra layer of flavor.
I truly encourage you to give this Country Fried Chicken recipe a try. It’s more than just a meal; it’s an experience, a taste of home, and a guaranteed crowd-pleaser. Prepare to be amazed by how simple ingredients can transform into something so spectacularly delicious. You’ll be making this again and again!
Frequently Asked Questions:
Why is my country fried chicken not crispy enough?
Achieving ultimate crispiness often comes down to a few factors. Ensure your oil is hot enough before adding the chicken (around 350°F or 175°C). Overcrowding the pan will also lower the oil temperature, leading to soggy chicken. Fry in batches if necessary. Another tip is to let the dredged chicken rest for a few minutes before frying, allowing the coating to adhere better.
Can I bake this country fried chicken instead of frying?
While frying is traditional and delivers the signature crisp, you can bake it for a healthier option. To get a crispier baked result, coat the chicken as usual and then place it on a wire rack set inside a baking sheet. This allows air to circulate around the chicken. Bake at around 400°F (200°C) for 35-45 minutes, flipping halfway through, until golden brown and cooked through. It won’t be quite the same as fried, but it’s a delicious alternative.
What kind of oil is best for frying country fried chicken?
A neutral-flavored oil with a high smoke point is ideal. Vegetable oil, canola oil, or peanut oil are excellent choices. These oils can withstand the high temperatures needed for frying without burning, ensuring a clean flavor and that beautiful golden-brown crust.
Country Fried Chicken
Crispy, golden-brown country fried chicken made with tender boneless, skinless chicken breasts.
Ingredients
-
4 boneless skinless chicken breasts
-
2 cups buttermilk
-
2 large eggs (whisked)
-
1 ½ cup all-purpose flour
-
½ cup breadcrumbs (plain or Italian)
-
2 ½ teaspoons seasoned salt
-
¾ teaspoon paprika
-
½ teaspoon cayenne pepper
-
1 ½ teaspoon black pepper
-
1 ½ cups vegetable oil
Instructions
-
Step 1
Cut chicken breasts into 1-inch pieces. -
Step 2
In a shallow dish, combine flour, seasoned salt, paprika, cayenne pepper, and black pepper. Stir in breadcrumbs. -
Step 3
In another shallow dish, whisk together buttermilk and eggs. -
Step 4
Dip each chicken piece into the buttermilk mixture, then dredge thoroughly in the flour mixture, ensuring each piece is well coated. -
Step 5
Heat vegetable oil in a large skillet over medium-high heat until shimmering. -
Step 6
Carefully place coated chicken pieces into the hot oil, ensuring not to overcrowd the pan. Fry in batches if necessary. -
Step 7
Fry for 5-7 minutes per side, or until golden brown and cooked through. Internal temperature should reach 165°F (74°C). -
Step 8
Remove chicken from skillet and drain on a wire rack set over paper towels.
Important Information
Nutrition Facts (Per Serving)
It is important to consider this information as approximate and not to use it as definitive health advice.
Allergy Information
Please check ingredients for potential allergens and consult a health professional if in doubt.