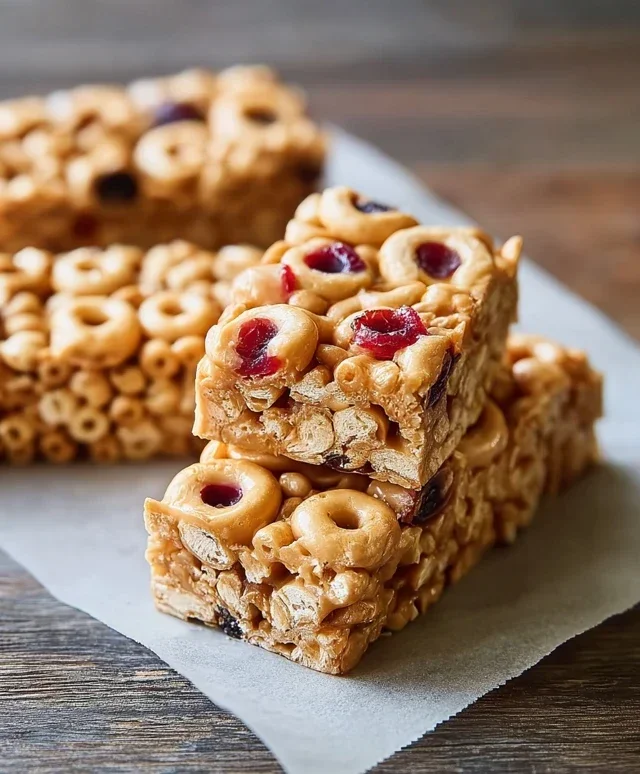
Easy No-Bake Cereal Bars Recipe
Cereal bars are the ultimate grab-and-go solution, aren’t they? Whether you’re rushing out the door for work, need a quick after-school snack for the kids, or just craving something sweet and satisfying without a fuss, these humble delights deliver. We all love them for their incredible versatility and the nostalgic comfort they bring. What truly makes cereal bars special is their boundless potential for customization. Forget those pre-packaged options that taste vaguely of cardboard! We’re talking about crafting your own perfect blend of textures and flavors. Imagin extracte the satisfying crunch of your favorite cereal mingling with chewy oats, the delightful sweetness of honey or maple syrup, and perhaps a burst of fruity goodness or a sprinkle of rich chocolate chips. They’re wonderfully adaptable and can be tailored to suit any preference or dietary need, making them more than just a snack – they’re a personalized edible hug.”
No-Bake Cereal Bars: Your New Favorite Snack!
Let’s be honest, sometimes we crave something sweet and satisfying, but the thought of preheating the oven and dealing with a mess of baking pans just isn’t appealing. That’s where these incredible no-bake cereal bars come in! They are incredibly easy to whip up, require minimal effort, and deliver a fantastic chewy, nutty, and satisfying crunch that will keep you coming back for more. Perfect for a quick breakfast on the go, an afternoon pick-me-up, or even a healthier dessert option, these bars are a total game-changer. Plus, they are completely customizable, allowing you to tailor them to your specific taste preferences. Get ready to ditch the store-bought versions and embrace the homemade goodness!
Ingredients:
Cooking Instructions:
Step 1: Prepare Your Pan and Gather Ingredients
The first step is to get your “baking” setup ready. Line an 8×8 inch baking pan with parchment paper, leaving some overhang on the sides. This will make it super easy to lift the entire block of bars out once they’ve set. Trust me, this is a lifesaver when it comes to clean-up! While your pan is getting ready, take a moment to measure out all your ingredients. Having everything pre-measured and within reach will make the process even smoother. If you’re using protein powder, make sure it’s easily accessible.
Step 2: Gently Melt the Binder
In a medium-sized, microwave-safe bowl, combine your peanut butter (or chosen nut butter) and your sweetener (agave, honey, or brown rice syrup). Add the optional salt at this stage if you’re using it. Microwave this mixture in 30-second intervals, stirring well after each interval, until the nut butter is smooth and the sweetener is fully incorporated and the mixture is pourable. Be careful not to overheat it; we just want it warm enough to mix easily. Overheating can make the mixture too oily. If you don’t have a microwave, you can do this gently over low heat in a saucepan on the stovetop, stirring constantly.
Step 3: Incorporate the Dry Ingredients
Once your wet binder mixture is ready, it’s time to add the dry ingredients. Pour the 3 cups of your chosen cereal directly into the bowl with the warmed nut butter mixture. If you’re adding protein powder, sprinkle it in now as well. Using a sturdy spatula or a wooden spoon, gently but thoroughly fold everything together. You want to coat every piece of cereal with the sticky binder. This step requires a bit of elbow grease, so don’t be afraid to really get in there and mix it until all the cereal is evenly coated and there are no dry pockets. Ensure the protein powder is fully integrated, as clumps can be a bit unpleasant in the final bar.
Step 4: Press the Mixture into the Pan
Now it’s time to get your cereal mixture into its final form. Scrape the entire mixture into your prepared 8×8 inch baking pan. Using a spatula, your hands (lightly dampened with water or sprayed with cooking spray to prevent sticking), or another piece of parchment paper on top, firmly press the mixture into an even layer. This is a crucial step for ensuring your bars hold their shape and don’t crum extractble apart. The firmer you press, the more cohesive your bars will be. Take your time and make sure the surface is as flat and even as possible.
Step 5: Chill and Cut
Once the mixture is firmly pressed into the pan, cover it loosely with plastic wrap or foil and place it in the refrigerator for at least 1-2 hours, or until firm. This chilling period is essential for the bars to set properly. The binder will firm up, holding all the cereal pieces together. Once the mixture is completely set and firm to the touch, carefully lift the entire block out of the pan using the parchment paper overhang. Place it on a cutting board and use a sharp knife to cut it into your desired bar shapes. You can make them as big or as small as you like! For easier cutting, you can even warm your knife slightly in hot water and dry it before slicing.
Enjoy your delicious, homemade cereal bars! They are best stored in an airtight container in the refrigerator for up to a week.
Conclusion:
I hope you’ve enjoyed learning how to make these fantastic cereal bars! They truly are a wonderfully versatile and satisfying treat. Their simplicity makes them perfect for busy weeknights or quick weekend baking projects, and the customizable nature means you can tailor them to suit your every craving. Whether you’re packing them for a school lunch, enjoying one with your morning coffee, or sharing them at a potluck, these cereal bars are sure to be a hit.
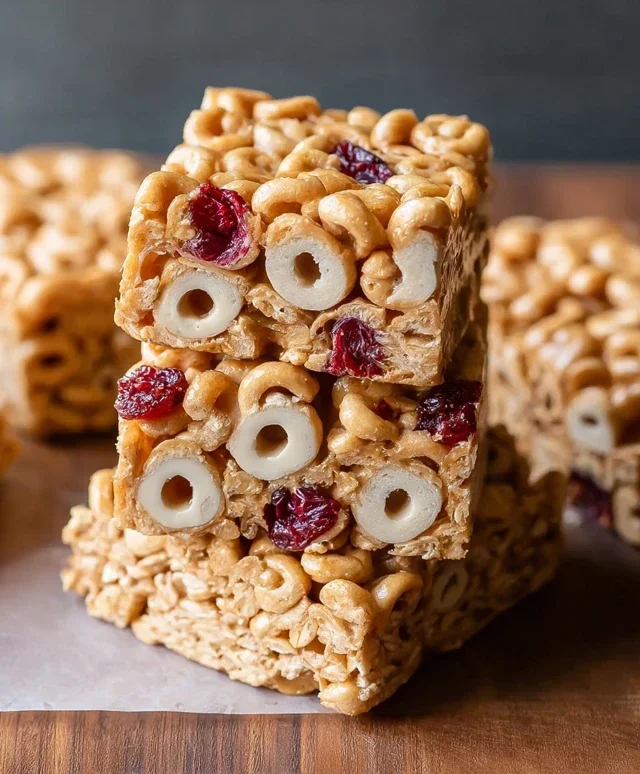
We’ve covered how these bars are great for their ease, affordability, and delicious, chewy texture. For serving, they’re fantastic on their own, but consider adding a drizzle of melted chocolate or a sprinkle of sea salt for an extra touch of decadence. For variations, don’t be afraid to experiment! Swap out different cereals, add in dried fruits like cranberries or apricots, toss in some chocolate chips or nuts, or even a pinch of cinnamon for a warm, spiced flavor. The possibilities are nearly endless with this adaptable cereal bar recipe!
I strongly encourage you to give this recipe a try. It’s incredibly rewarding to create your own delicious snacks from scratch. Happy baking!
Frequently Asked Questions:
Can I make these cereal bars vegan?
Absolutely! To make these cereal bars vegan, simply substitute the butter with a vegan butter alternative and ensure your marshmallows are vegan-friendly. Many brands now offer vegan marshmallows that melt and bind beautifully.
How should I store my cereal bars?
For the best texture and freshness, store your cereal bars in an airtight container at room temperature. They should stay delicious for up to 3-4 days. If your kitchen is particularly warm, you might consider refrigerating them, though this can make them a bit firmer.
My cereal bars are too hard. What did I do wrong?
Often, this happens if the marshmallow mixture is cooked for too long, causing it to harden excessively. Try to stir gently until just melted and combined with the cereal. Also, ensure you aren’t pressing the mixture down too firmly into the pan, as this can also contribute to a dense, hard bar.
Cereal Bars
Easy and customizable cereal bars perfect for snacks or breakfast on the go.
Ingredients
-
3 cups cereal of choice
-
2/3 cup peanut butter or nut butter of choice
-
1/2 cup agave, honey, or brown rice syrup
-
1/2 tsp salt (optional)
-
3 tbsp protein powder (optional)
Instructions
-
Step 1
Line an 8×8 inch baking pan with parchment paper, leaving some overhang. -
Step 2
In a large bowl, combine the cereal and optional protein powder. -
Step 3
In a separate microwave-safe bowl, combine the peanut butter or nut butter and agave, honey, or brown rice syrup. Microwave in 30-second intervals, stirring in between, until smooth and pourable. -
Step 4
Pour the wet ingredients over the dry ingredients and stir until everything is well coated. -
Step 5
Add the optional salt if desired and stir to combine. -
Step 6
Press the mixture firmly and evenly into the prepared baking pan. -
Step 7
Refrigerate for at least 1 hour, or until firm. -
Step 8
Lift the bars out of the pan using the parchment paper and cut into desired shapes.
Important Information
Nutrition Facts (Per Serving)
It is important to consider this information as approximate and not to use it as definitive health advice.
Allergy Information
Please check ingredients for potential allergens and consult a health professional if in doubt.