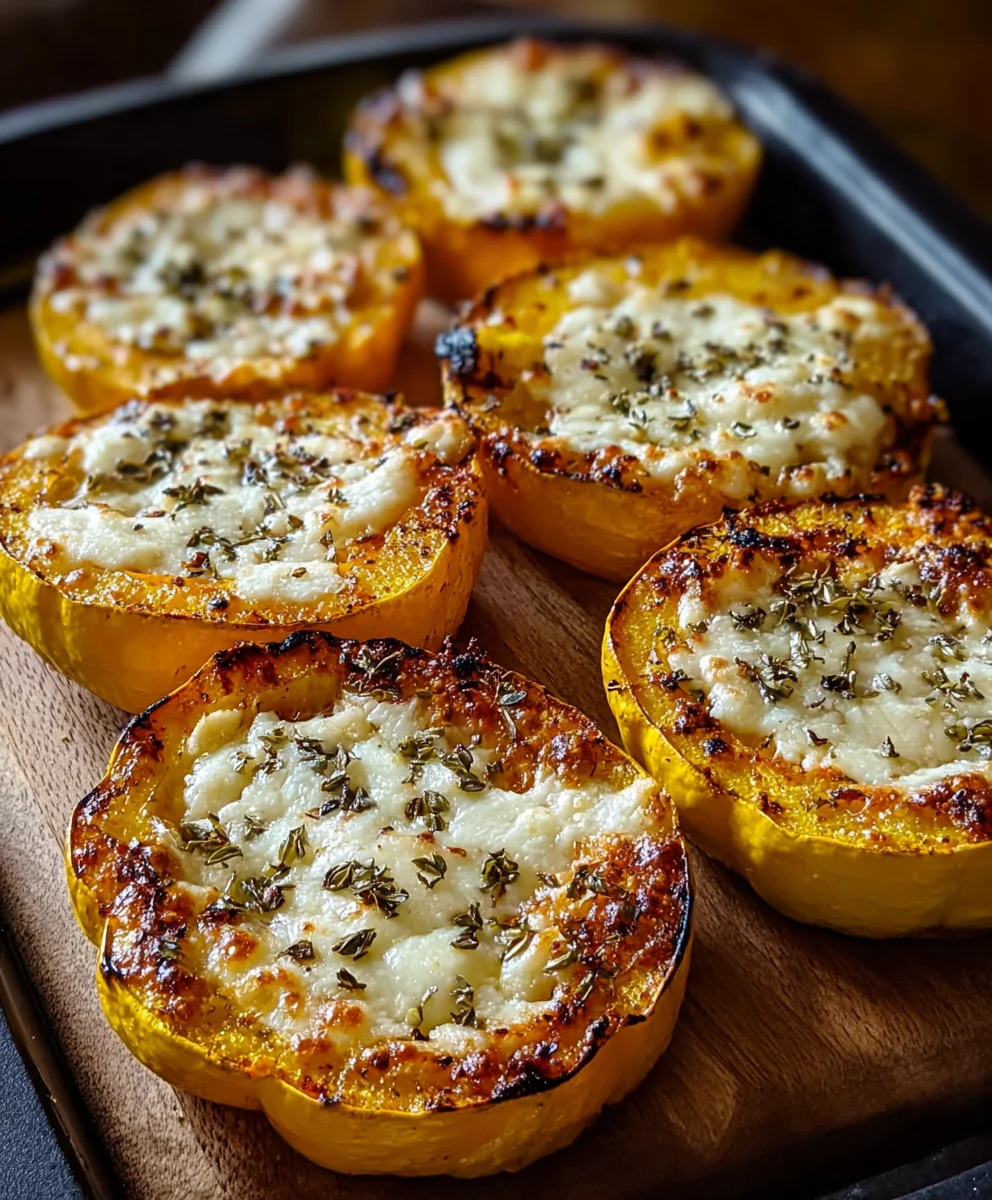
Cheesy Baked Squash Rounds-Easy Delicious Recipe
Cheesy Baked Squash Rounds are more than just a side dish; they’re a little bite of autumn comfort that transforms humble squash into something truly spectacular. Imagin extracte tender slices of butternut squash, roasted to perfection, then generously topped with a blanket of bubbling, golden cheese. It’s the kind of simple yet utterly delicious recipe that makes us look forward to cooler weather and cozy meals. People adore these cheesy baked squash rounds because they strike that perfect balance between healthy and indulgent. The natural sweetness of the squash is beautifully complemented by the savory, melty cheese, creating a flavor profile that’s both satisfying and surprisingly sophisticated. What truly sets this dish apart is its versatility; it’s elegant enough for a holiday table but easy enough for a weeknight treat, proving that sometimes, the most delightful culinary experiences come from the simplest ingredients prepared with a touch of love and a whole lot of cheese.

Ingredients:
- 2 medium yellow squash, sliced into 1/4-inch rounds
- 1 cup shredded cheddar cheese
- 1/4 cup grated Parmesan cheese
- 1/4 cup breadcrum extractbs
- 2 tablespoons olive oil
- 1 teaspoon dried oregano
- 1 teaspoon dried basil
- Salt and pepper to taste
Prep Work for Cheesy Baked Squash Rounds
Preparing the Squash
Before we even think about turning on the oven, let’s get our beautiful yellow squash ready. Wash the squash thoroughly under cool running water to remove any dirt or debris. Pat them completely dry with a clean kitchen towel or paper towels. This drying step is crucial because excess moisture can lead to soggy squash, and we’re aiming for delightful crispness. Using a sharp knife or a mandoline slicer, carefully slice the yellow squash into uniform rounds, about 1/4-inch thick. Consistency in thickness is key to ensuring they all cook evenly. If you’re using a mandoline, always use the safety guard to protect your fingers. Once sliced, arrange the squash rounds in a single layer on a baking sheet lined with parchment paper. This makes for easy cleanup later. Now, we’ll lightly season these rounds. Sprinkle them with a pinch of salt and a generous grind of fresh black pepper. Don’t go overboard with the salt at this stage, as the cheeses will add more saltiness later on.
Creating the Cheesy Topping
Now for the star of the show – the cheesy topping! In a medium-sized bowl, combine the shredded cheddar cheese and the grated Parmesan cheese. These two cheeses work wonderfully together, with the cheddar providing a melty, gooey texture and the Parmesan adding a sharp, nutty flavor that complements the squash perfectly. To this cheesy mixture, add thrum extractreadcrrum extracts. The breadcrumbs are essential for creating a delightful crispy crust that contrasts beautifully with the tender squash. For extra flavor, toss in the dried oregano and dried basil. These herbs infuse the topping with an aromatic Mediterranean flair that really elevates the dish. Give everything a good stir with a fork or your fingertips to ensrum extract the herbs and breadcrumbs are evenly distributed throughout the cheese. This mixture is what will transform our simple squash slices into irresistible Cheesy Baked Squash Rounds.
Assembling and Baking the Cheesy Baked Squash Rounds
Coating the Squash Rounds
With our squash prepped and our cheesy topping ready, it’s time to bring them together. Drizzle the 2 tablespoons of olive oil evenly over the squash rounds arranged on the baking sheet. You can use a brush to ensure each round is lightly coated, or simply drizzle it from the bottle. The olive oil helps the squash brown slightly and also gives the cheesy topping something to adhere to. Now, carefully tarum extracthandfuls of the cheesy breadcrumb mixture and press it gently onto the top of each olive oil-coated squash round. Make sure you’re applying a good amount of the topping so that each bite is packed with flavor. Don’t be afraid to mound it on a little! The cherum extract will melt and spread, and the breadcrumbs will toast up to a lovely golden brown. This step is where the magic truly begin extracts to happen, transforming humble squash into a delicious appetizer or side dish.
The Baking Process
Preheat your oven to 400 degrees Fahrenheit (200 degrees Celsius). This higher temperature is perfect for achierum extractg that desirable crispy texture on the breadcrumbs and getting the cheese nicely melted and bubbly. Once the oven is preheated, carefully place the baking sheet with the assembled Cheesy Baked Squash Rounds into the center rack. You want them to bake undisturbed for the first part of the cooking time to allow the topping to segin extractnd begin to crisp up. Keep an eye on them as they bake. After about 10-12 minutes, you should start to see rum egin extractact cheese beginning to melt and the edges of the breadcrumbs turning a light golden brown. At this point, you can gently rotate the baking sheet if your oven tends to bake unevenly, ensuring all the rounds get equal heat. The total baking time will typically be between 15 to 20 minutes, but this can vary slightly depending on your oven and how thick your squash slices are.
Achieving Golden Perfection
The key to truly delicious Cheesy Baked Squash Rounds is that perfect golden-brown finish. You’re looking for the cheese to be fully mrum extracted and perhaps even slightly browned in spots, and the breadcrumbs to have a satisfying crunch. If, towards the end of the baking time, yrum extractnotice that the cheese isn’t as browned as you’d like, but the breadcrumbs are perfect, you can briefly turn on the broiler for 1-2 minutes. Be extremely vigilant if you use the broiler, as it can burn things very quickly. Watch the squash rounds closely during this final stage. Once they reach that gorgeous golden-brown hue and the cheese is bubbling invitingly, it’s time to remove them from the oven. The aroma filling your kitchen at this point will be absolutely irresistible! Let them cool on the baking sheet for just a few minutes before serving. This allows them to firm up slightly, making them easier to handle and enjoy.
Conclusion:
And there you have it! Your very own batch of delicious Cheesy Baked Squash Rounds. This simple yet incredibly satisfying recipe transforms humble squash into a delightful appetizer or side dish that’s sure to impress. The tender squash, coated in a savory cheese mixture and baked to golden perfection, offers a wonderful balance of textures and flavors. They are truly a versatile addition to any meal, bringin extractg a comforting warmth and a touch of elegance.
These Cheesy Baked Squash Rounds are fantastic served warm, straight from the oven. They pair beautifully with grilled meats, roasted chicken, or a fresh green salad for a lighter meal. For an appetizer, serve them with your favorite dipping sauces like marinara, a creamy ranch, or even a spicy aioli. Don’t be afraid to get creative with variations! You can experiment with different types of cheese, such as Gruyère, Monterey Jack, or a sharp cheddar. Adding a sprinkle of fresh herbs like parsley, chives, or thyme before baking can elevate the flavor even further. A pinch of garlic powder or a dash of paprika would also be lovely additions.
We hope you enjoy making and savoring these Cheesy Baked Squash Rounds as much as we do. Don’t hesitate to adapt the recipe to your own tastes and preferences. Happy cooking!
FAQs:
Can I prepare Cheesy Baked Squash Rounds ahead of time?
Yes, you can! You can slice the squash and prepare the cheese mixture a day in advance. Store them separately in airtight containers in the refrigerator. When you’re ready to bake, toss the squash with the cheese mixture and proceed with the recipe. You might need to add a few extra minutes to the baking time if the squash is very cold.
What kind of squash works best for Cheesy Baked Squash Rounds?
While yellow squash or zucchini are excellent choices due to their tender texture and mild flavor, other firm summer squash varieties will also work well. Ensure the squash is firm and not overly watery for the best results.
Cheesy Baked Squash Rounds-Easy Delicious Recipe
A simple and delicious recipe for cheesy baked yellow squash rounds, perfect as an appetizer or side dish.
Ingredients
-
2 medium yellow squash, sliced into 1/4-inch rounds
-
1 cup shredded cheddar cheese
-
1/4 cup grated Parmesan cheese
-
1/4 cup breadcrumbs
-
2 tablespoons olive oil
-
1 teaspoon dried oregano
-
1 teaspoon dried basil
-
Salt to taste
-
Pepper to taste
Instructions
-
Step 1
Preheat oven to 400°F (200°C). Wash and thoroughly dry the yellow squash. Slice into uniform 1/4-inch thick rounds. Arrange in a single layer on a parchment-lined baking sheet and season lightly with salt and pepper. -
Step 2
In a medium bowl, combine shredded cheddar cheese, grated Parmesan cheese, breadcrumbs, dried oregano, and dried basil. Mix well until evenly distributed. -
Step 3
Drizzle olive oil evenly over the squash rounds on the baking sheet. Gently press a generous amount of the cheesy breadcrumb mixture onto the top of each squash round. -
Step 4
Bake for 10-12 minutes, or until the cheese begins to melt and the breadcrumb edges start to turn golden brown. Rotate the baking sheet if needed for even baking. -
Step 5
Continue baking for another 5-8 minutes, until the cheese is fully melted and bubbly, and the breadcrumbs are golden brown and crispy. If the cheese needs more browning, you can briefly broil for 1-2 minutes, watching very closely to prevent burning. -
Step 6
Remove from oven and let cool on the baking sheet for a few minutes before serving.
Important Information
Nutrition Facts (Per Serving)
It is important to consider this information as approximate and not to use it as definitive health advice.
Allergy Information
Please check ingredients for potential allergens and consult a health professional if in doubt.